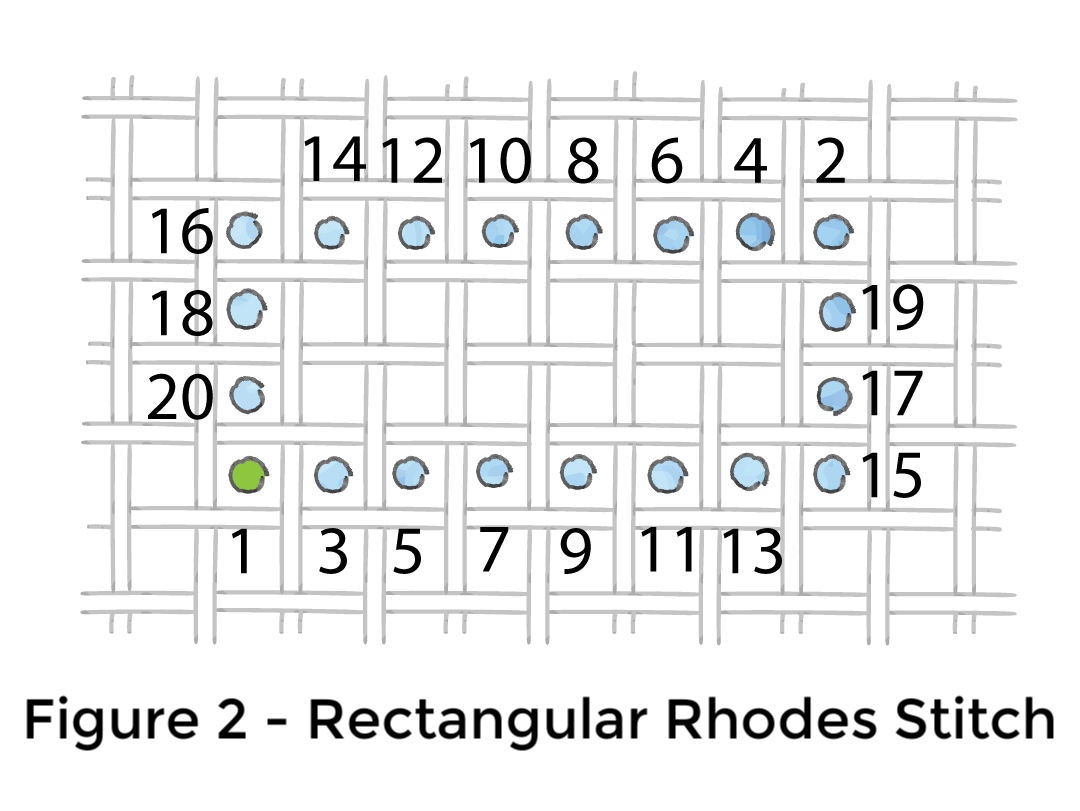
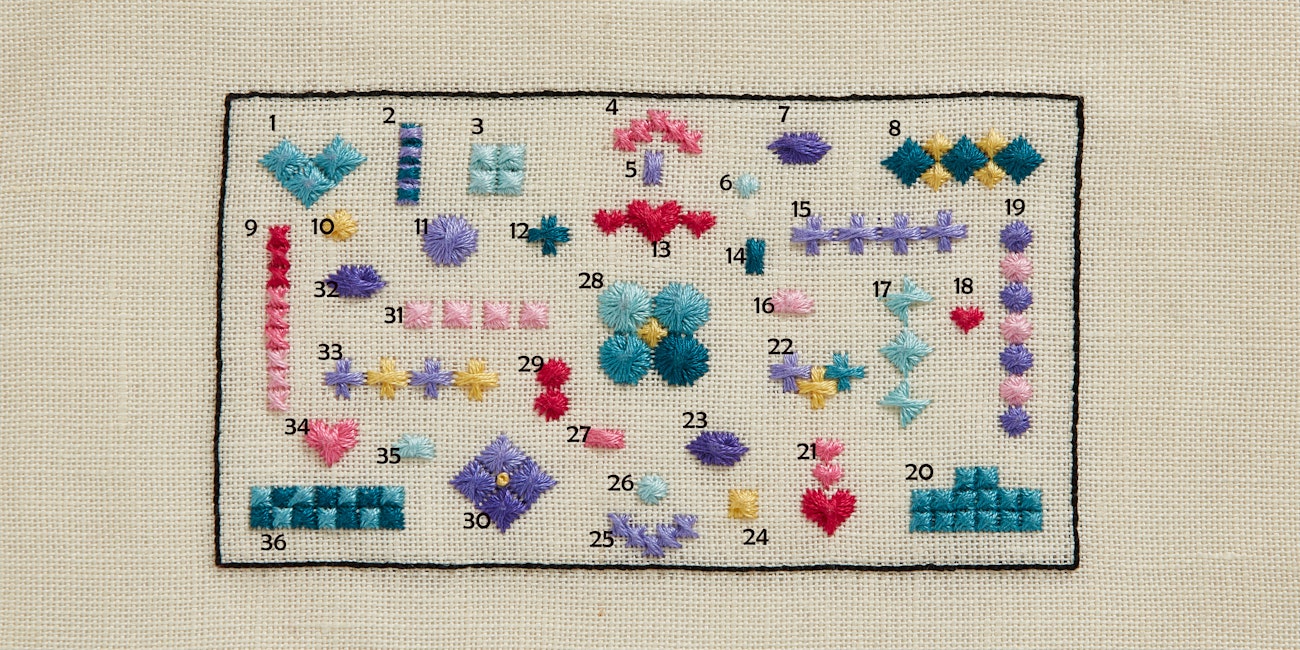
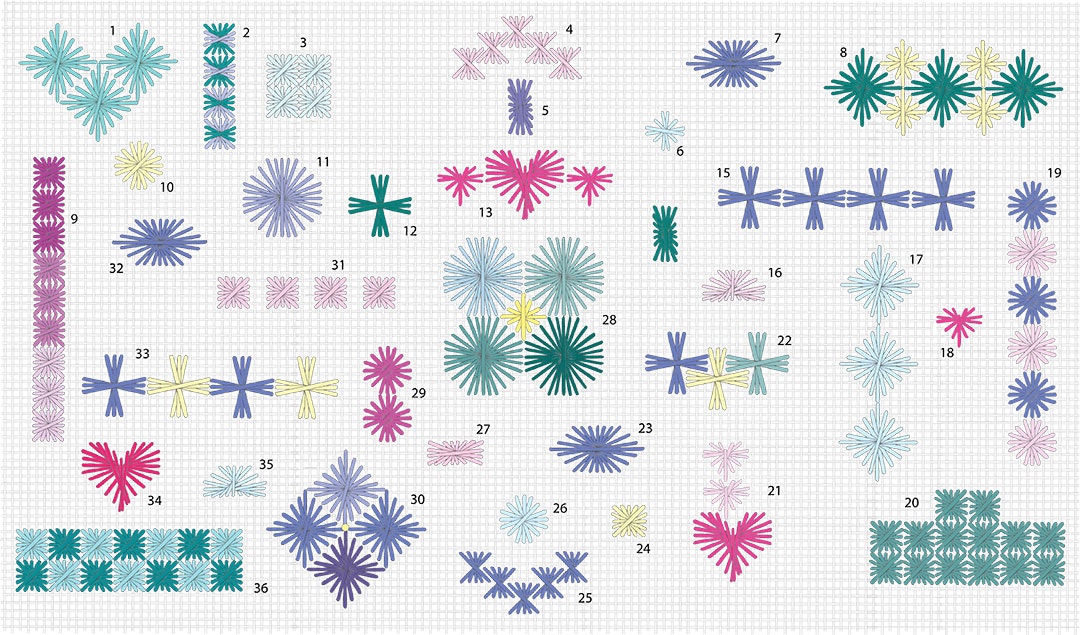
The Rhodes stitch is a highly textured member of the cross-stitch family. Its appearance is a distinctive geometric shape, including the original square (Figure 1) and rectangle (Figure 2) and later the circle (Figure 3), diamond (Figure 4), heart (Figure 5), oval (Figure 6), and partial patterns of these shapes (Figures 7 and 11).
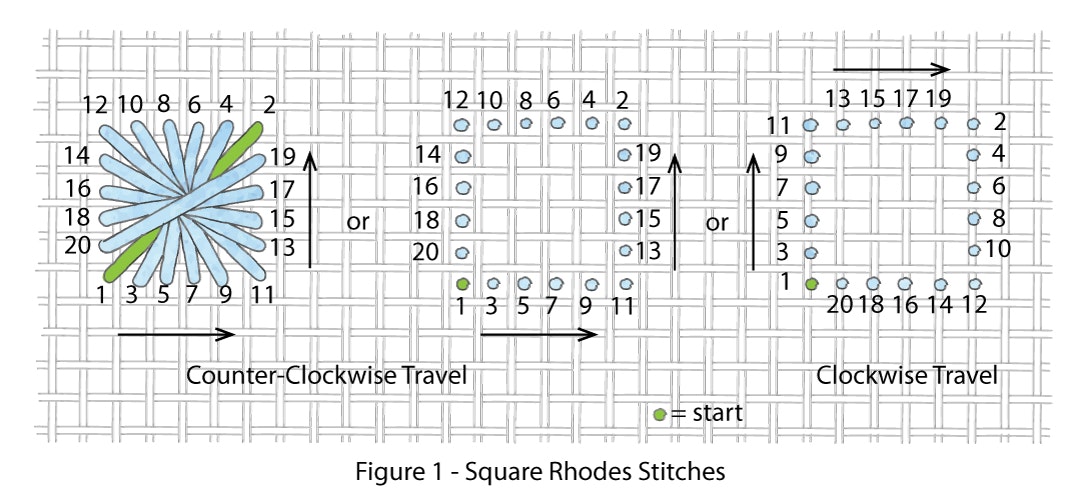

This modern-day stitch was created by and named for Mary Rhodes, an English needlewoman, teacher, and author who developed the square and rectangular versions of this stitch. She described them in her 1980 book, Dictionary of Canvas Work Stitches, as proceeding in a clockwise manner but some later authors/designers have diagrammed these stitches as being done in a counterclockwise manner. This procedure creates a large build-up of thread at the center point, thus making the Rhodes stitch a very textured stitch. As long as the stitches progress in a specific placement and sequence, the direction doesn’t matter. Also, where the stitch begins varies from illustration to illustration. The placement of the first leg of the stitch depends upon where the stitcher wants the last leg to be placed (vertically, diagonally, or horizontally), and ultimately affects the final appearance of the stitch.


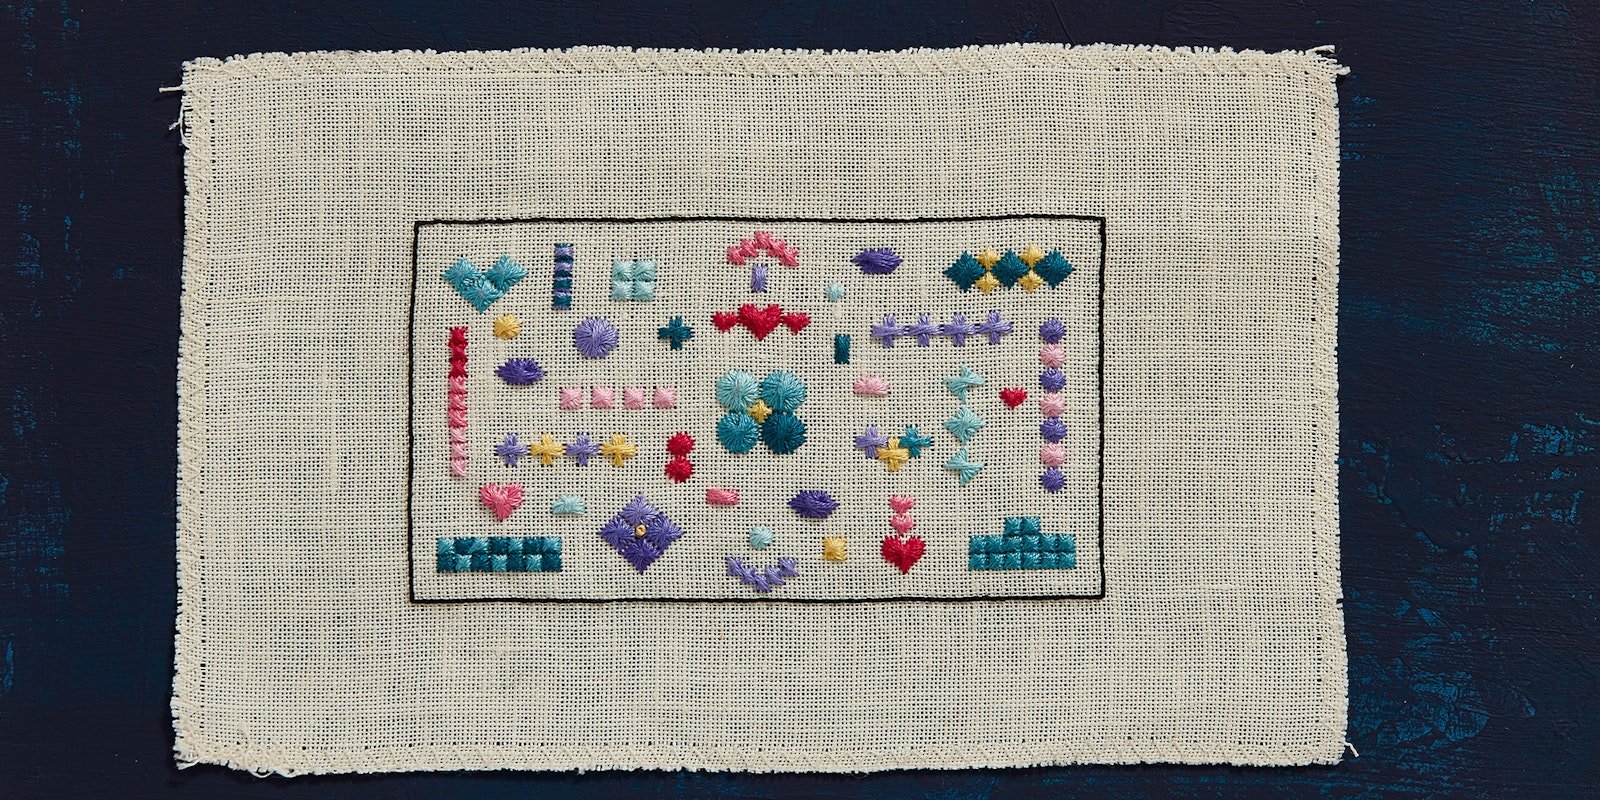
The Rhodes stitch is usually worked on an evenweave fabric, such as mono needlepoint canvas, congress cloth, or linen with enough sizing and tension (hoop, stretchers bars, or frame) to support the many legs of each stitch. However, it can be worked with more difficulty on plain fabric, but the shape’s outer stitch placement should be marked to keep the symmetry of the particular geometric shape. Subsequent authors/designers created the circle, diamond, heart, oval, and other versions of the Rhodes stitch and the many partial patterns of these shapes (Figure 7). The Rhodes stitch can be stitched as single units (Figures 1 through 8), distinct groupings (Figures 9 through 12), in rows (Figure 10 and 11), floral elements (flower heads and shamrocks, Figure 12), or as fillings for a background (Figure 10). See the Rhodes-Stitch Spot Sampler for examples of these arrangements.

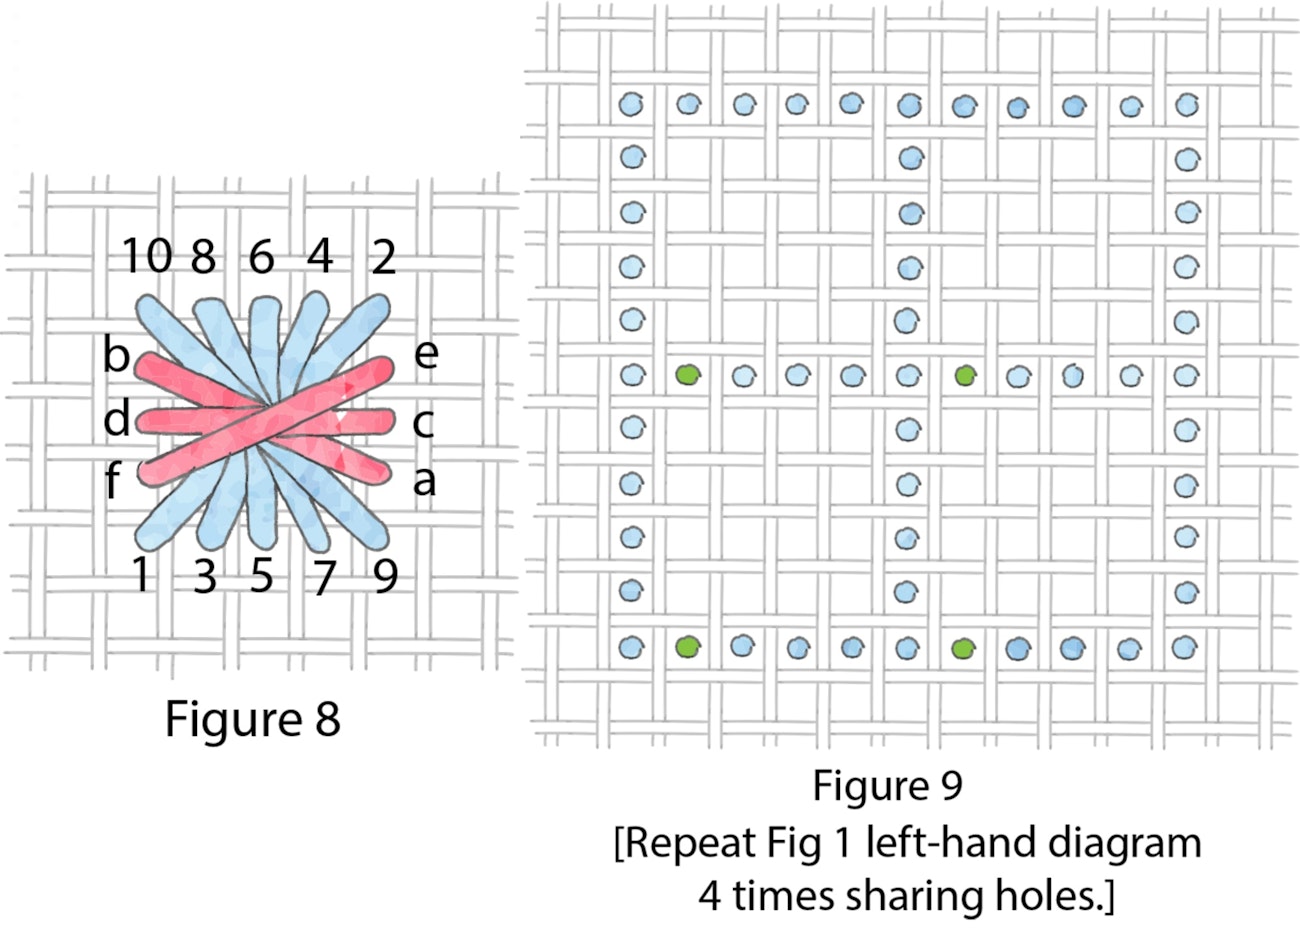
Each individual stitch is usually worked in one fiber type and in one color (solid, variegated, or overdyed versions of that color). However, some designers/stitchers have chosen to divide an individual shape into quarters or halves and stitch the shape in more than one color (Figure 8). Each Rhodes stitch can be worked over a various number of background threads, making the stitch larger or smaller as desired.


Threads to consider are stranded floss (cotton, rayon, or silk), metallics (blending filament or narrow braid), pearl cotton, flower thread, silk ribbon, and even tapestry or crewel yarns. If using multiple thread strands, it is advisable to use a laying tool or to railroad the strands to keep them as parallel as possible for the best final appearance. The Rhodes stitch tends to sag or one leg can become looser than the others, so always work with the ground fabric under tension. Make sure that the thread or yarn weight used is appropriate for the thread count of the ground fabric selected. To start a motif use an away-waste knot or stitch several tiny tacking stitches which eventually will be covered by the motif itself. Also, use a long length of thread or yarn of 20 plus inches (50 plus cm), because of the many legs for any Rhodes stitch. Lay the thread on the fabric surface somewhat snugly but not so tightly as to create holes in the fabric or be loose or floppy. To end the stitching thread, bury the thread under the existing stitches on the back, being careful not to disturb the stitch alignment.
 Note how tidy the back of Deanna’s embroidery is.
The Rhodes stitch in its numerous variations and shapes is fun and easy to work but somewhat time-consuming. The final motif is interesting and very eye-catching in any design.
Instructions
Note: Use 2 strands for all stitching.
With #310 floss, backstitch around a 4⅞ by 2¾ inches (12.4 x 7 cm) area. Randomly place and stitch the design elements, using the chart, key, and floss colors:
- #597, Figure 4.
- Top two elements – base #3808 and top #155; lower two elements – base #155 and top #3808.
- #3811, Figure 9.
- #603, Figure 11 (turn fabric 180 degrees).
- #155, Figure 2 (turn fabric 90 degrees).
- #3811, Figure 3 (small).
- #333, Figure 6.
- #3808 and #3822, Figure 4 (large and small).
- #601 (top), #603 (middle), #605 (bottom), Figure 10.
- #3822, Figure 3 (large).
- #3746, Figure 12 (circle only).
- #3808, Figure 7 (middle).
- #601, Figure 5.
- #3808, Figure 2.
- #155, Figure 7 (middle).
- #605, Figure 7 (right).
- #598, Figure 4.
- #601, Figure 5.
- #3746 and #605, Figure 3 (large).
- #3810, Figure 10.
- #601 and # 603, Figure 5 (both sizes).
- #155, #3822, and #3810, Figure 7 (middle).
- #333, Figure 6.
- #3822, Figure 1.
- #155, Figure 11.
- #3811, Figure 3 (large).
- #603, Figure 2.
- #598, # 597, #3810, #3808 and # 3822, Figure 12.
- #601, Figure 3 (large).
- #155 (top), #3746 (middle two), #333 (bottom) and #3822 (French knot).
- #605, Figure 1.
- #333, Figure 6.
- #155 and #3822, Figure 7 (middle).
- #603, Figure 5 (large).
- #3811, Figure 7 (right).
- #3810 and #3808, Figure 10.
Deanna Hall West is a former needlework technical editor for PieceWork and former editor of The Needleworker magazine.
Originally published April 23, 2019; updated January 23, 2023.