The velvet stitch, consisting of a cross-stitch and a loop, is a counted-thread stitch most often used in canvas work. Known by a variety of names—Astrakhan, Astrakhan velvet, Berlin plush, plush, raised, rug, and tassel—velvet stitches produce a raised surface of loops that may be left intact or cut; if cut, the stitches resemble velvet fabric or carpet pile. The velvet stitch may be used for bands and borders (fringe); as a filling stitch for beards, hair, thatched roofs, and animal fur; and to replicate small- or large-scale Oriental carpets.
During the seventeenth century, the velvet stitch was used to represent fur on clothing and on animals in stumpwork. From the middle to late nineteenth century, it frequently was employed in the very popular Berlin woolwork.
There are at least seven different ways to create the velvet stitch and its variations (Figures 1, 3, 4, 5, 6, 7, and 8). Regardless of which method is employed, the results achieved are the same: a loop secured by a cross-stitch (although, technically, there is not a complete cross-stitch on the variation in Figure 5). The most common methods are illustrated in Figures 1 and 6. The cross-stitch may cover one intersection of ground fabric threads (Figure 2) or more (Figures 1, 3, 4, 5, 6, 7, and 8).
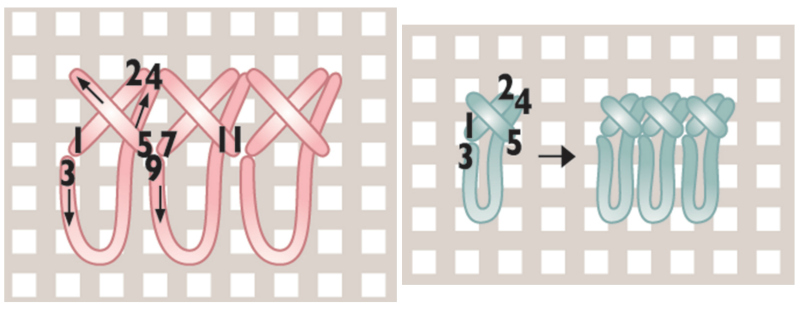
Figure 1 (Left). Figure 2 (Right).
Using either single (mono) or double (penelope) canvas or even weave linen, work the velvet stitch beginning at the bottom left-hand side of a motif or pattern; each row should be worked from left to right and from the bottom to the top of the motif; each new row of stitches should be worked directly above the previous row (Figure 9). This procedure ensures that the loops (of whatever length) will not interfere with the stitching of the next row.
Use a cylindrical object (knitting needle, dowel, pencil, or large tapestry needle) or flat one (quilter’s bias bar, a piece of cardboard, or collar stay) as a gauge (Figure 3) to achieve loops of equal length and to control the loops. The length of the loop (diameter of the gauge) determines the depth of the pile.
For large areas, cut and trim the loops to the desired length as the stitching proceeds. Insert small, sharp scissors at the base of a row of loops (Figure 9) and cut a few loops at a time. Start with long loops and gradually trim them to the length desired. Cut all of the loops in row one after the stitches in row two have been stitched, cut the loops of row two after row three has been stitched, and so on. For small areas, the cutting and trimming may be done after the stitching is completed.
Not all of the loops need to be trimmed to the same length. Many fine examples of raised Berlin work (also called raised woolwork, plush work, French raised work, velvet woolwork, sculpturing) illustrate the shearing or sculpturing of velvet-stitch loops to different heights to enhance the appearance of animals, flowers, and birds. If the ground fabric or canvas is sufficiently fine, the cut loops will be dense and support each other. Careful shading of the thread colors will further enhance the sculptural qualities. Brushing cut loops with a toothbrush or a Japanese Bunka nap brush will enhance the “fluffiness,” a desired effect for animal fur.
If the area surrounding a velvet-stitch motif is composed of flat stitches, work the flat stitches first and then the velvet stitches. Otherwise, the flat stitches may catch the looped threads of the velvet stitch.
Most types of thread are suitable for the velvet stitch, but a thick soft wool yarn (tapestry yarn), multistranded wool (Persian wool), or “fuzzy” fibers (Whisper, Santa’s Beard) offer the best effect for beards, hair, fur, and carpets. Other fibers, such as silk ribbon, multistranded cotton or silk floss, metallic braids, and matte and pearl cotton will give distinctively different appearances.


Try the various methods of stitching the velvet stitch illustrated here and experiment with different fibers and loops of different sizes to discover the numerous effects possible. It’s a fun and useful stitch.
—Deanna Hall West
This fifth installment of Deanna’s stitch tutorials originally appeared in the September/October 2002 issue of PieceWork, along with instructions for stitching an Elizabethan-inspired band sampler and much more. Deanna is PieceWork’s needlework technical editor; she previously was the editor of The Needleworker magazine. Stay tuned for more stitch tutorials from Deanna in the weeks ahead!
Deanna Hall West is PieceWork’s needlework technical editor; she previously was the editor of The Needleworker magazine. Stay tuned for more stitch tutorials from Deanna in the months ahead!
Featured Image: Scissors and needle case courtesy of Loene McIntyre. Photo by Joe Coca.
Posted June 19, 2017. Updated May 16, 2019.