
The herringbone stitch belongs to the large cross-stitch family and has many aliases—Mossoul, Russian, Russian cross, catch, Persian, witch, fishnet, and plaited stitch. The most commonly used name appears to be herringbone with the basic completed stitch resembling the backbone structure of the herring fish, commonly found in the North Atlantic Ocean and possibly pointing to the origin of this name.
 Vary the height, spacing and angle of legs to create this Herringbone-Stitch Sampler, using the stitch illustrations as guides.
Sampler instructions
Row 1: Open herringbone, #336 (Figure 1).
Row 2: Closed herringbone, #312 (Figure 3).
Row 3: Open herringbone background, (top to bottom) #334, 312, 336 (Figure 2).
Row 4: Tied herringbone, base line #334, tie #3325 (Figure 5).
Row 5: Tied herringbone, base line #312, tie #336 (Figure 5).
Row 6: Open herringbone, #334 (Figure 1).
Row 7: Open herringbone, #336 (Figure 1).
Row 8: Open herringbone, #334 (Figure 1).
Row 9: Double threaded herringbone, #312 and 336 (Figure 7).
Row 10: Threaded herringbone, base #312 and top 3325 (Figure 6).
Row 11: Solitary herringbone, top row #3325, middle row #334, and bottom row #312 (Figure 11).
Row 12: Double laced herringbone, base #312, top #3325 (Figure 4).
Row 13: Ladder herringbone, backstitches #336, lacing #3325 (Figure 8).
Row 14: Three-trip herringbone, 1st row #336, 2nd row #334, and 3rd row #3325 (Figure 10).
The history of the stitch
History records the herringbone stitch was being used in the 1500s, although it was probably used earlier, and continues to present day. English samplers and blackwork patterns (because the stitch was reversible) of the 16th and 17th centuries employed this stitch. Needleworkers used this stitch in English crewelwork (mid-17th century) and American crewelwork (second half of the 18th century) as well as in American samplers of the 19th century. The herringbone stitch also was used extensively to adorn seams and to appliqué additional patches, laces, and cigarette silks to the inner-patched areas on American and English crazy quilts. The herringbone stitch has also been used for hemming clothing. It’s a stitch used on modern-day samplers, crazy quilting, crewelwork, surface embroidery, needlepoint, and shadow quilting.
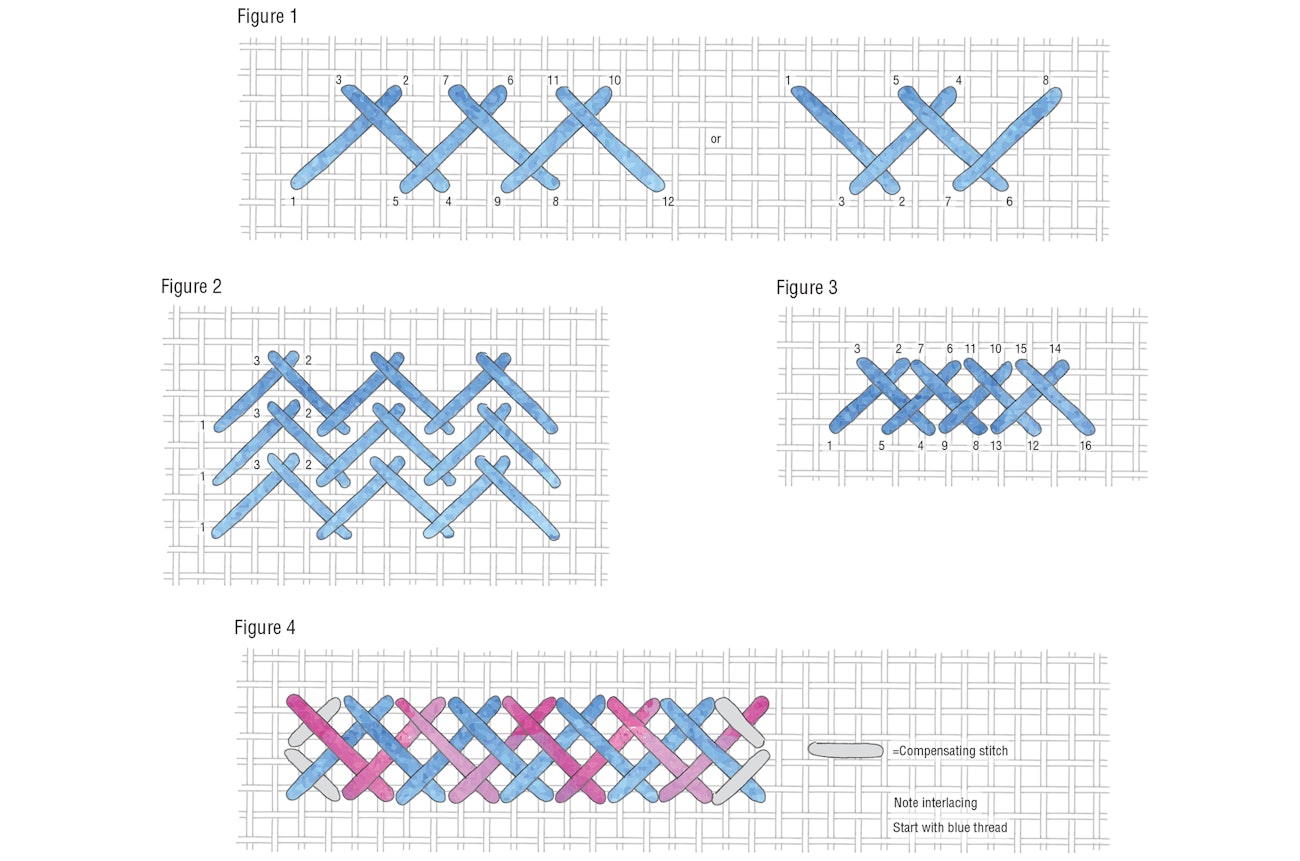
The herringbone stitch is an evenly spaced, elongated variation of a cross-stitch and is worked from left to right, keeping the lengths and spacing of the legs even and angled legs parallel within a row. Use the sewing method if the fabric is held in hand or use the stab method when the fabric is held taut in an embroidery hoop or frame. This stitch can be worked on either plain or evenweave ground fabrics. Use a sharps needle whenever piercing plain fabric and a tapestry needle for evenweave fabrics and for threading or tying additional threads upon the basic herringbone stitch.
To keep this stitch even and neat on plain fabric, mark two parallel lines with chalk or a water-soluble marker. Space these lines closer or wider apart, depending upon the effect desired. On the back of the ground fabric two parallel lines of backstitches will appear for a closed herringbone or running stitches for the open herringbone. To stitch a vertical row of stitches, simply turn the fabric 90 degrees. Frequently a small compensating stitch (Figures 4, 5, 6) is used to begin and end a row of herringbone stitches. This creates a more balanced, more compact-looking line design. To end a stitching thread, it is best to bury the thread by splitting the running or backstitches on the back of the fabric or split the actual ground fabric threads. Do not weave the stitching thread tail through the stitches on the back because eventually these tails unwind!
Many types of threads can be used, including cotton floss, silk floss and threads, yarn, pearl cotton, metallic threads, and even narrow silk ribbon. When using multiple strands of threads, keep the individual threads as parallel as possible (called railroading) to produce the best fabric coverage and appearance.
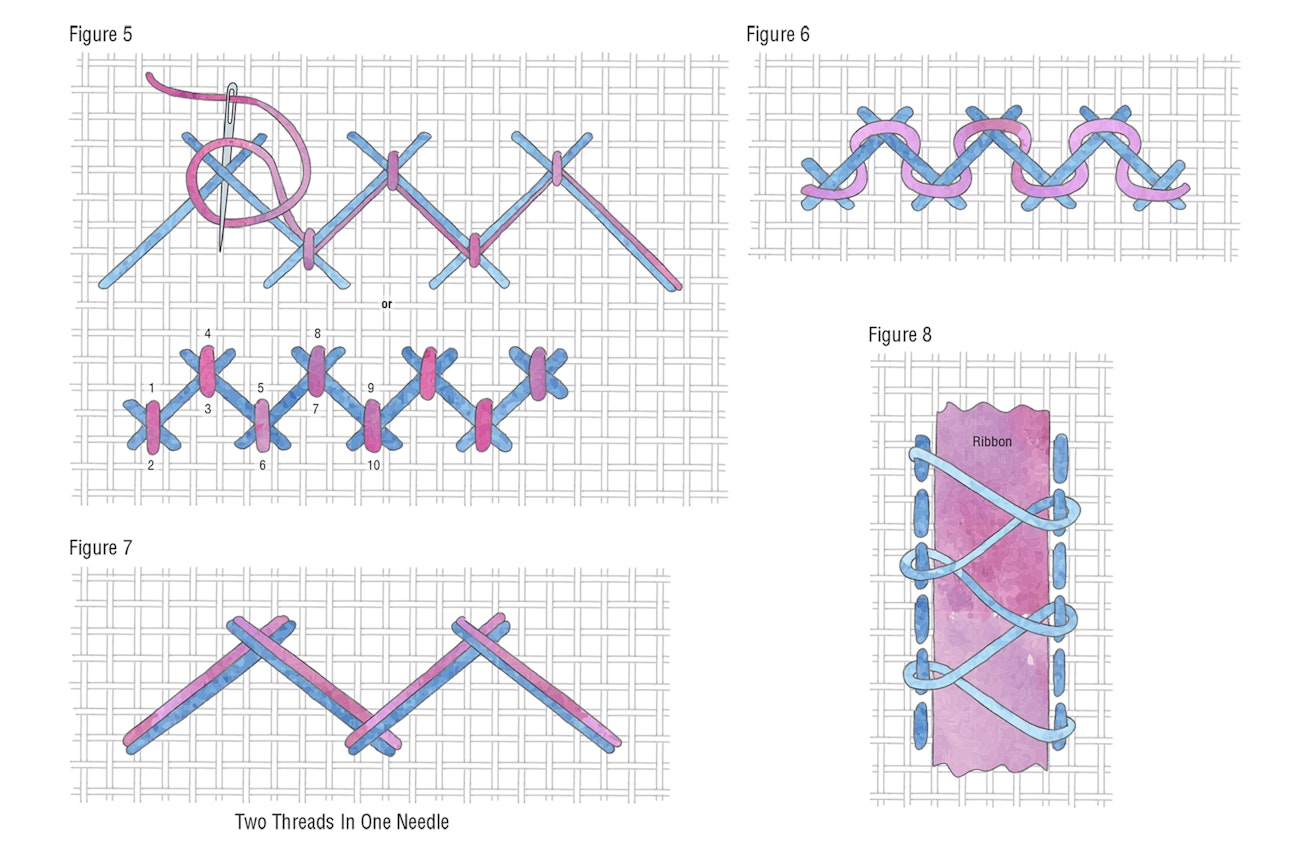
This zigzag line stitch can be used for lines, bands, borders, fillings, backgrounds, solitary stitches, and clothing trim. It can also be used as the foundation for many gorgeous interlacing stitches and ribbon insertions. This versatile stitch has numerous variations: open (Figures 1, 2), closed or shadow (Figure 3), double or Indian herringbone (Figure 4), tied (Figure 5), threaded (Figure 6), double threaded (Figure 7), ladder filling (Figure 8), foundation for ribbon insertion (Figures 8, 9), multiple-trip herringbone (Figure 10), and infrequently as a single, isolated stitch (Figure 11). These are just a few of the many intriguing variations. Plus, simply varying the height, width, and angle of the legs can drastically alter the final herringbone appearance.
The closed or shadow herringbone stitch is used to create a heavy, braided-look line or border (Figure 3). When this variation is stitched on the back of fine, semitransparent fabrics, such as organdy, batiste, or lawn, shadow-work quilting is created. When medium to dark colored threads are used, a much lighter, more muted color appears on the front surface of these fine fabrics. When a double backstitch is alternatingly stitched across a motif like a leaf, berry, or stem on the fabric surface, a herringbone stitch is automatically formed on the back side. I find it easier to stitch the alternating backstitches on the front fabric surface than to stitch the herringbone stitch on the back for my results seem to have a more evenly stitched and better appearance.
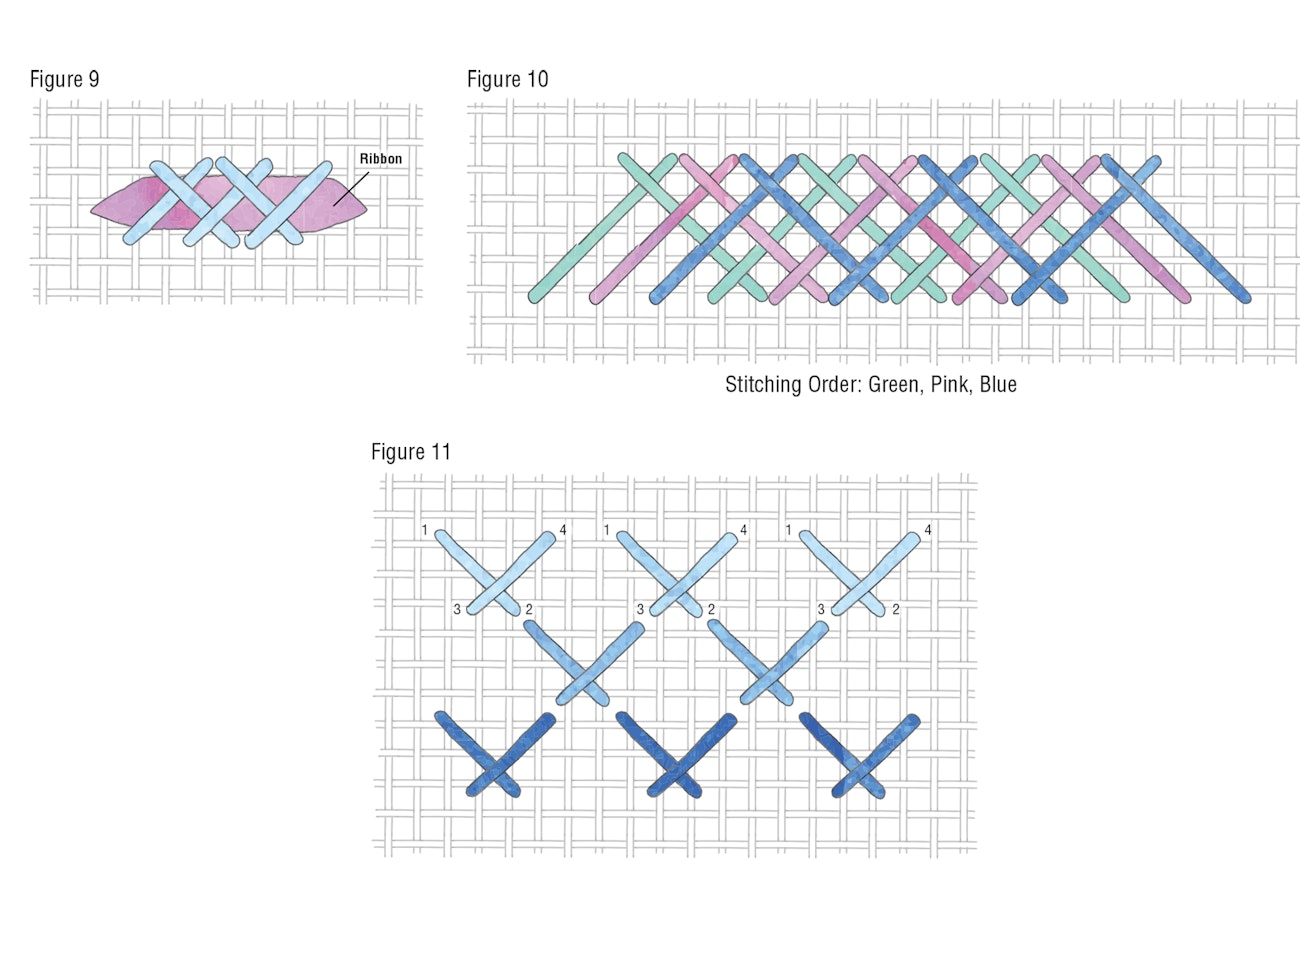
For the double or multiple-trip herringbone stitches, two or more contrasting colors or shades of the same color highlight the woven or interlacing effect of these variations, creating a very dramatic look. The multiple-trip herringbone stitch can be worked in two different ways: One, stitch one complete row on top of each other as in Figure 10, or two, stitch each succeeding row under on the way up and over on the way down of the previous row.
The tied herringbone can also be worked in a couple of different ways: One, using a sharp needle work a short straight or other stitch through the fabric at the points where the legs cross (bottom illustration of Figure 5), or two, work a coral knot, lazy daisy, or other stitch over the crossing points and not through the fabric (top illustration of Figure 5).
This barely touches the surface of the herringbone stitch. Have fun experimenting with the many variations, color combinations, and stitch placements.
Enjoy learning more about embroidery stitches in our blog series “A Stitch in Time.”
Want to learn more about stitching? This article and more are available in the Summer 2020 issue.
Also, remember that if you are an active subscriber to PieceWork magazine, you have unlimited access to previous issues, including Summer 2020. See our help center for the step-by-step process on how to access them.
Deanna Hall West is PieceWork’s needlework technical editor; she previously was the editor of The Needleworker magazine.
Originally published November 7, 2018; updated May 30, 2022.