The easy, square four-sided stitch (Figure 1a) is an old counted-thread stitch that first made its appearance on very early English samplers and still remains a popular sampler and pulled- and drawn-work stitch today. It’s a great stitch for items, such as cuffs and towels, where the fabric will be seen from both sides because the four-sided stitch reverses to a neat three-legged cross-stitch (Figure 1b). Its other appellations are the square, four-sided or square openwork, and infrequently the punch stitch, which is worked left to right and tightly pulled. It is only referred to in Rhodes work, a type of drawn-thread embroidery in which the entire ground fabric surrounding a stem-stitched-outlined design is worked in this stitch. Do not confuse the four-sided stitch with the single faggot stitch, sometimes called the diagonal square stitch, or the Italian hemstitch. Although these stitches may look the same on the front side, they are worked entirely differently and also appear dissimilar on the reverse side.
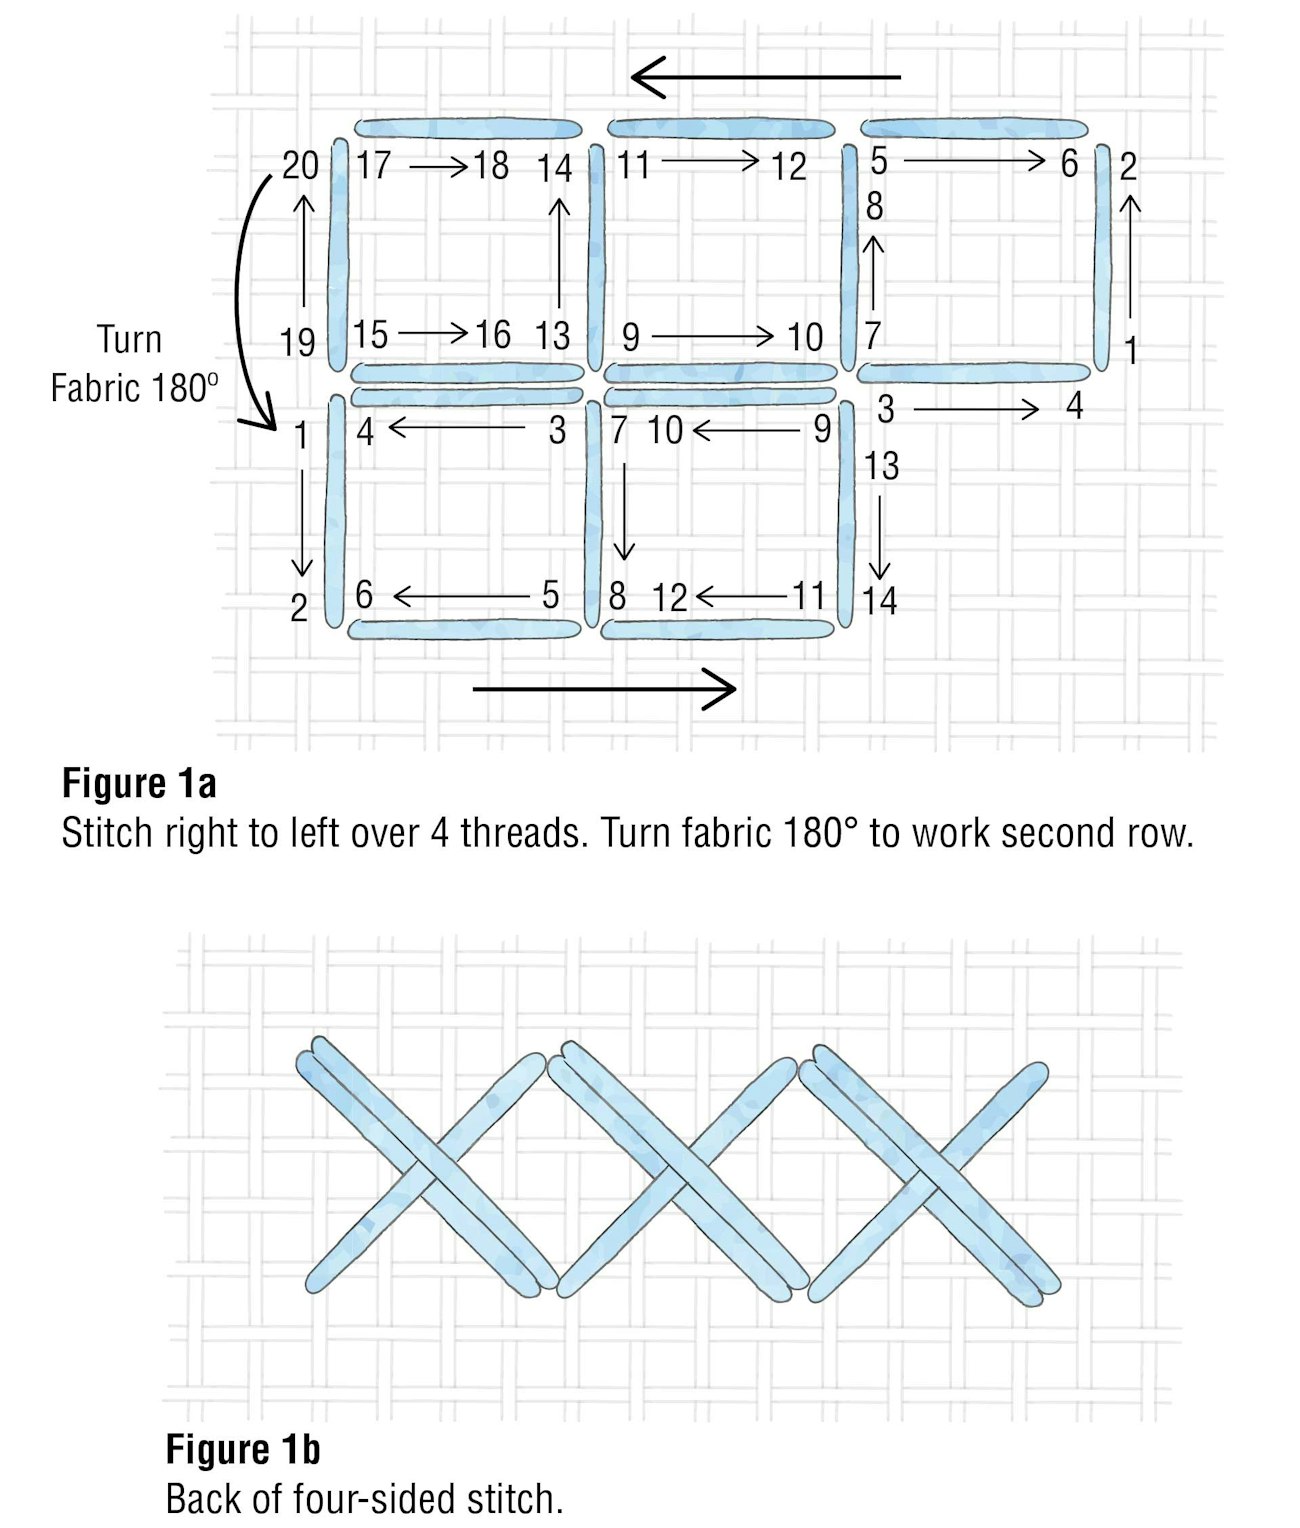
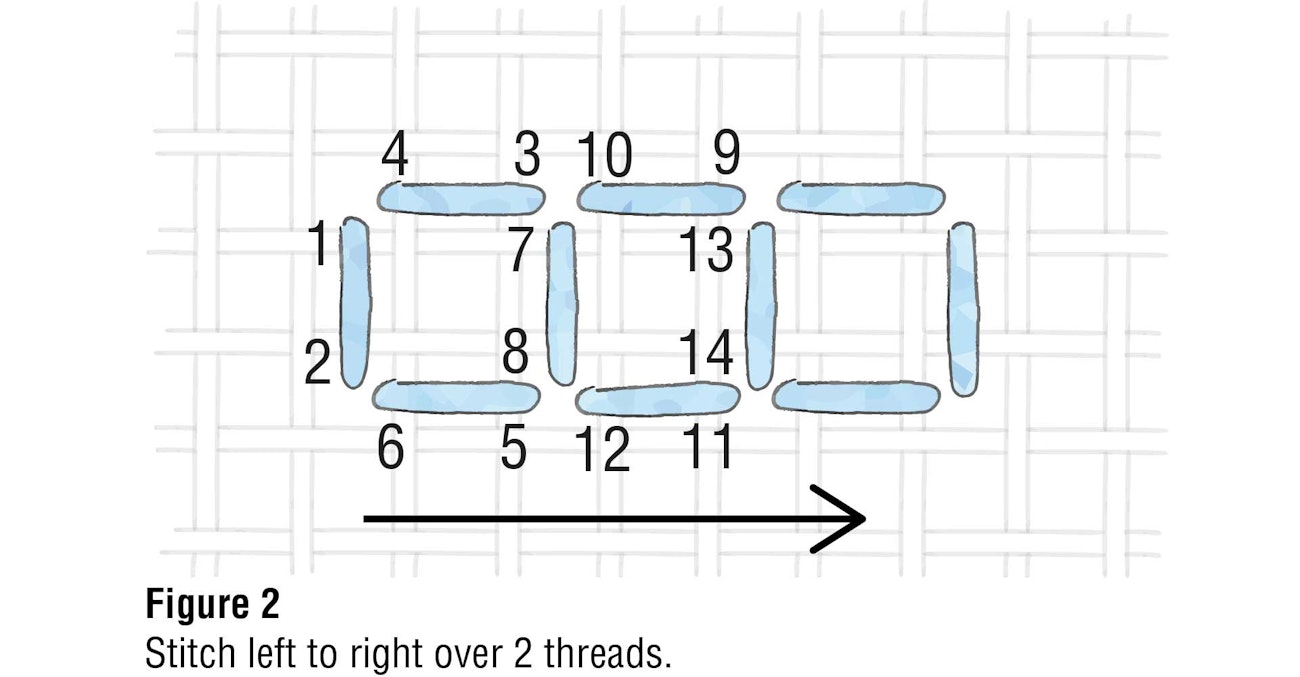
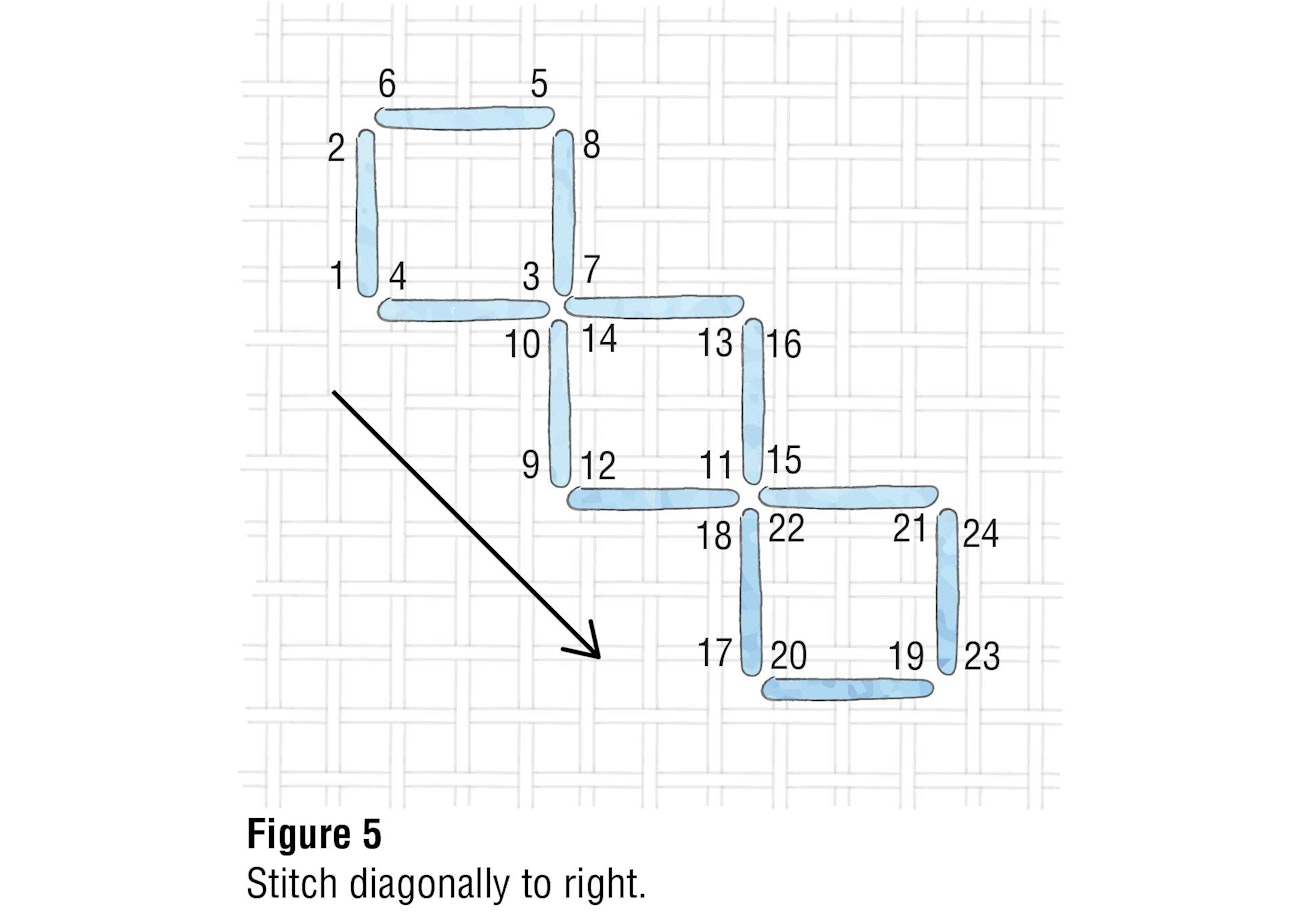
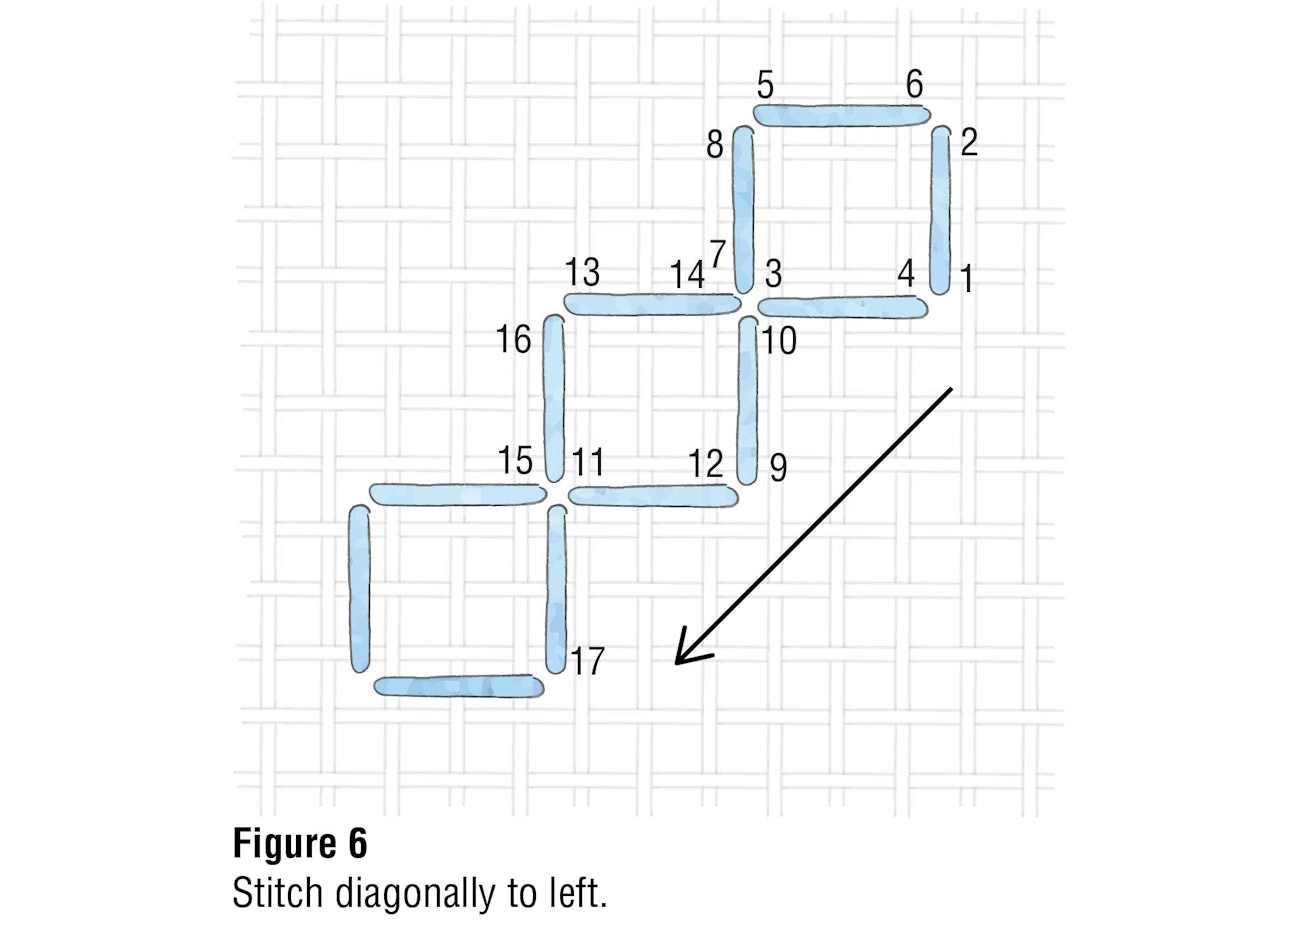
The four-sided stitch is worked on evenweave fabrics with a tapestry needle and usually in the right to left direction (Figure 1a). As previously stated, it can also be worked left to right (Figure 2), a method that is useful for many left-handed embroiderers because the overall traveling direction seems easier to stitch. This stitch can be worked horizontally (Figures 1a and 2), vertically (Figure 3), and diagonally (Figures 5 and 6). I find it advantageous and less time-consuming to repeatedly turn my fabric and to use the stitching pathway illustrated in Figure 1a whenever possible, rather than remembering multiple, different stitching pathways.
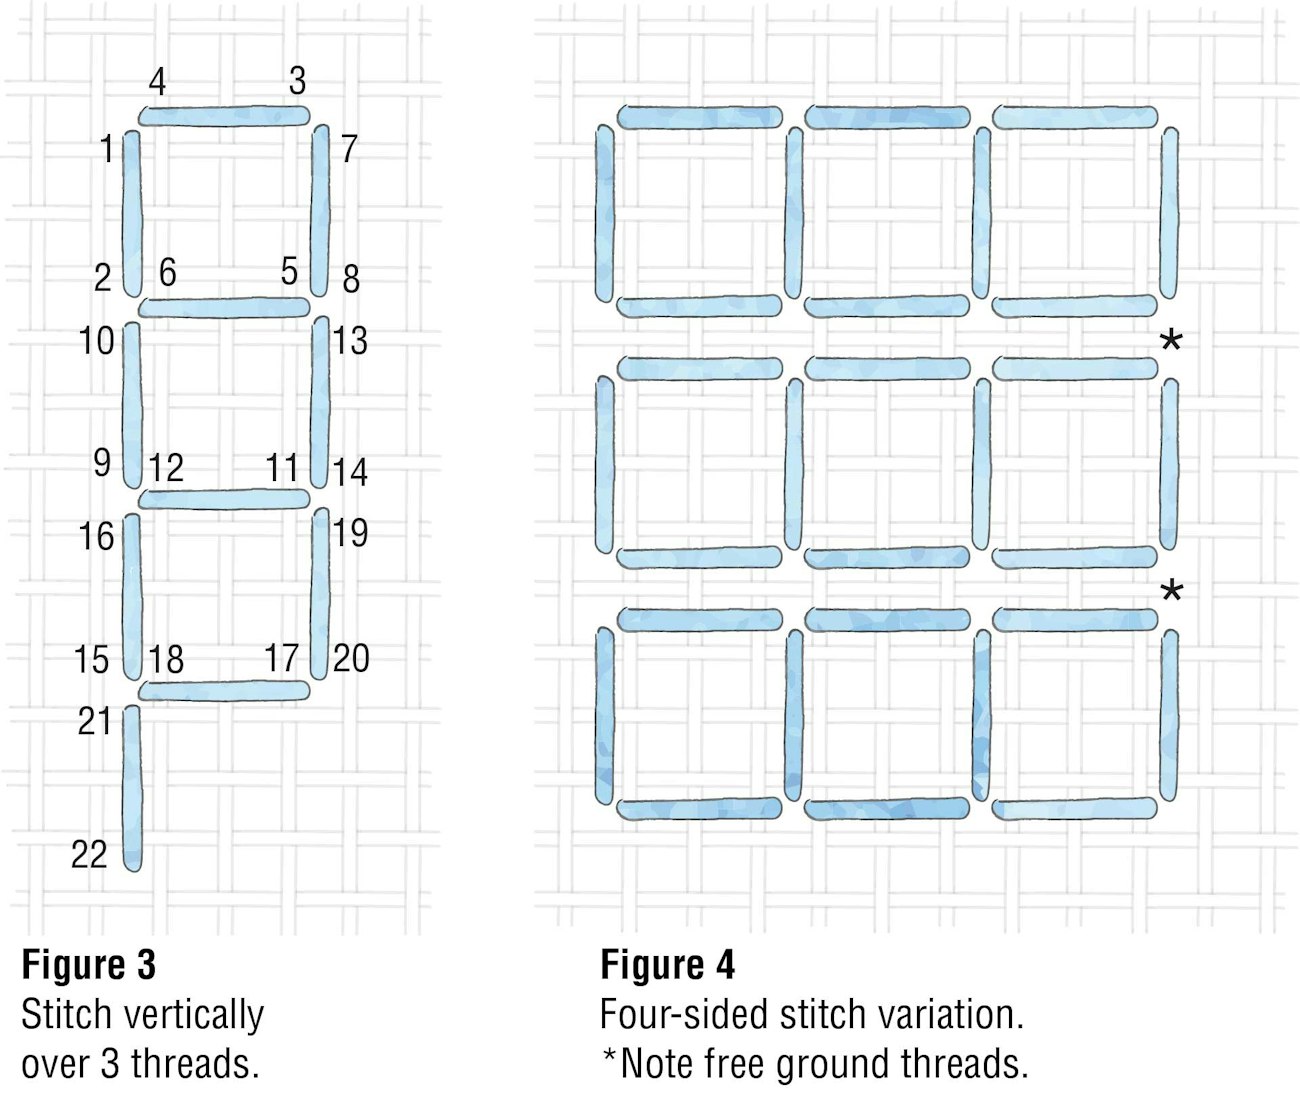
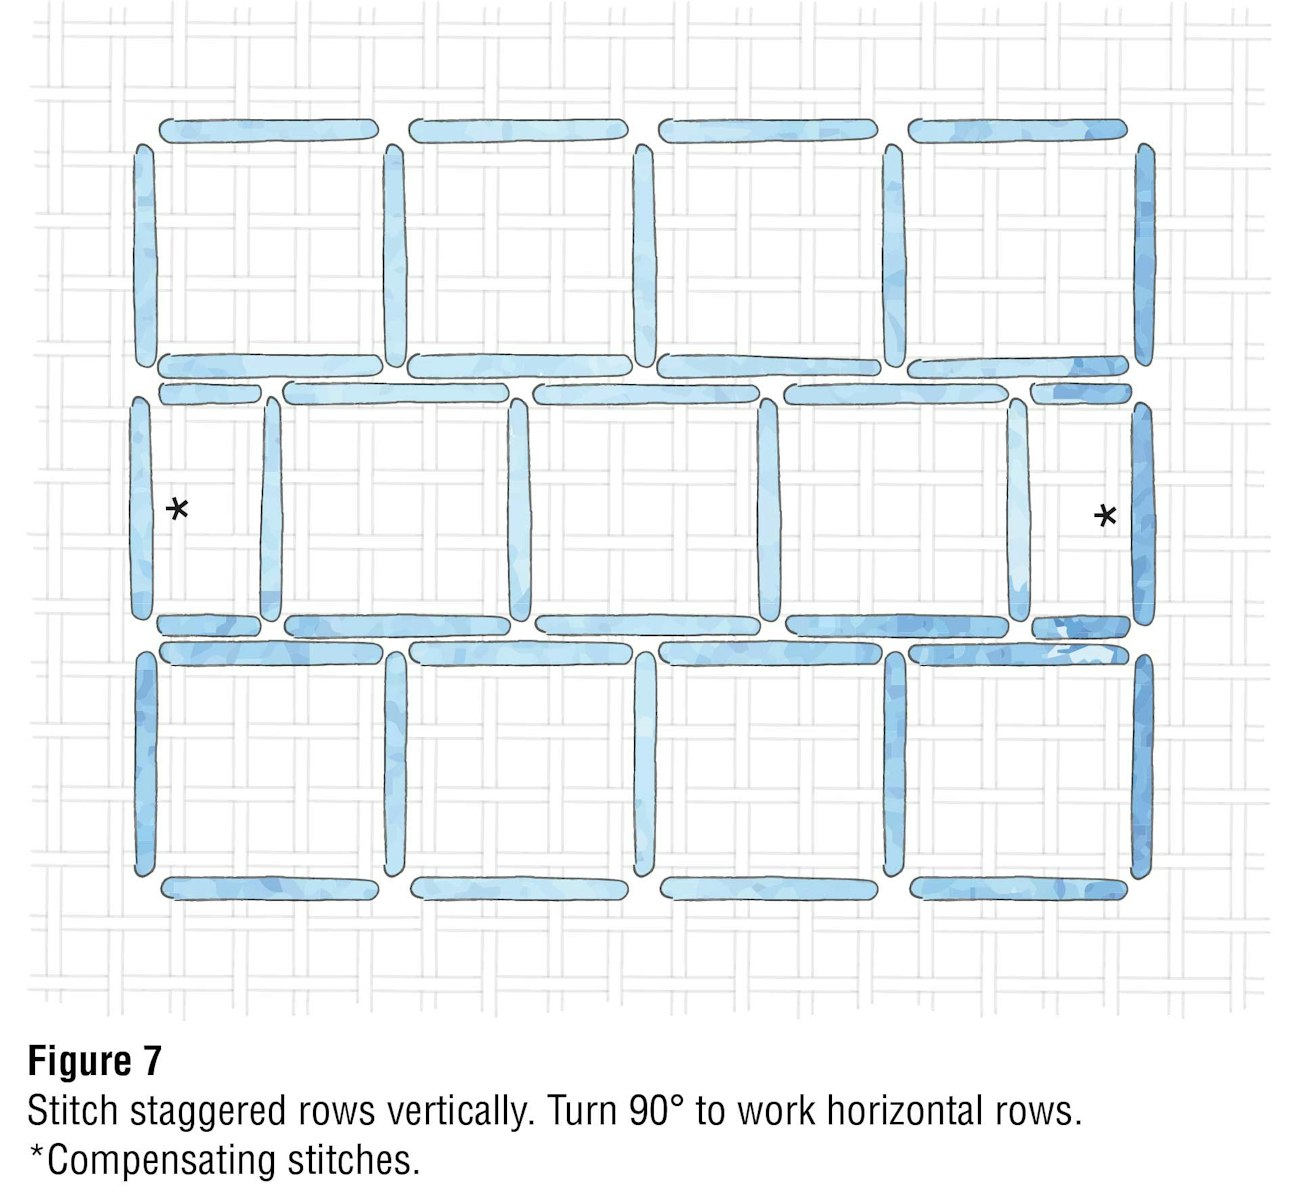
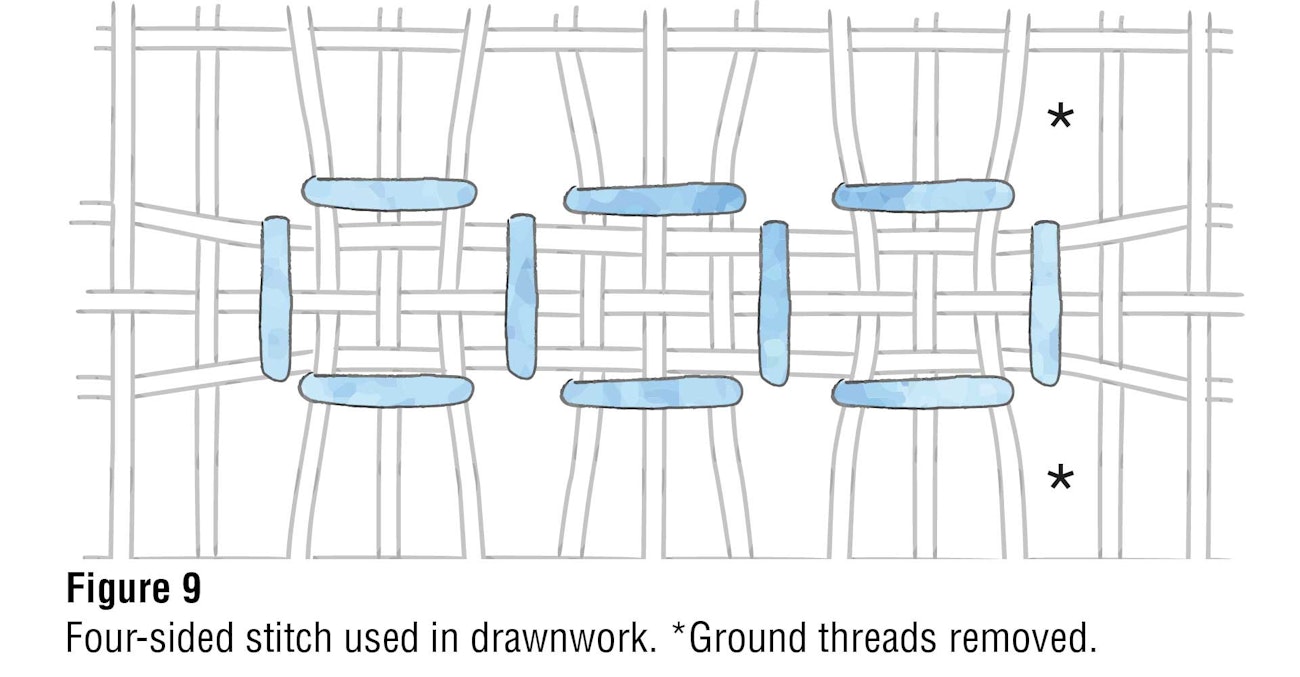
The four-sided stitch usually encloses an even number of fabric threads (2 or 4, but certainly less than 10). However, it can be stitched over almost any low number of even or uneven threads. Dissimilar numbers, such as 2 by 5 threads or 3 by 4, will result in a rectangular stitch instead of the usual square one. When stitching adjacent horizontal or vertical rows, note that the same holes are used, causing the stitching thread to be doubled (Figure 1a). In a simple variation of this stitch, a single or even multiple threads are left unworked between the rows (Figure 4) for another visual effect. Another variation occurs when the stitching thread is tightly pulled to create an overall lacy and open effect (Figure 9).
Almost any type of thread may be used as long as it’s similar in weight to the ground-fabric threads, and it must be strong enough to withstand the pull strength needed when used for pulled- or drawn-thread work. The more common threads used are silk or cotton floss, pearl cotton (various sizes), cordonnet, and linen in solid, variegated, or space- dyed threads. Fuzzy threads will, of course, obscure the distinctive character of this stitch.
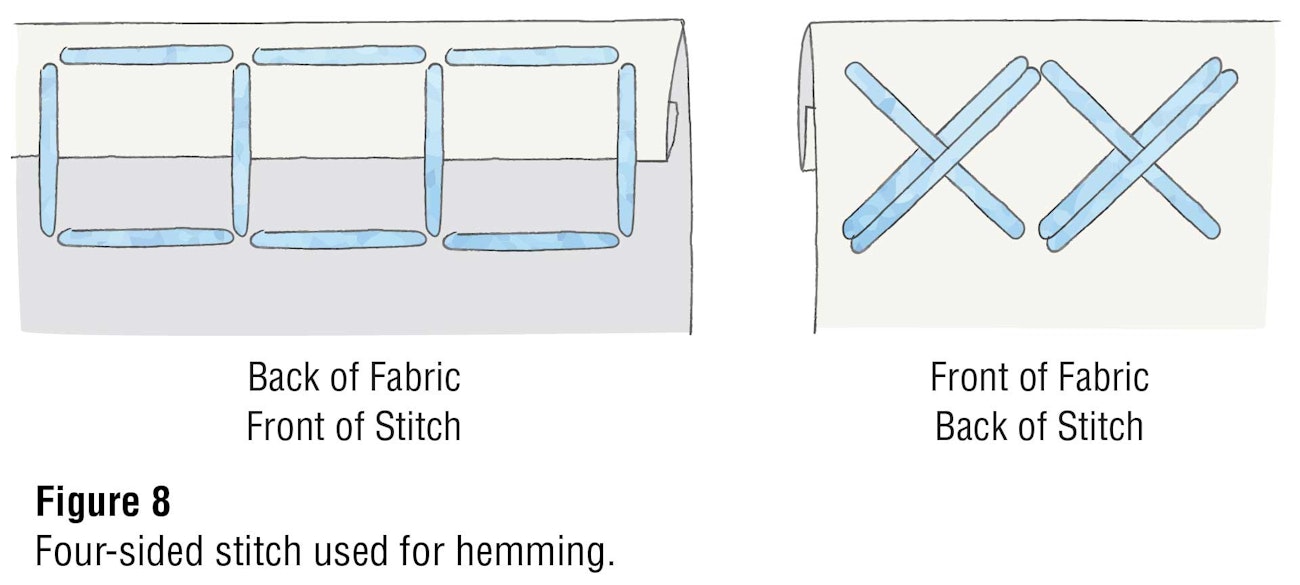
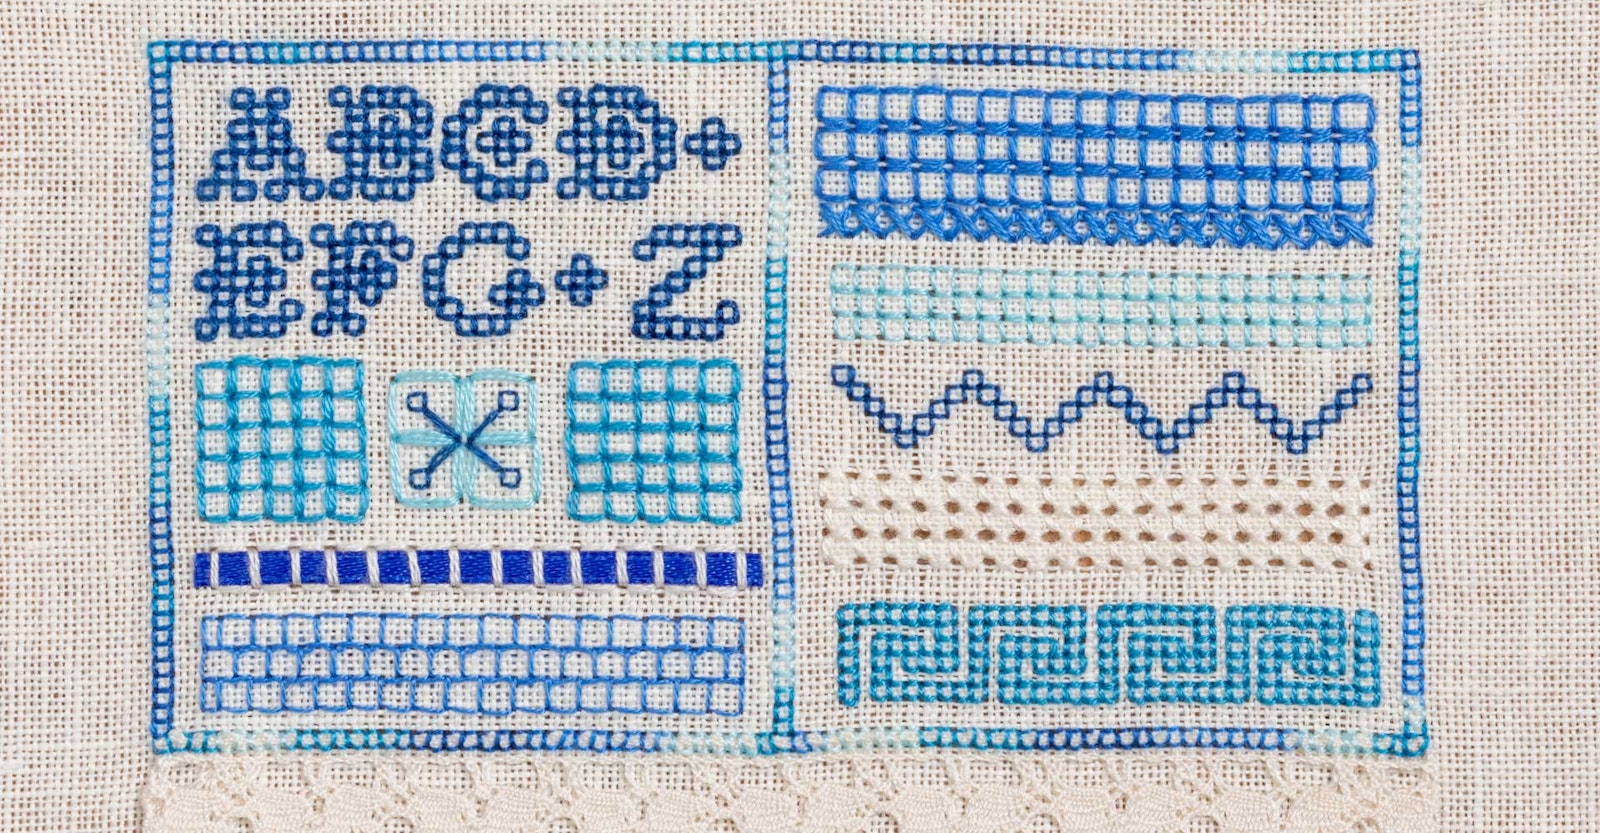
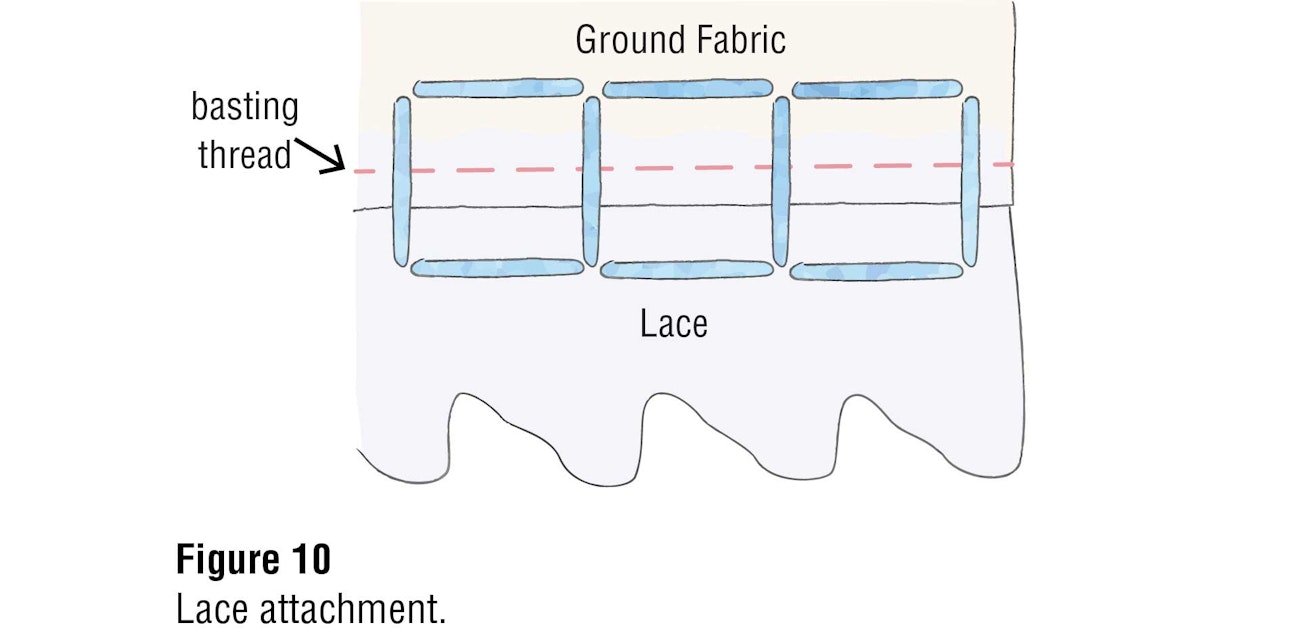
The four-sided stitch is effectively used for lines, bands, borders, fillings, alphabets and numbers, and in pulled- and drawn-thread techniques. The stitched squares can be arranged into a netlike (Figure 1a) or a staggered (Figure 7) arrangement, which may require a compensating stitch. Depending upon the size of the square, additional stitches can be sewn within each square (see the middle motif of Row 8 of the stitched sampler). In addition, this stitch can also be used to secure hems (Figure 8) and apply lace (Figure 10) to a fabric surface, although the Italian hemstitch is usually the stitch of choice for these applications.
When stitching alphabets, numbers, and other non-linear designs, it’s important to carry the working thread from one stitch to another through the backs of previously worked stitches. Although this obscures the look of distinct cross-stitches on the reverse side, it keeps the front of the design crisp, with no shadowing of threads being carried across unworked areas.

Instructions
Center and stitch the sampler, allowing 4 ground threads between design rows and at the left and right borders, except where noted. Note: These ground threads are not represented in the chart (See photo at top). Stitch in the following order for the best results.
1. For the outer top border (78 stitches), side borders, and center lines (44 stitches, excluding the top border stitches), use 1 strand of #4237 over 2×2 ground threads and the stitching pathway in Figures 1a and 3.
2. Using 2 strands of #798 over 4×4 ground threads, stitch 3 rows of horizontal stitches, allowing 1 ground thread between each horizontal row (Figure 4). For the fourth row, turn the fabric to the wrong side and work the four-sided stitch from this side. This will result in the three-legged cross-stitches (Figure 1b) appearing on the front of the sampler.
3. Using 1 strand of #3766 over 3 ground threads, stitch 3 rows of horizontal stitches (Figure 1a). Note: The middle row shares the same holes as the adjacent rows and there are 6 ground threads to the left and 4 ground threads to the right of this group of stitches.
4. Using 1 strand of #803 over 2 ground threads, follow the diagonal stitching pathways in Figures 5 and 6. Note: There are 6 ground threads to the left and 4 ground threads to the right of this group of stitches.
5. Using 2 strands of Ecru over 4×4 ground threads, stitch the pulled-thread technique (Figure 9), tightly pulling each leg of every stitch but not so tight as to distort the outer right border and center lines. Note: Allow 6 ground threads between this block and the Greek key block (Row 6).
6. Using 2 strands of #806 over 2×2 ground threads, follow the stitching pathways in Figures 1a, 2, and 3.
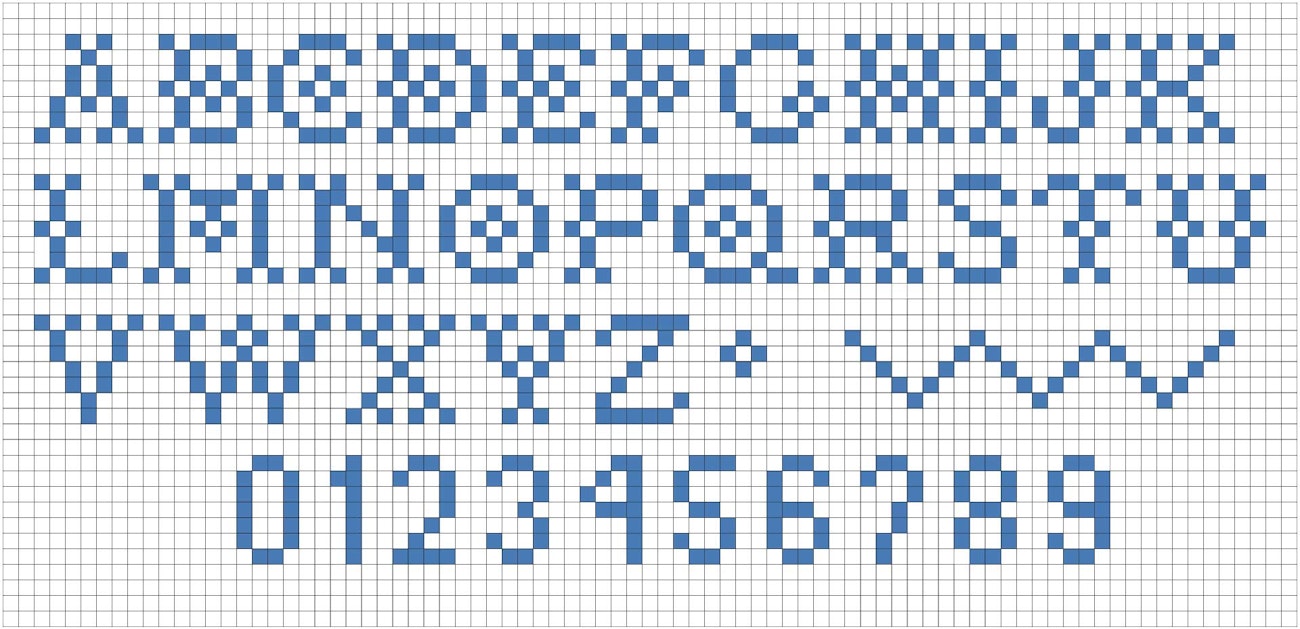
7. Use 2 strands of #803 over 2×2 ground threads with 2 threads left unworked between letters and the small motifs. Use the alphabet and numbers chart provided. Note: There are 4 ground threads between the small motif and the letter Z.
8. For the left block, using 2 strands of #806 over 4×4 ground threads, stitch vertically (Figure 3). For the middle block, use 2 strands of #3766 over 8×8 ground threads with 1 ground thread between the vertical rows; for the inner elements, use 1 strand of #803 over 2×2 ground threads, allowing 2 threads from each corner line. Use a double-stranded straight stitch to connect these small elements at the center. For the right block, using 2 strands of #806 over 4×4 ground threads, stitch horizontally (Figure 1a).
9. Using 2 strands of Ecru over 5×5 ground threads, stitch a single row. Note: Do not insert the ribbon at this time.
10. Using 1 strand of #798 over 4×4 ground threads, follow the staggered four-sided stitch pathways (Figure 7). Note: Where the compensating stitches occur at the ends of the stitching lines, work over 2×4 ground threads. There are 3 ground threads between this group of stitches and the bottom border stitches.
Cut the lace to 5⅝" (14.3 cm). Fold the raw ends under ⅛" (3.2 mm) on each side or to fit the width between the side borders. With the sewing thread and a sharp needle, tack the fold in place. Baste the upper edge of the lace to the ground fabric, carefully following the horizontal fabric thread that lines up with the last stitch of the side borders (see photo). Using 1 strand of #4237 over 2×2 ground threads, stitch horizontally (Figure 10) to attach the lace to the ground fabric. Remove basting threads.
Carefully insert the ribbon, shiny side up, under the vertical legs of the stitches in Row 9. If the vertical stitches become misaligned, use the tapestry needle to make them parallel again. Trim the ends of ribbon ⅛" (3.2 mm) beyond the last vertical legs at each end. Place small piece of paper under each ribbon end and apply a very tiny amount of glue to keep the ribbon from raveling. Remove papers after glue is dry.
Deanna Hall West is PieceWork’s needlework technical editor; she was previously the editor of The Needleworker magazine and has been in the needlework publishing and design industry for over 35 years.
This article was published in the Winter 2020 issue of PieceWork.