https://pieceworkmagazine.com/cdn-cgi/image/format=auto/https://www.datocms-assets.com/75076/1728657235-bush-two-color-norwegian-gloves.jpg?auto=format&w=900
Looking to create a gift for someone special? Check out Nancy Bush’s article and companion project on the Two-Color Knitting of Norway. Current PieceWork magazine subscribers can log in and visit the library link below to access the pattern.
Two-Color Knitting of Norway
The earliest knitting discovered in Norway is a fragment found in Bergen during excavation for a building. Probably buried sometime between 1476 and 1525, it is of wool yarn in stockinette stitch and seems to have been fulled. Because traders and travelers have always visited Bergen, the fragment may have originated in any of several countries in Europe where knitting was known, including Spain, France, and Germany.
Account books do not mention knitting in Norway until 1566, when an inventory made in Bergen County refers to a pair of worn knitted stockings, possibly made on the Faroe Islands. They were confiscated from a man in jail in Bergen.
[PAYWALL]
The first written record of a Norwegian knitter concerns Lisbet Pedersdatter, who was born in Christiania (today Oslo) but in 1634 was in jail in Stavanger accused of witchcraft (the outcome is not recorded). About 1670, business records describe coarse “farmer’s stockings” exported from Bergen. Records dating from 1711 mention Helia Rasmusdatter, who “knit stockings,” and Magle Larsdatter, who “lives from knitting stockings.”
Although the technique of totrådbindinga, or pattern knitting in two different colors of yarn, was known in several places in Norway and abroad, the colorwork we know as typically Norwegian emerged during the nineteenth century. The use of two colors offered the opportunity not only for decoration but also for extra warmth: The strand of yarn not being worked is carried across the back of the fabric, doubling its thickness.
 Norwegian sweater in the regional Fana style. Knit with wool yarn, with cotton and wool trim, and cotton lining. Purchased in Norway in 1951. Vesterheim Norwegian-American Museum, Decorah, Iowa
In 1855 or 1856, a young goat girl in Selbu named Marit Emstad (née Guldseth, 1841–1929) knitted a pair of white mittens patterned in black for the farmer for whom she worked. Marit and her sister also made some for themselves, which they wore to
church one Sunday. According to the story, the mittens caused a great stir among the women, and all were determined to create their own versions of these patterns. The mittens soon became an element of the local folk costume.
Two-Color Norwegian Gloves
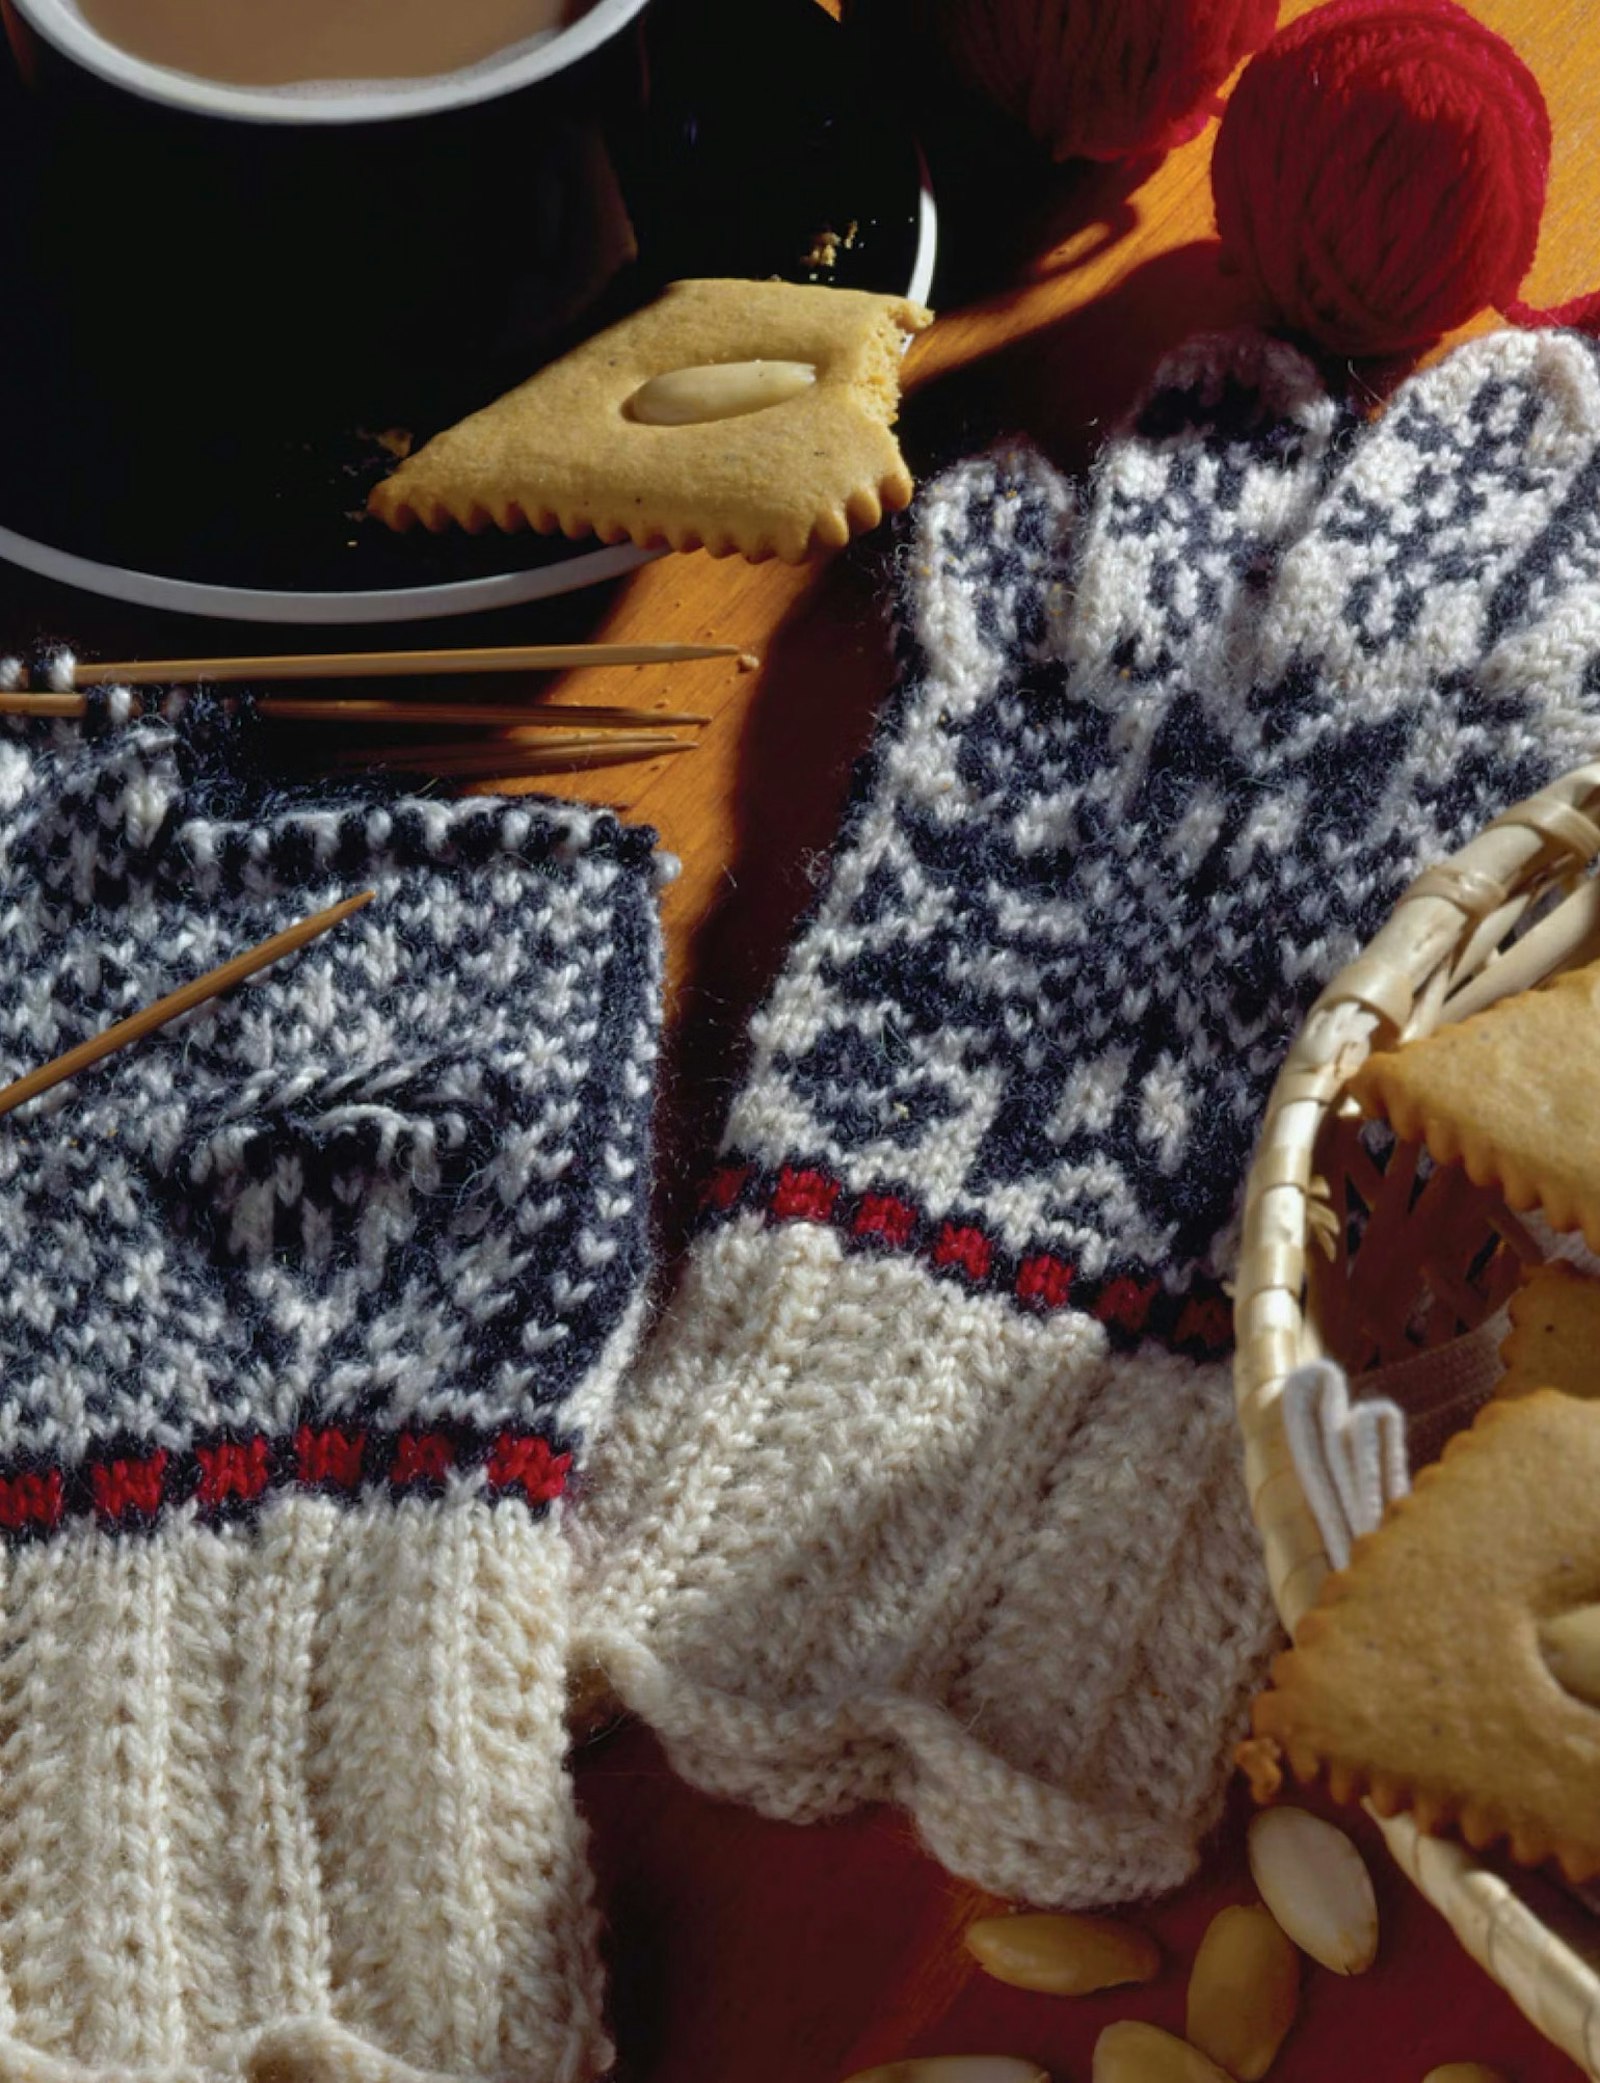
These gloves were inspired by a pair with similar patterning in the Vesterheim Norwegian-American Museum in Decorah, Iowa. Coordinating the colored pattern with the glove shaping makes this a challenging project.
Materials
- Dale of Norway Heilo, 100% Norwegian wool yarn, sportweight, 108 yd (98.7 m)/50 gram (1.75 oz) ball, 2 balls each of #0020 Natural and #0083 Charcoal Gray, 1 ball of #4018 Red
- Needles, set of 4 or 5 double pointed, size 2 (2.75 mm) or size needed to obtain gauge
- Stitch holder or scrap of yarn
- Tapestry needle
Finished Size: Woman’s medium
Gauge: 7 sts and 9 rnds = 1 inch (2.5 cm) in patt
Lace Pattern (10-st repeat)
Rnd 1: K.
Rnd 2: *Ssk, k2, yo, k2, yo, k2, k2tog; rep from * to end of rnd. Rep Rnds 1 and 2.

Get the “Two-Color Norwegian Gloves” PDF
Enjoy this subscriber-exclusive pattern courtesy of PieceWork magazine.
Click here to get the pattern PDF of “Two-Color Norwegian Gloves.”
Along with the instructions, you can get a print-ready version of the chart for easy reference.
Instructions
Left Hand
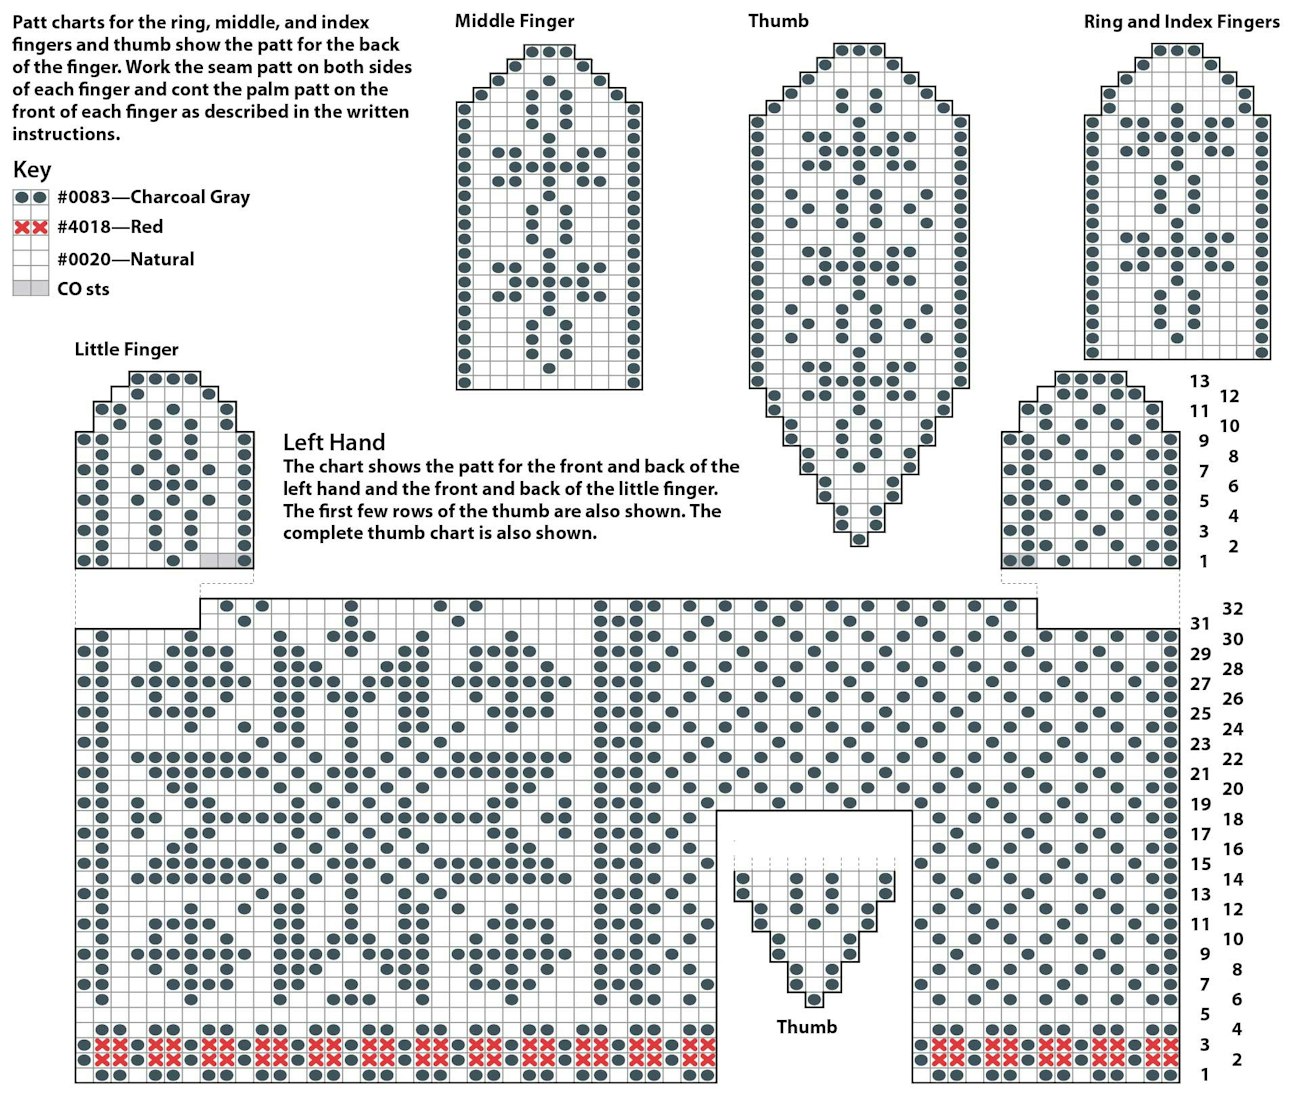
Cuff: With Natural, CO 50 sts evenly on 3 or 4 needles. Being careful not to twist the stitches, join into a circle and work the lace patt for 2½ inches (6.3 cm), inc by M1 on the last rnd—51 sts.
Hand: Work the 1st 5 rnds of the hand from the Left Hand chart. Inc for the thumb as foll: Work the 1st 15 sts of Rnd 6 from the chart, M1 in Charcoal Gray, complete the rnd. Cont working from the chart, inc on each side of the thumb st on the next rnd, then on every odd-numbered rnd as shown on the Thumb chart until there are 13 thumb sts. Work 1 rnd even.
Set thumb aside: Work the 1st 15 sts of Rnd 19 from the chart, place the 13 thumb sts on a length of scrap yarn, CO 11 sts in patt, and work the rem of the rnd—62 sts. Cont until you have completed Rnd 30 of the chart.
You will beg the little finger 2 rnds before beg the other fingers. The same 3-st seam patt that borders the hand cont up each side of the little and index fingers, and matching patts will be established on each side of the other fingers and thumb.
Little finger: Working from Rnd 1 of the Little Finger chart, work 1 st Charcoal Gray, work 7 sts in the established palm patt, place the next 47 sts on a holder, CO 5 sts as foll: 3 Charcoal Gray, 2 Natural, then work the rem 7 sts in patt for the back of the finger: 1 Natural, 1 Charcoal Gray, 3 Natural, 2 Charcoal Gray—20 sts. Divide the sts onto 3 needles and, working in the rnd, cont foll the Little Finger chart until you have completed Rnd 9. Working in patt, dec for the tip of the finger as foll.
Rnd 10: K1, ssk, k3, k2tog, k3, ssk, k3, k2tog, k2—16 sts.
Rnd 11: Work even as charted.
Rnd 12: K1, ssk, k1, k2tog, k3, ssk, k1, k2tog, k2—12 sts.
Rnd 13: With Charcoal Gray only, k1, sl 2, k1, p2sso, k3, sl 2, k1, p2sso, k2—8 sts.
Break the yarn, thread it through the rem sts, and draw them up snugly.
Ring finger: Transfer the sts on the holder set aside for the other fingers to 3 or 4 needles. Beg at the CO seam sts of the little finger, pick up and k 3 Charcoal Gray sts from the CO seam sts and 1 Natural from between the CO sts and the palm sts.
Work Rnd 31 from the chart. When you reach the little finger on the back of the hand, pick up and k 1 Natural from the CO st—52 sts.
Work Rnd 32 from the chart, keeping the 3-st seam patt opposite the little-finger seam patt.
To beg the ring finger, work the 3 seam sts, then 8 sts in the palm patt, place the next 33 sts on a holder, CO 5 sts: 1 in the palm patt, the next 3 in the seam patt, and the last in the back finger patt. Work the next 7 sts from the back of the hand and 1 st picked up in the prev rnd in the back finger patt—24 sts. Cont knitting in the rnd, maintaining the seam and palm patts and foll the chart for the back of the finger. Shape the top of the finger as shown on the chart, using the same decs as for the little finger.
When the ring finger is complete, work the middle and then the index fingers in the same manner, setting up the sts so that there are 3 seam sts on each side, 9 sts on the palm side, and 9 sts on the back of each finger—24 sts for each finger.
Thumb: Transfer the 13 sts at the thumbhole to a needle. Attach Natural and pick up and k the middle of the 3 seam sts from the hand. Pick up and k 11 sts from the sts CO for the thumbhole: 1 Charcoal Gray, 9 in palm patt, 1 Charcoal Gray, then pick up and k 1 more st from the hand in Natural—26 sts. Divide these sts onto 3 needles and work in the rnd, maintaining the palm, seam, and back thumb patts. Shape the top of the thumb as shown on the chart.
Turn the glove inside out and darn in the loose ends, closing any gaps that occur near the base of the fingers.
Right Glove
Reverse the placement of the thumb and fingers.
Finishing
Lay the finished gloves flat and pat them into shape. Cover them with a damp towel and lightly steam-press.
Nancy Bush teaches knitting workshops nationwide and is the author of numerous books. She lives in Salt Lake City, Utah, and owns the Wooly West.
Originally published December 18, 2020; updated October 23, 2024.


 Norwegian sweater in the regional Fana style. Knit with wool yarn, with cotton and wool trim, and cotton lining. Purchased in Norway in 1951. Vesterheim Norwegian-American Museum, Decorah, Iowa