https://pieceworkmagazine.com/cdn-cgi/image/format=auto/https://www.datocms-assets.com/75076/1656661139-quilt-blocks-to-knit-header.jpg?auto=format&w=900
Ann Budd invites you to send some cheer in the mail with a set of three special handmade cards featuring tiny knitted quilt blocks. In the project instructions below, you’ll learn how to create all three blocks. These patterns don’t require much yarn or much time to complete, so they are great for stashbusting and as a quick evening project. Create one of these colorful cards to brighten a friend’s day or get creative with these knitted blocks and join several together to make a miniature quilt. Current PieceWork subscribers can instantly download the pattern below, or visit the library to learn more.
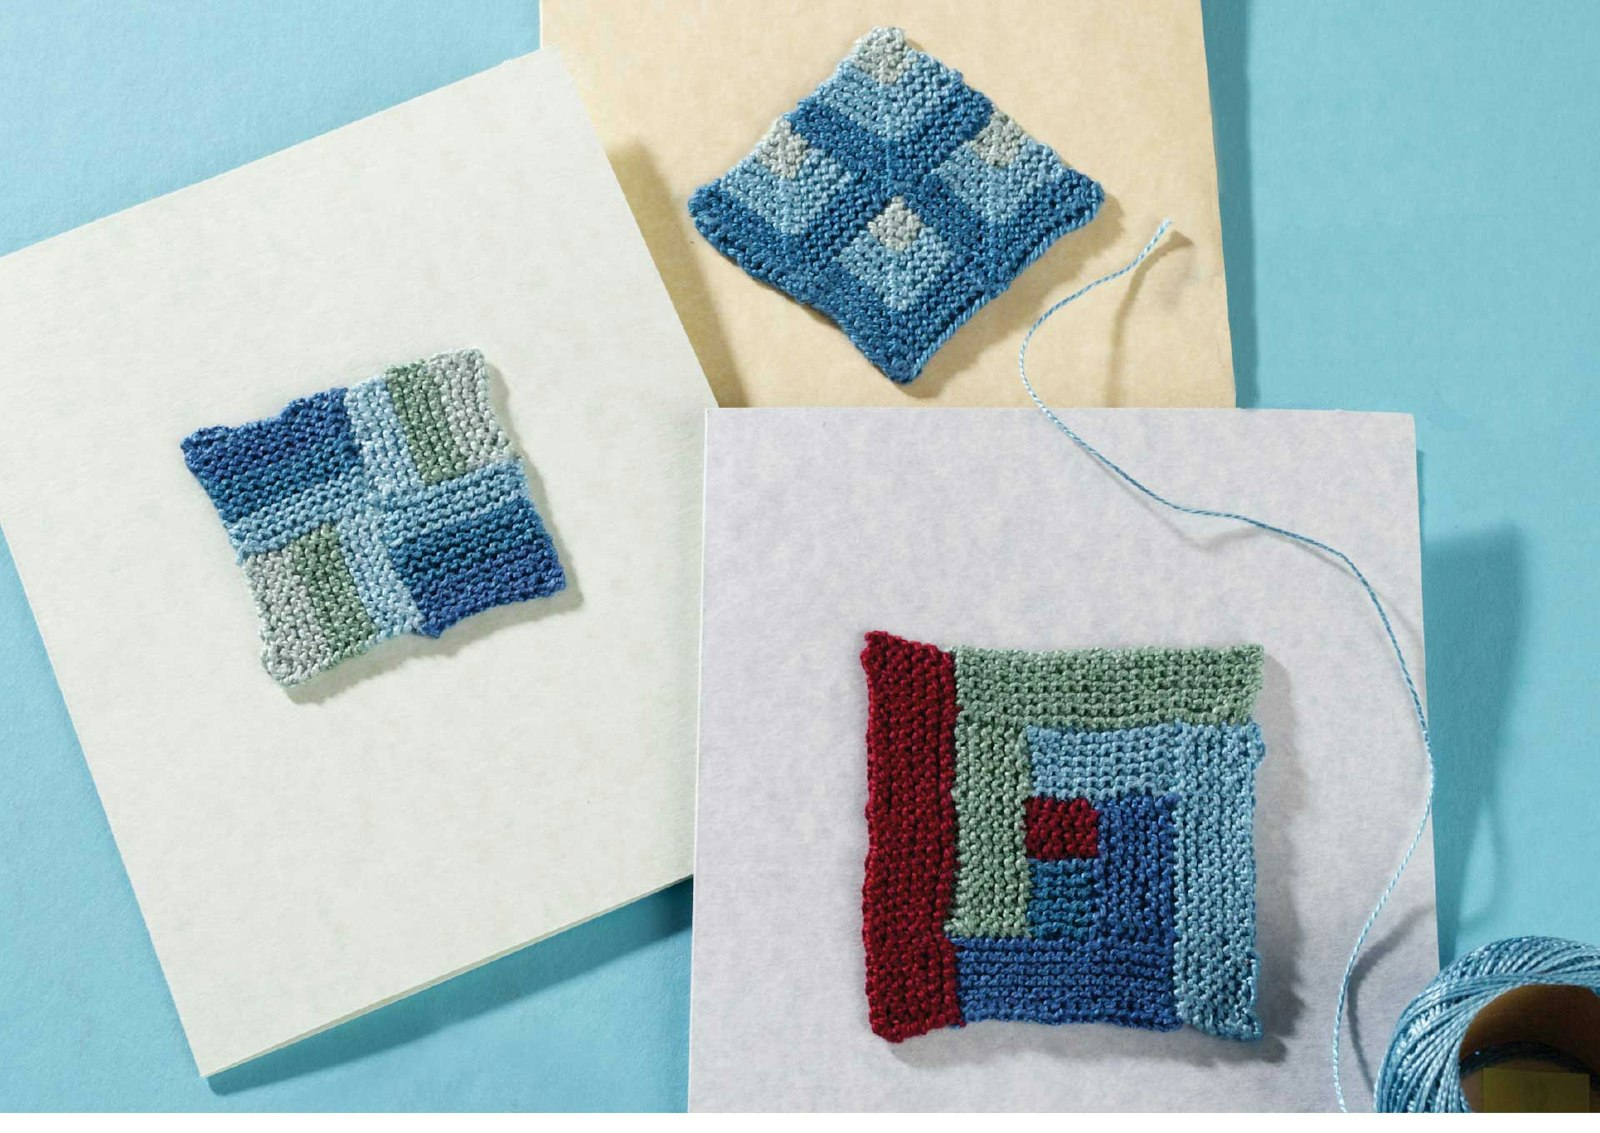
In this age of emails, cell phones, and text messages, a handwritten note is a welcome rarity. To add a personal touch, I decorated note cards with knitted quiltlike blocks. Using size 8 pearl cotton and size 0000 needles, I worked all of the blocks in garter stitch and changed the direction that the colors were worked so that the garter ridges would have different orientations. I mounted the blocks on prescored, acid- and lignin-free cards that I purchased in a craft store.
Materials
[PAYWALL]Presencia Finca Pearl Cotton, 100% cotton thread, size 8, 77 yards (70 m)/10 g ball, 1 ball each of
- #3556 Light Teal (A)
- #3560 Medium Teal (B)
- #3574 Dark Teal (C)
- #3319 Royal Blue (D)
- #4218 Light Sea Foam (E)
- #4228 Medium Sea Foam (F)
- #1902 Dark Red (G)
Needles, size 0000 (1 mm) or size needed to obtain gauge
- Tapestry needle, small-eye
Finished design size: Log Cabin block, about 2¼ x 2¼ inches (6 x 6 cm); others, about 1¾ x 1¾ inches (4 x 4 cm)
Gauge: About 12 sts and 24 rows = 1 inch (2.5 cm) in
garter stitch; exact gauge is not critical for this project
but will affect the finished size
Visit pieceworkmagazine.com/abbreviations/ for terms you don’t know.
“Quilt Blocks to Knit” PDF Download
We've included the written-out instructions for each block below, but you can download a printable PDF version of them here or by clicking the button below.
Download PDF
Instructions
Notes: It’s important to CO and BO loosely so that the edges don’t pull in.
When picking up sts along the selvedge edge of garter st, pick up 1 st for every garter ridge. See the schematics below for color key, block diagrams, and knitting direction.


Fence Rail Block
Mini-Block 1: Loosely CO 12 sts with E. K 7 more rows. Change to F and k 8 rows. Change to A and k 8 more rows. With RS facing, BO all sts loosely.
Mini-Block 2: Turn Mini-Block 1 90° so selvedge is across the top. With B and RS facing, pick up and k 12 sts evenly spaced (1 st for every garter ridge) along selvedge edge. K 7 more rows. Change to C and k 8 rows. Change to D and k 8 rows. BO all sts loosely.
Mini-Block 3: Turn piece so Mini-Block 2 is on the left, Mini-Block 1 is on the right, and stripes of Mini-Block 1 are running horizontally. With A and RS facing, pick up and k 12 sts evenly spaced along top (selvedge) edge of Mini-Block 2. K 7 more rows. Change to F and k 8 rows. Change to E and k 8 rows. BO all sts loosely.
Mini-Block 4: Turn piece so stripes of Mini-Blocks 1 and 3 are running vertically. With B and RS facing, beginning in corner where 3 blocks meet, pick up and k 13 sts evenly spaced along selvedge edge of Mini-Block 3 (12 sts plus 1 st for seam). K 7 more rows. Change to C and k 8 rows. Change to D and k 8 rows. BO all sts loosely.
With A threaded on the tapestry needle, sew selvedge edge of Mini-Block 4 to BO edge of Mini-Block 1.

Mini Mitered Squares Block
Mini-Block 1: Loosely CO 25 sts with C. This counts as RS Row 1. Continue as foll:
Even-numbered Rows 2–22: K.
Row 3: K11, sl 1, k2tog, psso, k11—23 sts rem.
Row 5: K10, sl 1, k2tog, psso, k10—21 sts rem.
Row 7: K9, sl 1, k2tog, psso, k9—19 sts rem.
Row 9: Change to B, k8, sl 1, k2tog, psso, k8—17 sts rem.
Row 11: K7, sl 1, k2tog, psso, k7—15 sts rem.
Row 13: K6, sl 1, k2tog, psso, k6—13 sts rem.
Row 15: K5, sl 1, k2tog, psso, k5—11 sts rem.
Row 17: Change to E, k4, sl 1, k2tog, psso, k4—9 sts rem.
Row 19: K3, sl 1, k2tog, psso, k3—7 sts rem.
Row 21: K2, sl 1, k2tog, psso, k2—5 sts rem.
Row 23: K1, sl 1, k2tog, psso, k1—3 sts rem.
Row 24: Sl 1, k2tog, psso—1 st rem.
Cut yarn and pull through rem loop to secure.
Mini-Block 2: With C, CO 12 sts, then with RS facing pick up and k 13 sts along right selvedge edge of Mini-Block 1—25 sts total. Rep Rows 2–24 of Mini-Block 1.
Mini-Block 3: With C and RS facing, pick up and k 13 sts evenly spaced along left selvedge edge of Mini-Block 1, then use the backward-loop method (*Loop working yarn and place it on needle backward so that it doesn’t unwind. Repeat from *) to loosely CO 12 more sts—25 sts total. Rep Rows 2–24 of Mini-Block 1.
Mini-Block 4: With C, pick up and k 12 sts evenly spaced along the left selvedge edge of Mini-Block 2, then pick up and k 1 st in top corner of Mini-Block 1, then pick up and k 12 sts evenly spaced along right selvedge edge of Mini-Block 3—25 sts total. Rep Rows 2–24 of Mini-Block 1.

Log Cabin Block
Loosely CO 6 sts with G. K 11 rows—6 garter ridges on RS. With RS facing, BO all sts loosely. Turn piece clockwise 90° so left selvedge (end of RS rows) is across the top.
With C and RS facing, pick up and k 6 sts along selvedge edge of G block. K 11 rows—6 garter ridges on RS. With RS facing, BO all sts loosely.
Turn piece clockwise 90°, and with D and RS facing, pick up and k 12 sts evenly spaced along C and G blocks. K 11 rows. With RS facing, BO all sts loosely.
Turn piece clockwise 90°, and with B and RS facing, pick up and k 12 sts along selvedge edge of D and G blocks. K 11 rows. With RS facing, BO all sts loosely.
Turn piece clockwise 90°, and with F and RS facing, pick up and k 18 sts evenly spaced along B, G, and C blocks. K 11 rows. With RS facing, BO all sts loosely.
Turn piece clockwise 90°, and with D and RS facing, pick up and k 18 sts evenly spaced along F, C, and D blocks. K 11 rows. With RS facing, BO all sts loosely.
Turn piece clockwise 90°, and with B and RS facing, pick up and k 24 sts evenly spaced along both D blocks and B block. K 11 rows. With RS facing, BO all sts loosely.
Turn piece clockwise 90°, and with F and RS facing, pick up and k 24 sts evenly spaced along both B blocks and F block. K 11 rows. With RS facing, BO all sts loosely.
Turn piece clockwise 90°, and with G and RS facing, pick up and k 30 sts evenly spaced along both F blocks and D block. K 11 rows. With RS facing, BO all sts loosely.
Finishing
Weave in all loose ends. Block as necessary.
Attach block to card: Cut 12-inch (30.5-cm) lengths of yarn to match the corner colors of the block. Position the block as desired on the card, then tack each corner to the card with its matching color, and tie off the ends on the inside of card. Rep for the other blocks.
“Quilt Blocks to Knit” PDF Download
Download PDF
Interested in learning more about quilts? Find this pattern and others in the September/October 2007 issue of PieceWork.
Also, remember that if you are an active subscriber to PieceWork magazine, you have unlimited access to previous issues, including September/October 2007. See our help center for the step-by-step process on how to access them.
Ann Budd is the author of Getting Started Knitting Socks and The Knitter’s Handy Book series (Loveland, Colorado: Interweave Press, 2007, 2002, and 2004). She lives in Colorado.
Originally published December 26, 2020; updated August 6, 2025.