
The whimsical world of Weldon's Practical Needlework continues to delight and enchant modern needleworkers. For a holiday treat, we offer a knitting pattern from Weldon’s Practical Needlework, Volume 10, Twenty-eighth Series, Pincushion, Knitted Like a Lemon.
The samples shown above were made by Heather A. Vaughan and featured in Knitting Traditions Fall 2015. Heather knit her citrus in Brown Sheep Cotton Fine, sunflower gold and lime light for fruit, jungle green for leaves and stems, using size 0 (2 mm) for fruit and size 2 (2.75 mm) for the leaves and stems.
Here is the pattern as it was published in the nineteenth century, with neither corrections nor alterations.
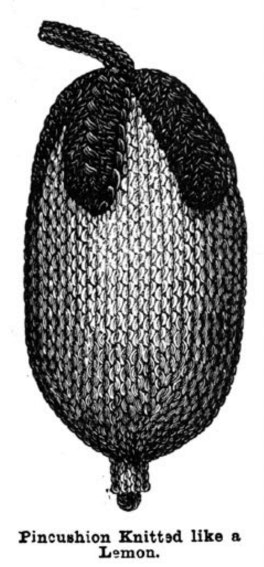
Pincushion, Knitted Like a Lemon
A lemon pincushion is a novel ornament for a drawing-room table; it is also suitable and pretty to hang on a Christmas tree, and a plate full of these useful trifles will form an attractive addition to a stall at a bazaar and realise a fair percentage of profit. Required: ½ oz. of lemon-coloured and ¼ oz. of shaded green single Berlin wool, a pair of No. 12 and a pair of No. 16 steel knitting needles.
The lemon wool is to make the fruit, the green is for the leaves and stem. With lemon wool and No. 12 needles cast on 34 stitches. The knitting should be done rather tightly; the first stitch of every row must be slipped and drawn tightly to avoid any hole or small gap at the turning, the last stitch of each little row also should be knitted tightly for the same reason. 1st row—Knit plain 34 stitches. 2nd row—Knit 22 stitches, leave 12 stitches unknitted; turn the work. 3rd row—Knit 14, leave 8; turn the work. 4th row—Knit 15, turn the work. 5th row—Knit 16, turn the work. 6th row—Knit 17, turn the work. 7th row—Knit 18, turn the work. 8th row—Knit 19, turn the work; and proceed in this manner, knitting one additional stitch in every successive row, until you get to the 19th row—Knit 30; which brings you quite to the end of the needle away from the tag. 20th row—Knit plain 34 stitches, that is, knit all along the pin, and you come to the end close by the tag. This forms one section of the lemon.
It requires five sections, therefore repeat from the first row four times. Cast off. Make a stuffing of cotton wool, horse-hair, or any soft fabric, to the size and shape of a lemon, stretch the knitting smoothly thereon; join the cast-on stitches to those that were cast off, and sew up the ends; the end that points out like a lip is the bottom of the lemon, at the other end, the top, the leaves are to be arranged. For the Leaves—With green wool and No. 16 needles—leaving a tag of wool about 4 inches long—cast on 2 stitches. 1st row—Make 1 (by passing the wool round the needle), knit 2. 2nd row—Make 1, purl 3. 3rd row—Make 1, knit 4. 4th row—Make 1, purl 5. 5th row—Make 1, knit 6. 6th row—Make 1, purl 7. 7th row—Make 1, knit 2, slip 1, knit 2 together, pass the slipped stitch over, knit 3. 8th row—Make 1, purl 7. Repeat the two last rows 6 times. 21st row—Slip 1, knit 1, slip 1, knit 2 together, pass the slipped stitch over, knit 2 together, knit 1. 22nd row—Slip 1, purl 2 together, purl 2 together; this brings you to the top of the leaf, having 3 stitches on the needle. Cast off. Make in all five of these leaves.
Group the five leaves round the top of the lemon, and use the cast-off tag to secure each in place; attach the points of the leaves to the lemon by the cast-on tag, and pass the end of the wool right through the lemon before cutting it off closely. For the Stalk—Take the green wool, and cast 12 stitches on one of the No. 16 needles; knit 1 plain row, then cast off. Sew the stalk in the centre of the group of leaves, using for this purpose both the commencing and finishing ends of wool; pass one end of wool right through to the lip of the lemon, then pass it back again, leaving a small loop in the lip, and secure it firmly. The engraving clearly shows the working of the lemon, and the arrangement of the leaves and stalk.