I know how to do “proper” kumihimo on a marudai (a round stand that is the most common traditional frame used for making kumihimo), although I rely heavily on the books of Jacqui Carrey and Roderick Owen for guidance. A few years ago, I started demonstrating kumihimo at craft shows as part of my weaving guild’s outreach program. I’m not a great multitasker, so I quickly realized that complex patterns, even ones with only 4 moves, were above my abilities in public. I picked an easy pattern, the round braid that has 2 moves, varied the yarn colors and patterning, and was happy with my results.
On a whim, I purchased a kumihimo disk at a conference. It came with 8 flip-top bobbins and enough thread to make a braid to for a necklace. That little project was enough to get me started. The round braids that I make on a disk are identical to what I was doing on the marudai. The braid has 3 moves and is easy to learn and do in public.
Setting up a disk
- Cut 8 strands of yarn 3x the length of the braid you want to make. It can be any type of yarn, but for the smoothest braids, multiple strands of a thin yarn work better than 1 thick yarn.
- Contain the lengths of yarn in flip-top bobbins or make butterflies out of them.
- Tie the free ends of the 8 strands together in a simple overhand knot.
- Pull the knotted ends through the center hole of the disk so that the knot is on the bottom.
- Insert the strands in the slots of the disk so that you have 1 strand on each side of the north, east, south, and west points of your disk. The butterflies or flip-top bobbins should hang down on the outside below the disk.
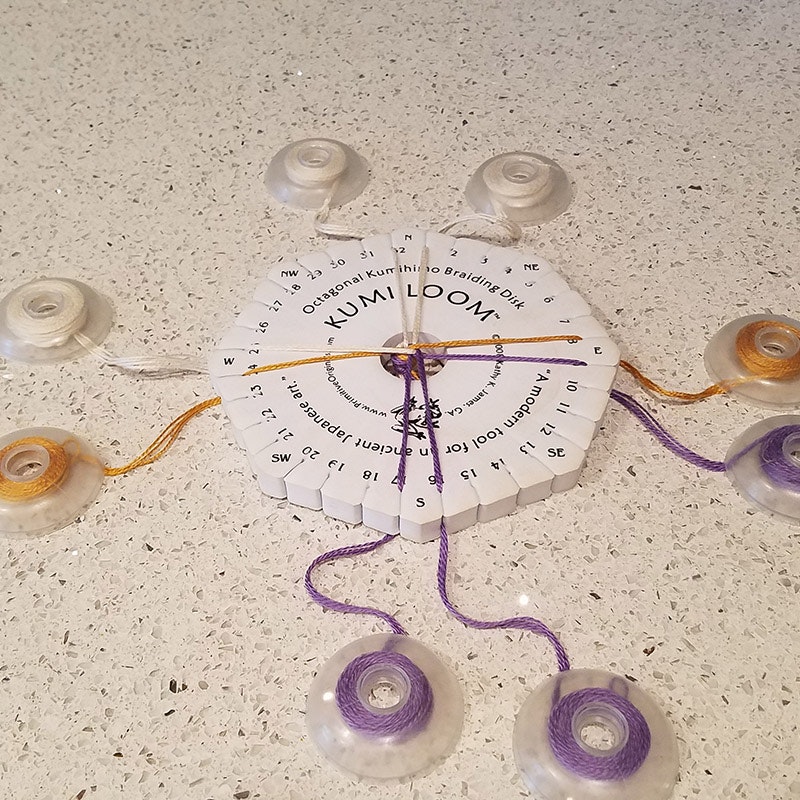
A loaded disk ready for braiding. Note the pairs of yarn strands bordering the north, east, south, and west positions.
Braiding
- Hold the disk horizontally, with the north (top) position away from you. With your free hand, move the strand to the right of the north position and put it in the slot next to the strand to the right of the south (bottom) position. Now you should have 1 strand at the top position and 3 at the bottom position.
- Move the strand at the far left of the bottom position, straight up so that it is to the left of the strand remaining at the top position.
- Rotate the disk counterclockwise, so the pair of ends that were at the east position are now at the top, and the west is at the bottom.
Repeat steps 1–3.

Step 1 completed.

Step 2 completed.

Step 3 completed. Notice how the disk has rotated counterclockwise.

In just a few minutes, a braid develops.
Tips
- There are many color patterns that you can make with this simple braid. Experiment on your own or check out the many patterns on Pinterest and other websites.
- Before putting your disk down, work step 1. When you pick it back up, whether 10 minutes later or 10 days later, all you need to do is put the position with 3 strands at the bottom and work step 2 to find your place again.
- If finished length is a priority for you, add extra length to your initial strands.
- To stretch out your braid as you work, attach a small weight, such as a fishing weight, to the center knot.
Project Problem-Solver
I use my kumihimo disk as a problem-solver in 3 main ways:
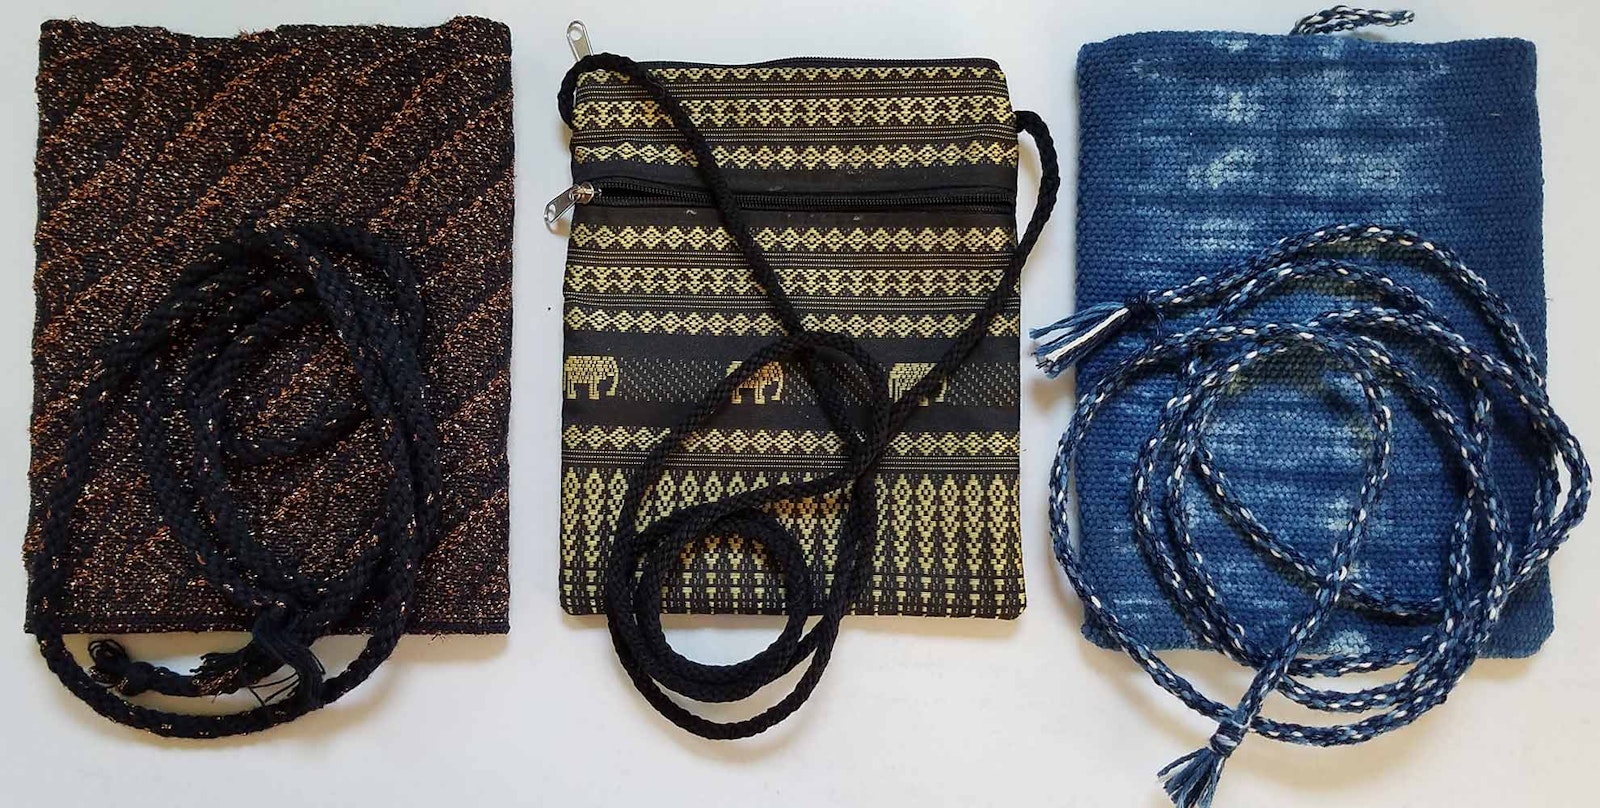
Make matching cords for bags and other projects.
After trying for a while to find cords that I liked and that matched my woven bags, I decided to make my own. That allows me to use the same yarns in my cord that I used in the fabric of the bag.
Use leftover yarns and thrums from weaving and other projects.
There is nothing quite like looking at the thrums from a silk scarf and mentally calculating the cost of the silk that will be wasted if you just throw it away. When I cut a project off my loom, I carefully grab the thrums and keep them organized as possible kumihimo candidates. Thrums braids tend to be short, but they make a nice decoration on a small gift or bottle of wine and can also be used for making jewelry.
Braid for relaxation.
The disk is very portable, and the work is quiet and repetitive, making it a great craft to take to the doctor’s office, a kid’s soccer game, or a guild meeting—any place where you may be interrupted and won’t have to pay much attention to what you are working on. There are many other braids that could be made on the disk, but I stick with the round, 8-strand braid for simplicity.
Weave (and braid!) well,
Susan