Subscriber Exclusive
Knit an “All Shall Be Well” Shawl
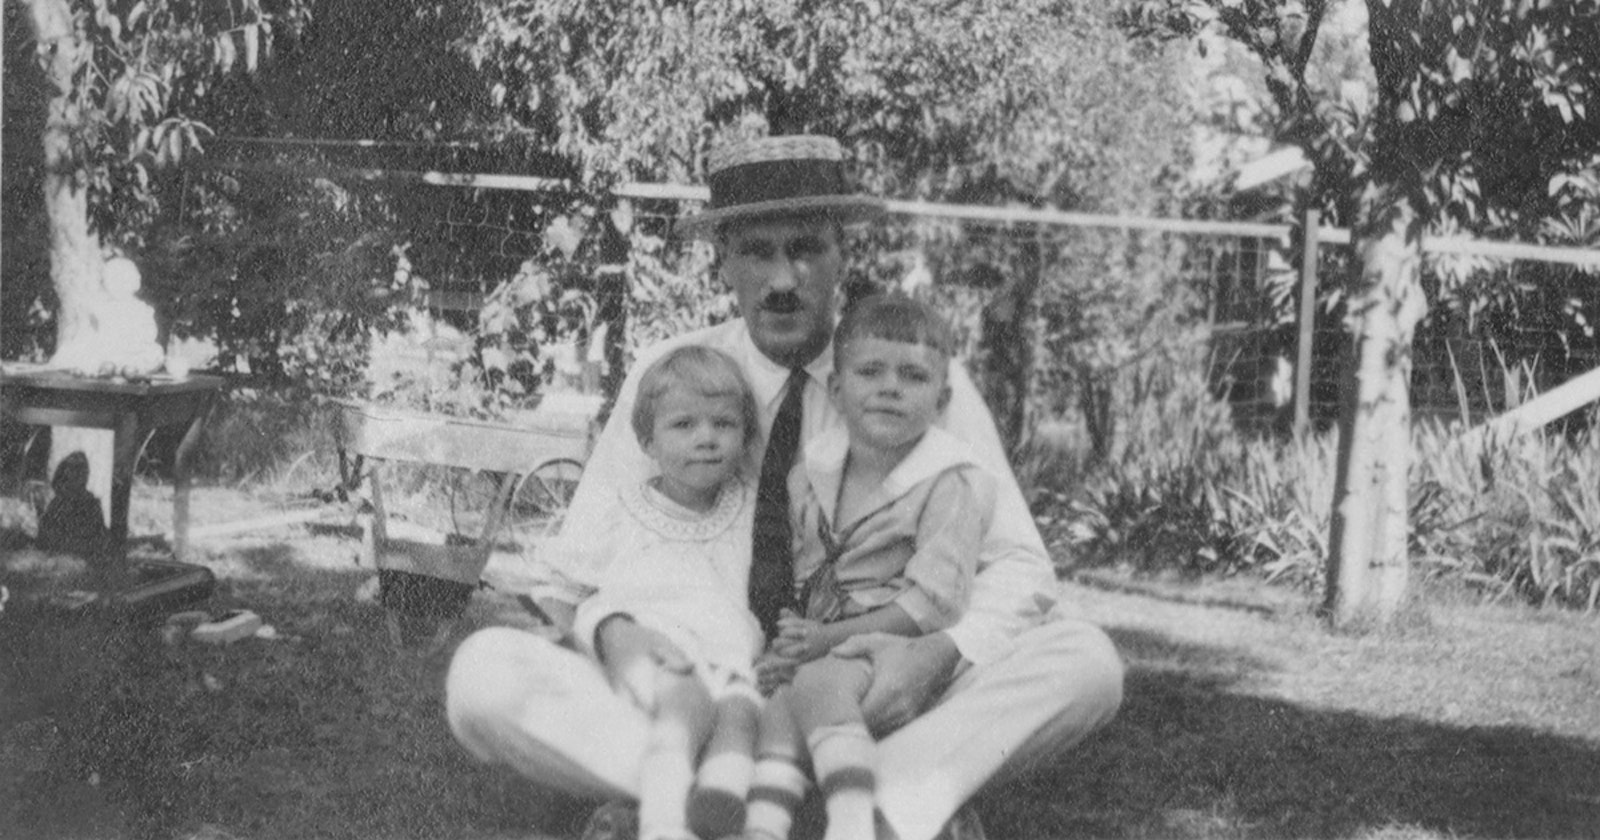
Jacqueline based her shawl on the one her grandfather knitted during World War I.
Jacqueline based her shawl on the one her grandfather knitted during World War I. <a href="https://pieceworkmagazine.com/knit-an-all-shall-be-well-shawl/">Continue reading.</a>
https://pieceworkmagazine.com/cdn-cgi/image/format=auto/https://www.datocms-assets.com/75076/1656653561-02-man-and-two-kids.jpg?auto=format&w=900
Current PieceWork magazine subscribers can log in and access this bonus subscriber-exclusive PDF instantly. We hope you enjoy this project of healing originally created in 2007.
As I knit my version of my grandfather’s shawl, I found a quote running through my mind from Julian of Norwich (circa 1342–1416), an English mystic. She acknowledges the pain in life and then adds, “But all shall be well and all shall be well and all manner of things shall be well.” This comforting message spoke to me not only of the healing power of working with my hands, but also of the hope with which I am sure my grandfather, Sheldon, knit his own shawls.
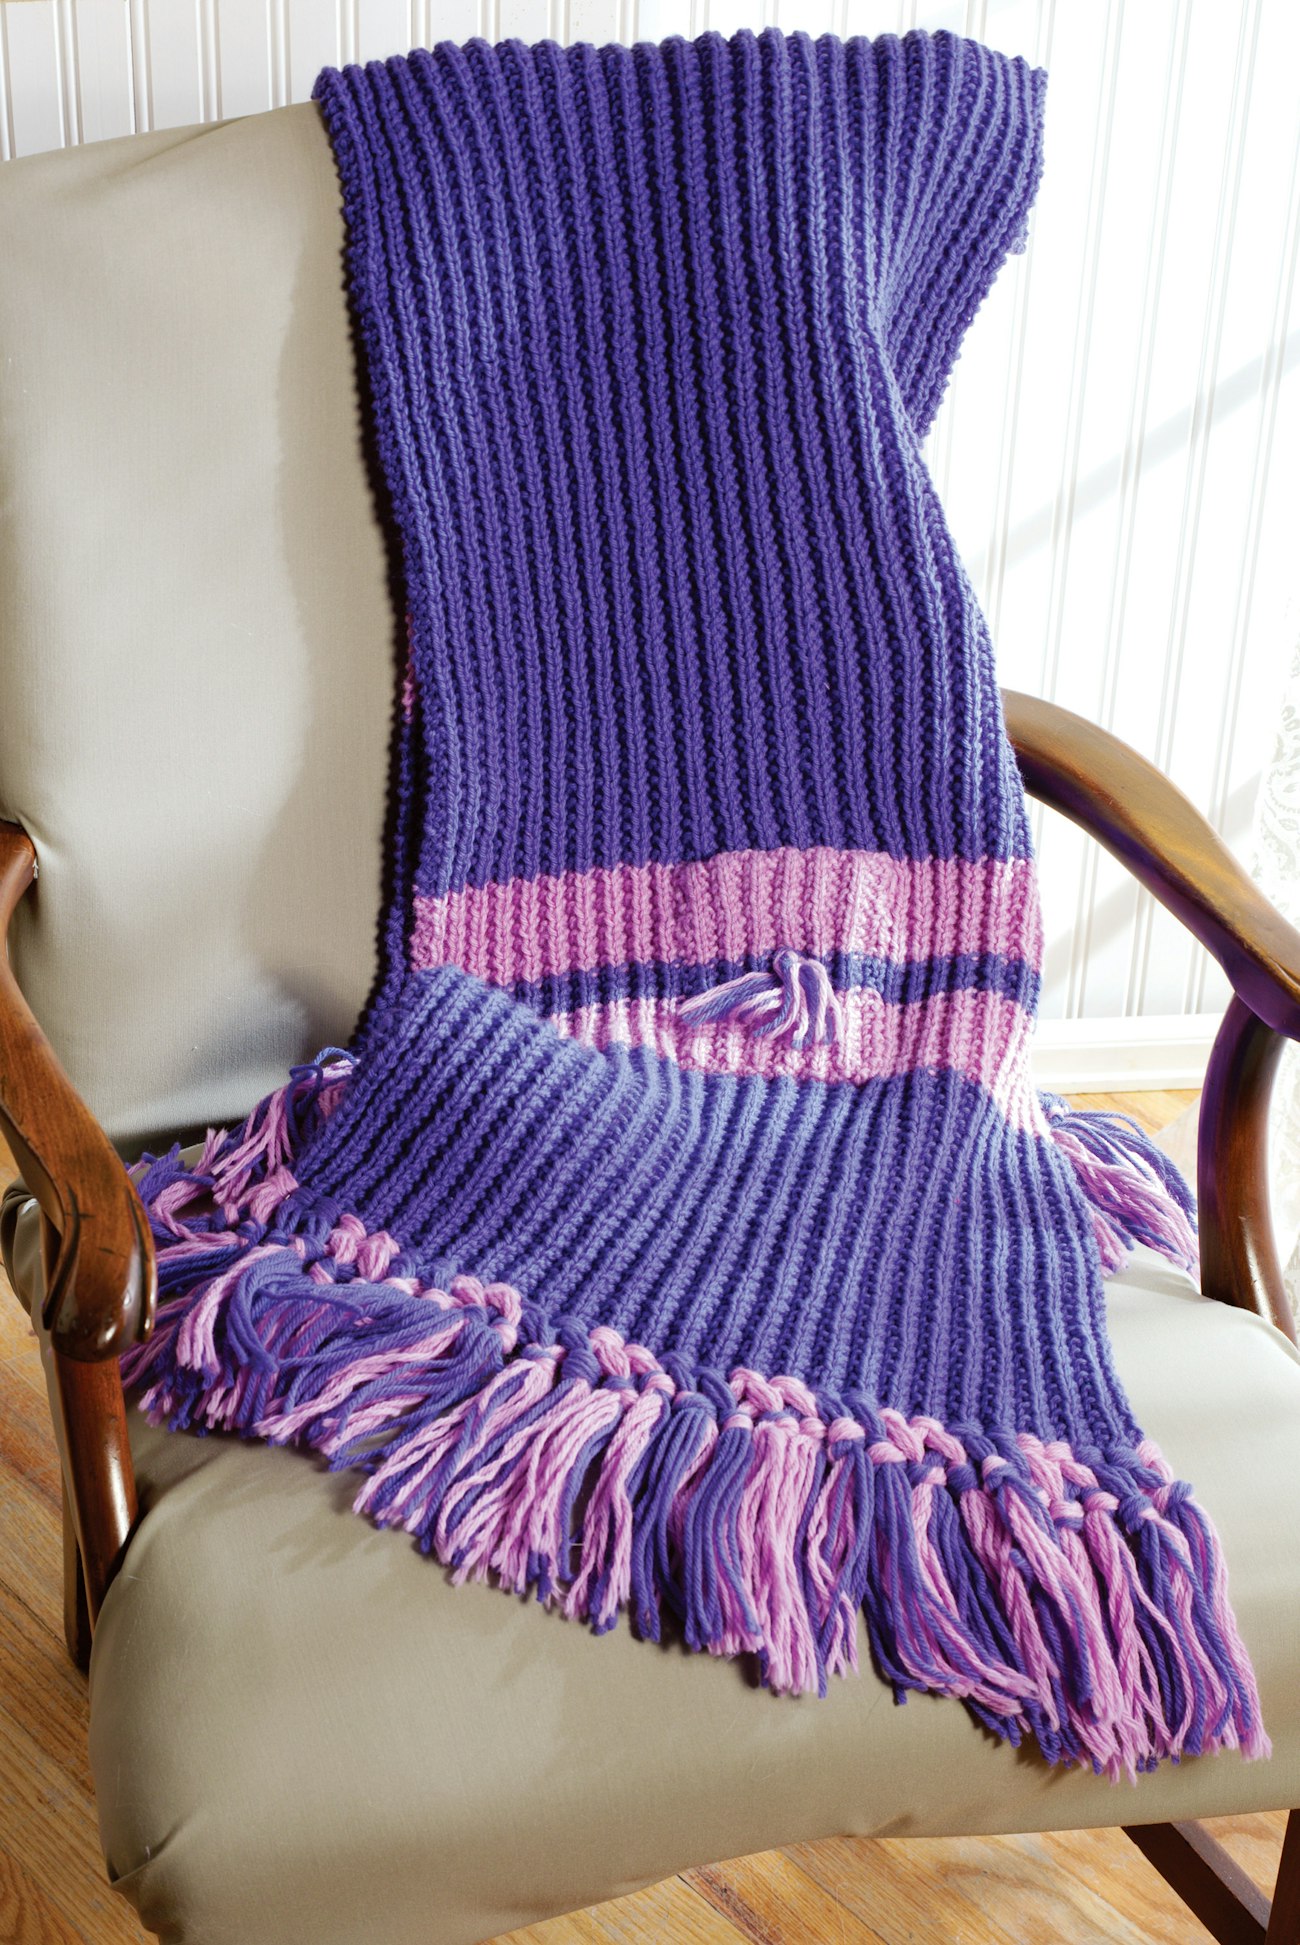 Jacqueline Blix’s modern adaptation of a shawl her grandfather knitted while convalescing from an injury he received during World War I. Photo by Joe Coca
Materials
- Cascade 220 (worsted weight), 100% wool yarn, 220 yards (201 m)/100 g skein, 5 skeins of #8888 periwinkle (main color)
- Cascade 220 Quatro (worsted weight), 100% wool yarn, 220 yards (201 m)/100 g skein, 2 skeins of #5016 pale lilac (contrasting color)
- Needles, size 9 (5.5 mm), 24 inch (61.0 cm) or longer or size needed to obtain gauge
- Crochet hook, size I/9 (5.5 mm)
- Tapestry needle
SUBSCRIBER EXCLUSIVE
Current PieceWork magazine subscribers can log in and access this bonus subscriber-exclusive PDF instantly. We hope you enjoy this project of healing originally created in 2007.
As I knit my version of my grandfather’s shawl, I found a quote running through my mind from Julian of Norwich (circa 1342–1416), an English mystic. She acknowledges the pain in life and then adds, “But all shall be well and all shall be well and all manner of things shall be well.” This comforting message spoke to me not only of the healing power of working with my hands, but also of the hope with which I am sure my grandfather, Sheldon, knit his own shawls.
Jacqueline Blix’s modern adaptation of a shawl her grandfather knitted while convalescing from an injury he received during World War I. Photo by Joe Coca
Materials
- Cascade 220 (worsted weight), 100% wool yarn, 220 yards (201 m)/100 g skein, 5 skeins of #8888 periwinkle (main color)
- Cascade 220 Quatro (worsted weight), 100% wool yarn, 220 yards (201 m)/100 g skein, 2 skeins of #5016 pale lilac (contrasting color)
- Needles, size 9 (5.5 mm), 24 inch (61.0 cm) or longer or size needed to obtain gauge
- Crochet hook, size I/9 (5.5 mm)
- Tapestry needle
[PAYWALL]
Finished size: About 69 x 15 1⁄2" (175 x 39 cm), excluding fringe
Gauge: 28 sts and 26 rows = 4" x 4" (10.2 cm), unblocked
Visit pieceworkmagazine.com/abbreviations for terms you don’t know.
Mistake Rib Pattern Stitch
(multiple of 4 sts plus 3)
Row 1 and all subsequent rows: * K2, p2; rep from * to last 3 sts, end k2, p1.
Instructions
Notes: The rib pattern produces fabric that looks the same on both sides. Choose one side to be the RS, and change colors consistently, always beginning the new color by starting with a RS row. You may find it helpful to mark the RS with contrasting scrap yarn or a safety pin to identify it more easily.
Shawl
With MC, CO 111 sts. Introducing each new color beg with a RS row (see Notes), work rib pattern in stripes as follows:
9 inches (22.9 cm) MC, 2 1⁄4 inches (5.7 cm) CC, 1 inch (2.5 cm) MC, 2 1⁄4 inches (5.7 cm) CC, 40 inches (101.6 cm) MC, 2 1⁄4 inches (5.7 cm) CC, 1 inch (2.5 cm) MC, 2 1⁄4 inches (5.7 cm) CC, 9 inches (22.9 cm) MC—piece measures about 69 inches (175 cm) from CO. BO all sts in pattern. Weave in ends.
Pocket
CO 27 sts with CC. Work rib pattern in stripes as follows, beg each new color with a RS row as for shawl: 2 1⁄4 inches (5.7 cm) CC, 1 inch (2.5 cm) MC, 2 1⁄4 inches (5.7 cm) CC. Beg on a RS row, p 2 rows for fold line. K next row, dec a total of 5 sts—22 sts. Work in St st (k on RS rows, p on WS rows) for about 1 1⁄2 inches (4 cm) for facing at top edge of pocket. BO all sts. Weave in ends.
Block the pocket. Make the pocket tassel by cutting four 12-inch (30.5-cm) strands of each color. Knot the strands together in the middle using a square knot (tied right strands over left, then left strands over right). Adjust strands into pleasing arrangement and trim to desired length. Center the knot on MC pocket stripe on RS of the pocket as shown, sew the tassel in place with yarn threaded on the tapestry needle, and weave in sewing tails on WS. Fold the top edge of the pocket down along the fold line, and sew the facing to the inside of the pocket using a 12-inch (30.5-cm) length of yarn and the tapestry needle. Center the pocket in the middle of the shawl, aligning the stripe patterns, and sew the pocket in place around the sides and bottom.
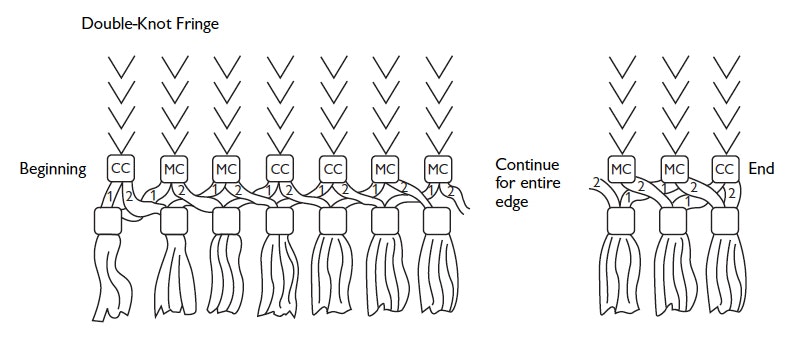
Double-Knot Fringe
Note: The shawl is trimmed on each end with 28 knots of fringe, 14 each MC and CC. The color order of the knots begins with 1 knot of CC at the edge, followed by (2 knots MC, 2 knots CC) 6 times, ending with 2 knots MC, 1 knot CC at other edge.
Align each fringe knot with a column of k sts across the CO or BO edge of the shawl; there will be 27 k columns, so the last knot corresponds to the 3 stitches at the end of the row.
For each fringe knot, cut eight strands of yarn 18 inches (45.7 cm) long. Fold the eight strands in half to create a loop at one end. With RS of shawl facing and beg at one side, insert the crochet hook into the edge of the shawl from
the back to the front about 1 row up from the end of the shawl. Draw the fringe loop through from front to back, then pass the ends of the fringe knot through the loop, and snug the knot into place against the edge of the shawl so that the fringe ends are even. Continue in this manner, following the color order given above.
When all the fringe knots are in place, beg at the left edge of the shawl, divide the first CC and MC knots into two halves of eight strands each, and flip the right-hand halves up and out of the way on the surface of the shawl. Knot the left-hand section of the first CC fringe to the left-hand section of the adjoining MC fringe (both marked 1 in the illustration above) about 1 inch (3 cm) below the original knot. Divide the next MC knot (third knot from the left edge) into two halves of eight strands each, again placing the right-hand section out of the way. Bring the right-hand section of first CC knot (marked 2 in the illustration) down and over the MC strands of the previous knot, and tie it to the left-hand half of the second MC knot. Continue in this fashion, using the illustration as a guide. Trim the fringe ends even. Rep for other end.
“Knit an “All Shall Be Well” Shawl” PDF download
Click here to get the PDF download of “Knit an “All Shall Be Well” Shawl”
Download PDF
Jacqueline Blix has been knitting for ten years and quilting for more than twenty. Her interest in history made researching this article a pleasure. Coauthor with her husband, David Heitmiller, of Getting a Life: Strategies for Simple Living Based on the Revolutionary Program for Financial
Freedom, “Your Money or Your Life” (New York: Penguin Putnam, 1999), she lives in Seattle, where she has served on the board of the Pacific Northwest Needle Arts Guild and is a member of the Seattle Knitters Guild.
Originally published May 28, 2021; updated May 8, 2024.