Subscriber Exclusive
Embroider a Globe
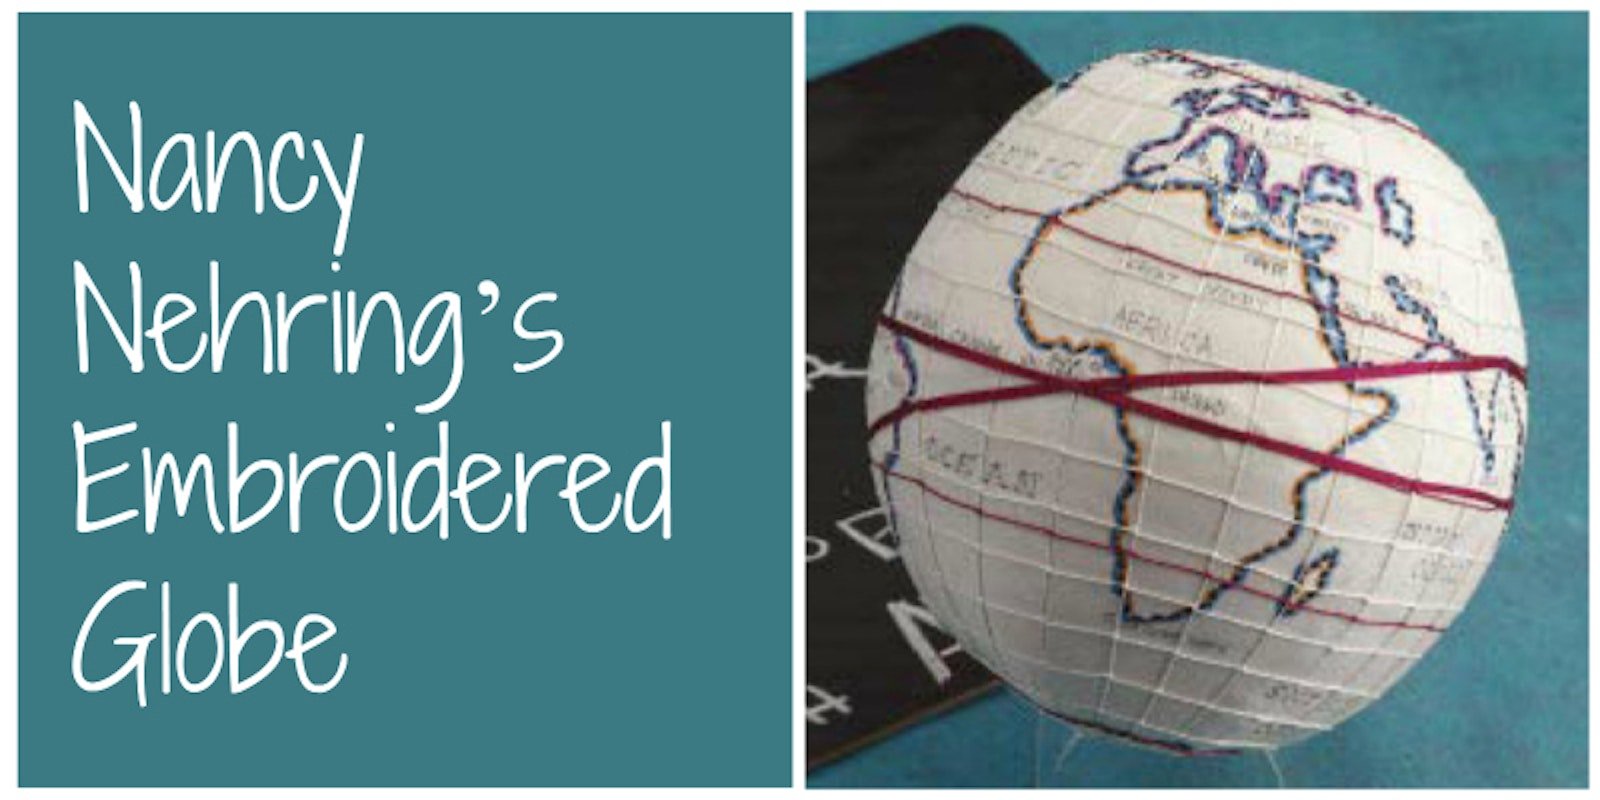
From about 1804 until 1844, young schoolgirls at Westtown School, a boarding school in Pennsylvania established by Quakers in 1799, embroidered globes, both terrestrial and celestial.
From about 1804 until 1844, young schoolgirls at Westtown School, a boarding school in Pennsylvania established by Quakers in 1799, embroidered globes, both terrestrial and celestial. <a href="https://pieceworkmagazine.com/embroider-a-globe/">Continue reading.</a>
https://pieceworkmagazine.com/cdn-cgi/image/format=auto/https://www.datocms-assets.com/75076/1656655383-nancy-nehring-embroidered-globe.jpeg?auto=format&w=900
From about 1804 until 1844, young schoolgirls at Westtown School, a boarding school in Pennsylvania established by Quakers in 1799, embroidered globes, both terrestrial and celestial. Used to teach geography in the early decades of the nineteenth century, real globes were expensive; thus, a stitched globe was an economical way for a young girl not only to learn her lessons but to practice her needlework. For more details, see Judith A. Tyner's article "Stitching the World: Westtown School's Embroidered Globes" in the September/October 2004 issue of PieceWork.
Our embroidered globe is based on ones available between 1800 and 1840 and features place names in use during that period. Placing the finished globe on an egg cup, a low candlestick, or an acrylic base are three options for display. Personalize your globe with your initials and the year you made it.
Materials
- Broadcloth, 100% silk fabric, ivory, 12 x 22 1/2 inches (30.5 x 57.2 cm), 1 piece
- Medium-weight canvas, 100% cotton, ivory, 12 x 22 1/2 inches (30.5 x 57.2 cm), 1 piece
- YLI Thread, 100% silk 1000-denier thread, 22 yards (20/m)/card, 1 card each of black, ivory, and red
SUBSCRIBER EXCLUSIVE
From about 1804 until 1844, young schoolgirls at Westtown School, a boarding school in Pennsylvania established by Quakers in 1799, embroidered globes, both terrestrial and celestial. Used to teach geography in the early decades of the nineteenth century, real globes were expensive; thus, a stitched globe was an economical way for a young girl not only to learn her lessons but to practice her needlework. For more details, see Judith A. Tyner's article "Stitching the World: Westtown School's Embroidered Globes" in the September/October 2004 issue of PieceWork.
Our embroidered globe is based on ones available between 1800 and 1840 and features place names in use during that period. Placing the finished globe on an egg cup, a low candlestick, or an acrylic base are three options for display. Personalize your globe with your initials and the year you made it.
Materials
- Broadcloth, 100% silk fabric, ivory, 12 x 22 1/2 inches (30.5 x 57.2 cm), 1 piece
- Medium-weight canvas, 100% cotton, ivory, 12 x 22 1/2 inches (30.5 x 57.2 cm), 1 piece
- YLI Thread, 100% silk 1000-denier thread, 22 yards (20/m)/card, 1 card each of black, ivory, and red[PAYWALL]
- John James Needle, embroidery size 7
- Sewing thread, ivory
- IBC Silk Pins, super fine (.5 mm), 1 3/8 inches (3.5 cm) long, glass head, 250/box, 1 box
- Fiberfill
- Mechanical pencil, 0.5 mm
- Pigma Micron 01 Permanent Marking Pen, 1 mm, black
- Fabric Dye Brush Pens, permanent pigment, 1 package of 6 colors
Finished size: 5 1/2 inches (14.0 cm) in diameter
Download the patterns here. Patterns may be photocopied for personal use only.
Patterns A and B
Land Form Pattern 1
Land Form Pattern 2
Land Form Pattern 3
Land Form Pattern 4
Instructions:
Notes: Use one strand of thread throughout.
Construct the inner canvas base: Trace pattern pieces A and B on paper and cut out. Working on the back of the canvas, align the grain line of the larger pattern (A) with the grain of the fabric. Trace the outer line of the pattern with the pencil; repeat eleven more times. To indicate the seam allowances, center the smaller pattern (B) inside the previously traced larger patterns on the fabric and trace around the smaller pattern. Cut out all the pieces along the outside lines.
 |
|
Backstitch |
 |
|
Cross-stitch |
 |
|
Running stitch |
Sew the pieces together to form the canvas base: With right sides facing, stab a pin straight down through the top point of two pieces; repeat at the right-hand corner. Pin the seam lines on the right-hand side in two or three places. With sewing thread doubled and knotted, stitch small backstitches along the pinned seam line, starting and ending exactly at the corner and the point. Remove the pins. Repeat until all the pieces are paired. Backstitch the remaining long sides of three pairs into a half sphere. Repeat for the three remaining pairs to form the other half sphere; leave a 1 1/2-inch (3.8-cm) opening in the center of the last seam. Press the seams open. With right sides facing, pin and backstitch the two half spheres together. Turn the sphere right side out through the opening. Fill with fiberfill (the fiberfill should be packed firmly and distributed evenly). Slip-stitch the opening closed.
Construct the outer silk cover: Working on the right side of the silk, align the grain line of the larger pattern (A) with the grain of the fabric. Trace the outer line of the pattern with the pencil; repeat eleven more times. Using a light source and pencil, center and lightly trace the twelve pattern pieces with the land forms inside the previously traced larger patterns. Mark the asterisks with small dots; do not trace the letters and numbers. Cut out all the pieces along the outside lines.
Backstitch the silk pieces together as for the inner canvas base to form the two half spheres, pressing the completed seams open as construction progresses; refer to the land-form patterns for proper placement when pairing pattern pieces (for example, the side of the pattern piece labeled E 60 should be joined with the corresponding piece also labeled E 60). Along the 180-degree longitude lines (E 180 joins W 180), stitch only 2 inches (5.1 cm) from each pole toward the equator (doing so creates the opening for inserting the inner canvas base later). With right sides facing, pin and backstitch the two half spheres together, ensuring that the 180-degree longitude lines are aligned.
Using small running stitches and the black silk thread, stitch the outlines of the land forms. Ensure that all seam allowances are open before you stitch across them.
Insert the inner canvas base through the open seam of the silk cover: Begin by turning the silk cover partially inside out; the seams and poles of both the canvas base and the silk cover should be aligned. Secure by pinning the seam of the Prime Meridian (0-degree line) to the canvas base. Place this seam on a table; squeeze the canvas base to make it smaller and pull the silk cover over it. Pin and slip-stitch the opening of the silk cover closed. Remove all pins.
With the fabric pens, draw along the running stitches, using blue on the water sides of the stitches and any color but blue on the land sides of the stitches. Refer to the land-forms patterns and list of place names for reference.
To wrap the longitude lines: Place pins in the globe around the equator every 15 degrees (which roughly corresponds to the time zones), dividing the space between the vertical seam lines into four sections (each section will be approximately 3/4 inch [1.9 cm] wide along the equator); place pins half the distance between the equator and the poles around the globe again dividing the space between the vertical seam lines into four sections (each section will be approximately 1/2 inch [1.3 cm] wide); place one pin in each pole. Tie a slipknot around the pin at the South Pole, leaving a 6-inch tail. Firmly, but not so firmly as to cause indentations, wrap the ivory silk thread continuously around all the longitude lines of the globe, starting at the 180-degree longitude line. Tie ends together; bury each tail inside the globe by taking a 1 1/2-inch (3.8-cm) stitch in the globe; clip tails.
Add the line for the equator: Using the red thread, begin at the intersection of the equator and the 180-degree longitude by leaving a 6-inch (15.2-cm) tail and tying a slipknot around a pin; wrap around the equator four times, using pins to hold the wraps parallel and in place. To anchor, wrap once more, using the same thread and stitching a cross-stitch over all the wrapped threads at every other intersection with the longitude lines and through the silk fabric. Tie ends together; bury each tail inside the globe by taking a 1 1/2-inch (3.8-cm) stitch in the globe; clip tails.
Mark the latitude lines with a pencil dot every 10 degrees (1/2 inch [1.3 cm] apart) along each longitude wrapped line. Place pins at each mark. Using the ivory silk thread, stitch the latitude lines above and below the equator from pole to pole: Bring the thread up on the left side of a longitude line and take a long stitch to the right toward the pin on the next longitude line. Couch down with a tiny backstitch over each intersection with the longitude lines; continue around the globe. Repeat for the other latitude lines.
Add the Tropic of Cancer and the Tropic of Capricorn latitude lines at 23 degrees, about 1 1/4 inches (3.2 cm), north and south of the equator, respectively); use one wrap of the red silk thread and stitch as for the latitude lines; backstitch at the intersections with the longitude lines. Add the Arctic and the Antarctic Circles in the same manner at 66 degrees north and south, about 1 1/4 inches (3.2 cm) from the poles.
Place pins at the dots that correspond to the asterisks of the pattern and wrap the ecliptic line, using the same number of wraps and cross-stitches as when you stitched the equator. The threads that run above the pin at the Tropic of Cancer and below the pin at the Tropic of Capricorn will pass the equator at 180 and 0 degrees longitude as they are wrapped around the globe. Remove all pins.
Using the black permanent pen, write the place names on the globe, making sure that the labels are within and/or evenly spaced across outlines, latitudes, and longitudes. Refer to the land-forms patterns and list of place names for reference; the names of the oceans and continents are larger than other place names. (See list of place names below.)
| Place Names |
| 1. Pacific Ocean
2. Ecliptic
3. Tropic of Capricorn
4. New Guinea
5. New Holland
6. Mongels
7. Chinese Empire
8. Borneo
9. Siam
10. Sumatra
11. Asia
12. Bay of Bengal
13. Ceylon
14. India
15. Indian Ocean
16. Southern Ocean
17. Persia
18. Arabia
19. Turkey
20. Europe
21. Mediterranean
22. Egypt |
23.Great Desert
24. Africa
25. Congo
26. C. of Good Hope
27. Gulf of Guinea
28. Newfoundland
29. Atlantic Ocean
30. Tropic of Cancer
31. Equatorial Coloure
32. Brazil
33. C. Horn
34. South America
35. New Amazonia
36. Patagonia
37. Straight of Magellan
38. Hudson Bay
39. Canada
40. North America
41. Orleans
42. Florida
43. Gulf of Mexico
44. California |
About the Designer: Nancy Nehring of Sunnyvale, California, writes about historical needlework; her most recent book isTunisian Crochet (Little Rock, Arkansas: Leisure Arts, 2004). Her Irish-crochet doll dress won first place in the crochet/tatting category in PieceWork's Needleworker of the Year Award 2003.
Posted February 20, 2014. Updated September 29, 2017.
From September/October 2004 issue of PieceWork.