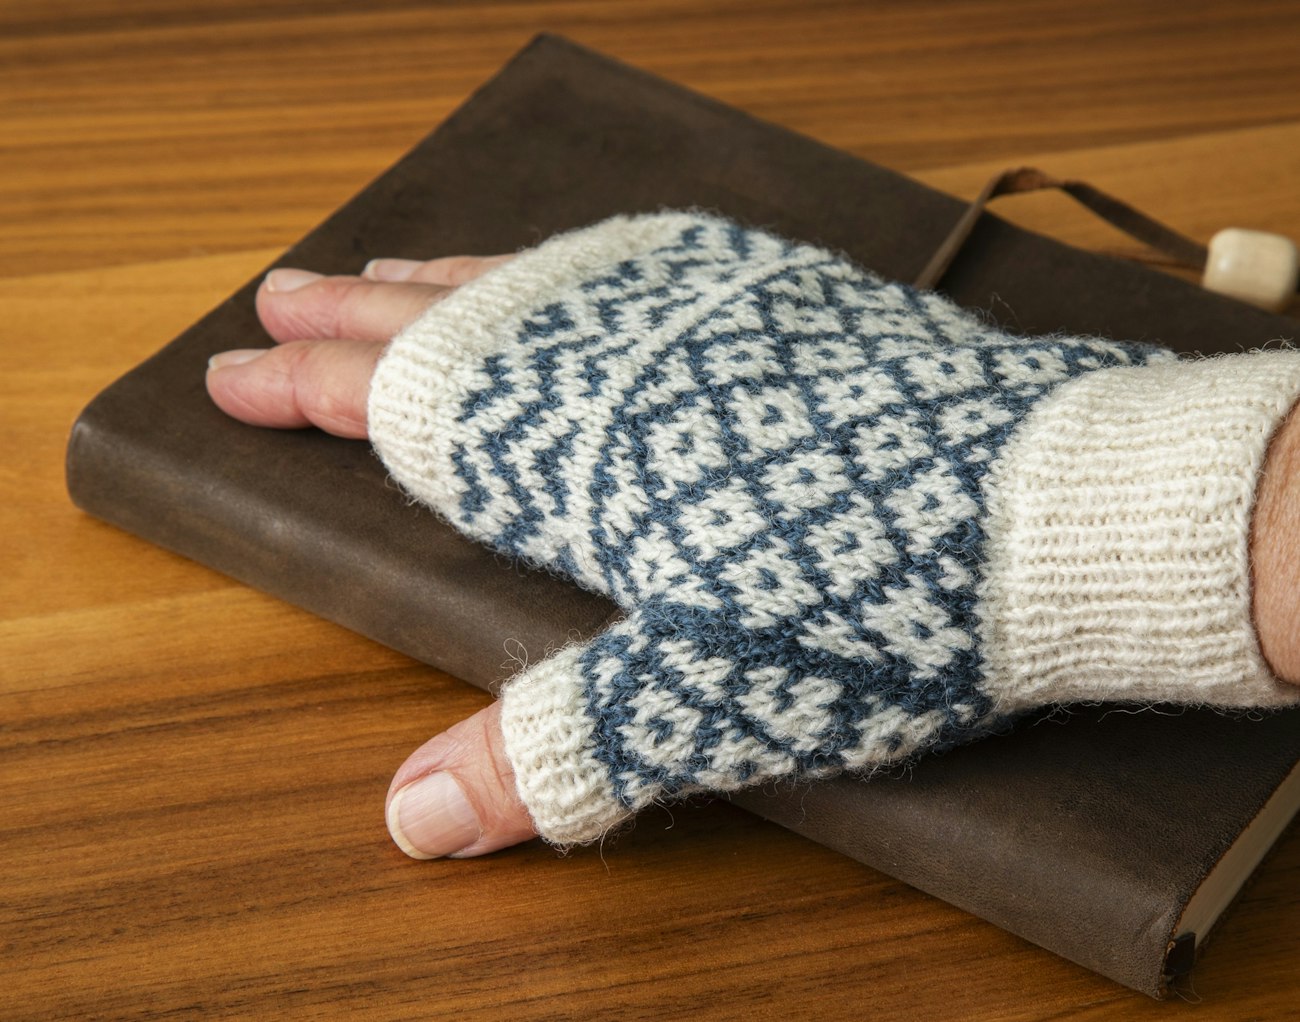
https://pieceworkmagazine.com/cdn-cgi/image/format=auto/https://www.datocms-assets.com/75076/1775766824-260305_pwfall26-1363-anderson-mitts-header-mg.jpg?auto=format&w=900
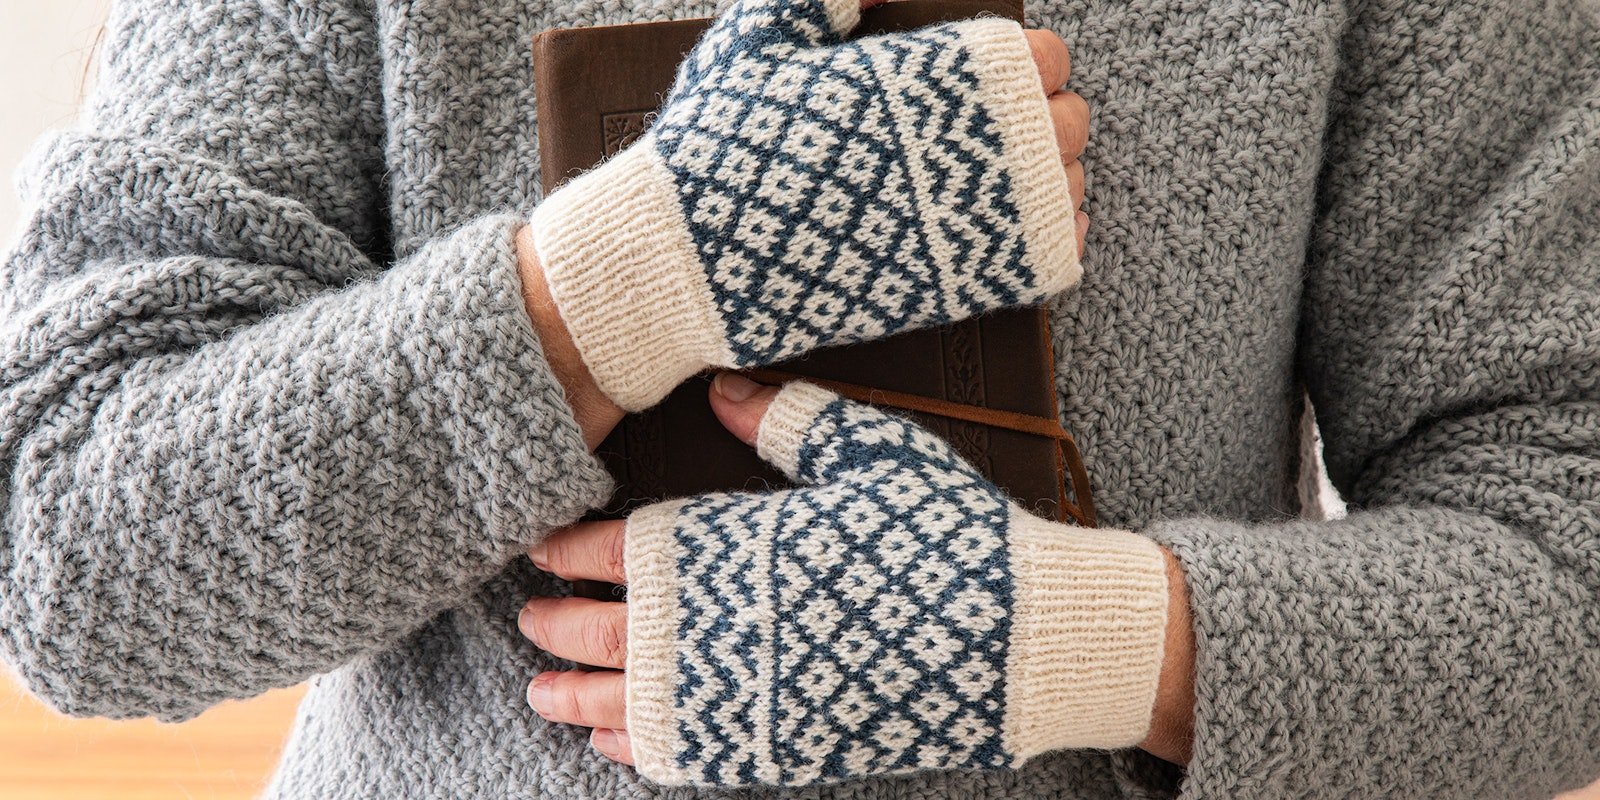
Continuing our deep dive into the world of blue and white, we’re sharing the fabulous Echoes in Indigo Fingerless Mitts pattern by Elaine Anderson. She told us that she’s always loved playing with motifs and color combinations, usually going for a large range of colors. Aware that she may have overlooked the possibilities of a two-color palette, Elaine began looking for historical examples with this color limitation. The twelfth-century socks and textile fragments she discovered amazed her. The more she learned about them, the more compelled she felt to recreate the patterns. —PieceWork editors
Subscribers can log in to get the pattern instructions below. Not a subscriber? Learn more about all the perks.
Echoes in Indigo Fingerless Mitts
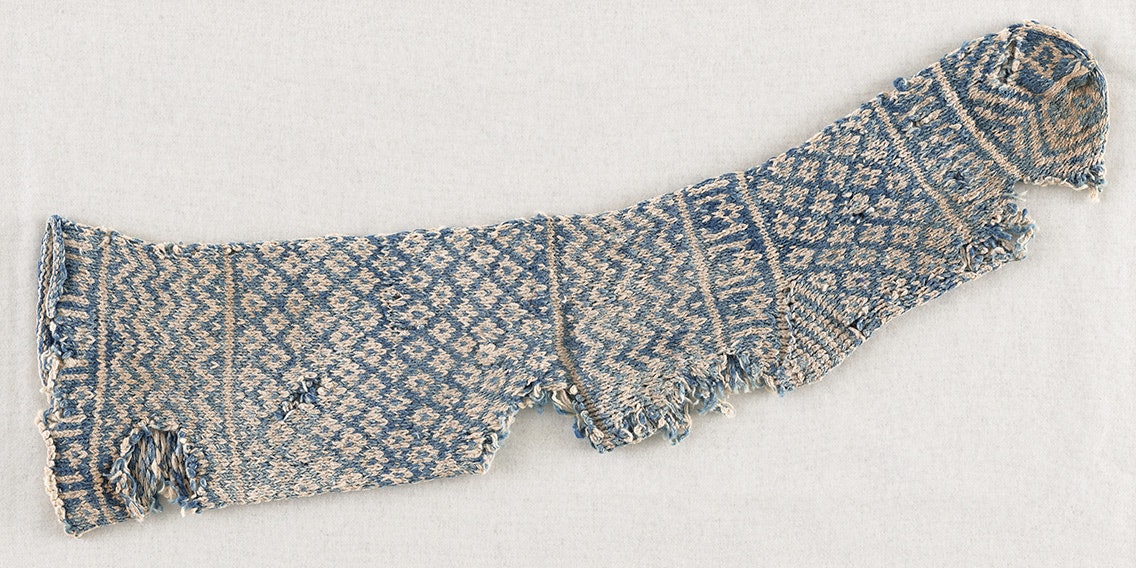
These fingerless mitts were inspired by surviving colorwork sock fragments dating from circa 1100–1400 AD and originating in North Africa. I have recreated the intricate blue and white patterns from photographs of an extant piece in the George Washington Textile Museum. The original socks were likely plant-dyed using either indigo or woad. I chose Earth, a natural indigo-dyed fingering weight yarn from Glasgow dyer Woollenflower, for this pattern to keep the historic link.
Click on the photos below to get a closer look.
Materials
• Jamieson & Smith 2-ply Jumper Weight (100% Shetland wool), fingering weight, 114 yd (105 m)/0.88 oz (25 g): 1 (1, 1, 2) ball(s) of Shade 1A Natural White (MC)
• Woollenflower Earth (100% wool blend of Exmoor Blueface and Zwartbles), fingering-weight, 473 yd (400 m)/3.5 oz (100 g): 1 skein of Deep Night (indigo, CC)
• Needles: size 1 (2.25 mm) set of double-pointed needles (dpns); and size 2 (2.75 mm) set of dpns, or size needed to obtain gauge in colorwork pattern
• Small stitch holder for thumb
• 3 markers (1 for beginning of rnd and 2 in a contrasting color to mark gusset)
• Tapestry needle
[PAYWALL]
Finished size: 6¾ (7½, 8¼, 9)" (17.1 [19, 21, 22.9] cm) palm circumference and 6 (6¼, 6½, 7½)" (15.2 [15.9, 16.5, 19.1] cm) long.
Gauge: 32 sts and 38 rnds = 4" (10.2 cm) in colorwork pattern using larger needles.
Visit pieceworkmagazine.com/abbreviations for terms you don’t know.
Special Stitches
M1L (make 1 left) lift the running thread between the stitch just worked and the next stitch from front to back, and knit into the back of this thread
M1R (make 1 right) lift the running thread between the stitch just worked and the next stitch from back to front, and knit into the front of this thread
Notes
Both mitts are worked the same and can be worn on either hand.
You may substitute 20 to 30 grams of an alternative fingering-weight wool yarn for Woollenflower Earth.
Fingerless Mitts
Cuff
With smaller needles and MC, use the long-tail method to CO 54 (60, 66, 72) sts. Distribute sts evenly over dpns, pm in color for start of rnd, and join for knitting in the rnd, being careful not to twist sts. Rnds begin on pinky side of hand.
Next rnd: *K1, p1; rep from * to end.
Rep the last rnd until piece measures 1½" (3.8 cm), or your preferred cuff length; longer cuffs may require more yarn.
Lower Hand and Thumb Gusset
Change to larger dpns.
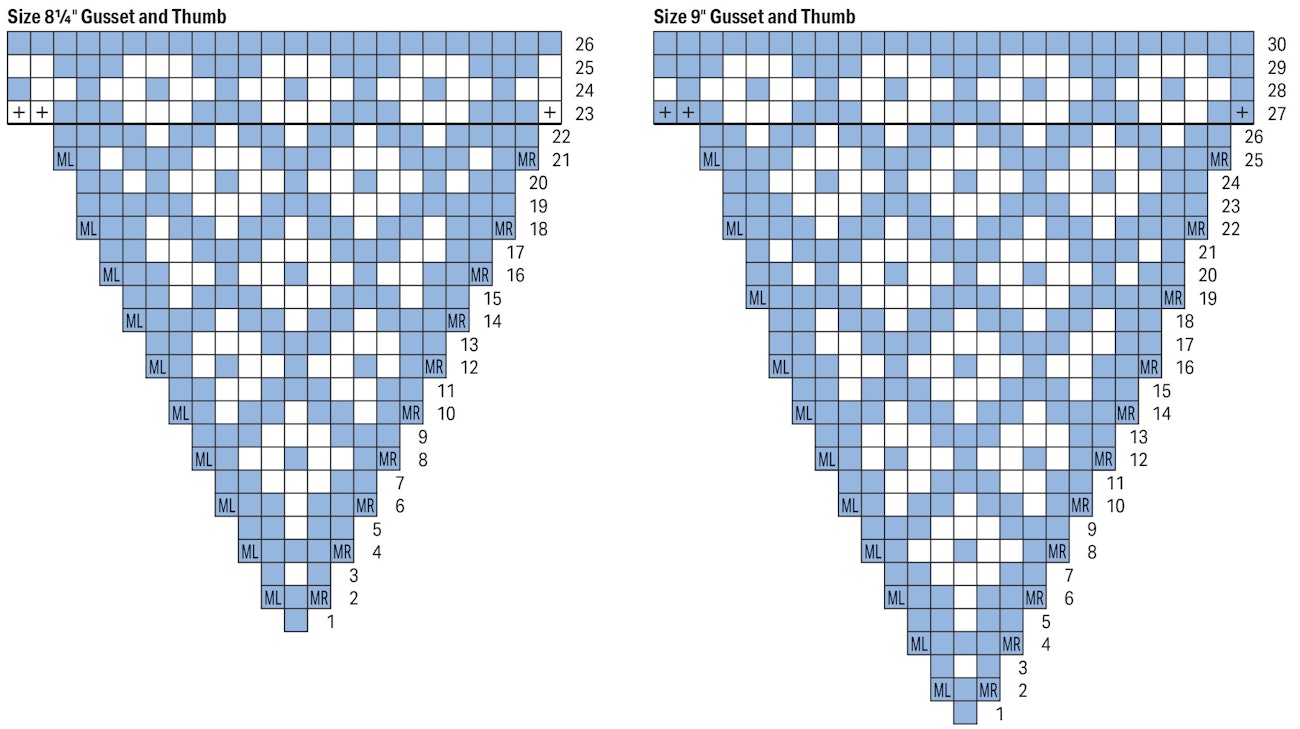
Next rnd: With MC, k27 (30, 33, 36), pm in contrast color to mark beginning of gusset, knit to end of rnd.
Next rnd: With MC, knit to m, sl m, M1L, pm in contrast color to mark end of gusset, knit to end of rnd—55 (61, 67, 73) sts; 1 gusset st between m, 27 (30, 33, 36) sts each side of gusset.
Join CC.
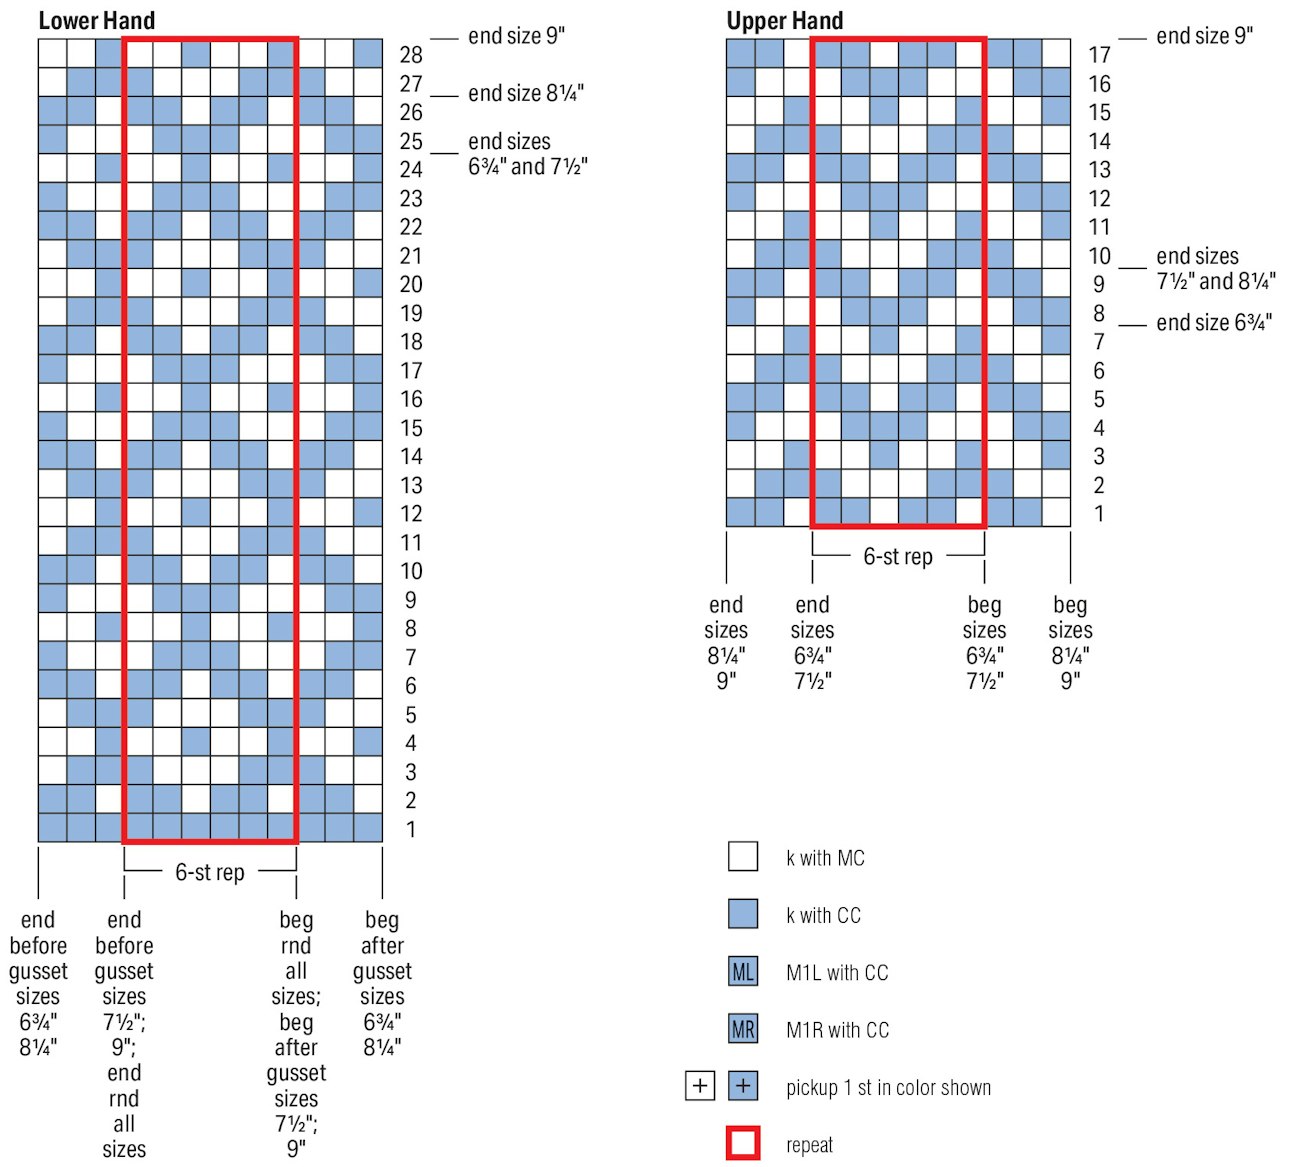
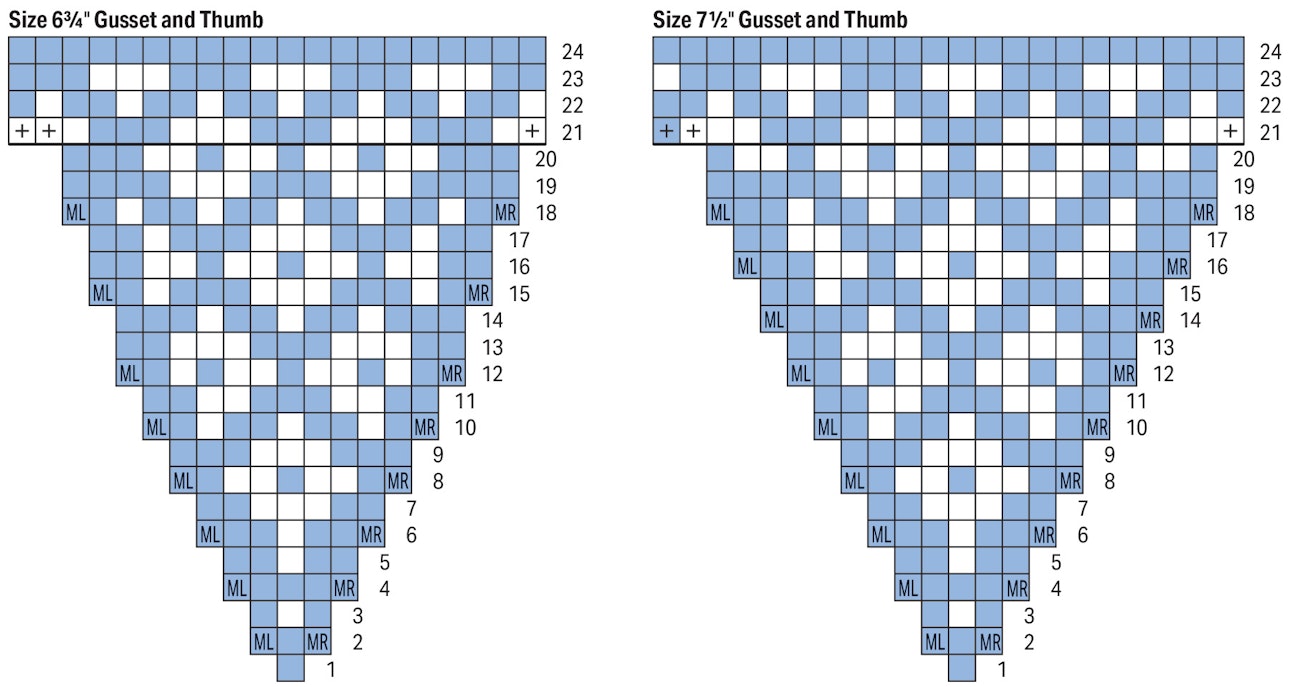
Next rnd: Beginning at the start of the pattern repeat box for all sizes, work Rnd 1 of Lower Hand chart over 27 (30, 33, 36) sts ending where indicated for your size before gusset; sl m, work Rnd 1 of Gusset and Thumb chart for your size over 1 st, sl m; beginning where indicated for your size after gusset, work Rnd 1 of Lower Hand chart over 27 (30, 33, 36) sts, finishing at the end of the pattern repeat box for all sizes.
Increasing gusset sts as shown, continue chart patterns as established until Rnd 20 (20, 22, 26) of charts have been completed—71 (79, 87, 95) sts; 17 (19, 21, 23) gusset sts between m, 27 (30, 33, 36) sts each side of gusset.
Rnd 21 (21, 23, 27): Work 27 (30, 33, 36) sts of Lower Hand chart, remove first gusset m, place 17 (19, 21, 23) gusset sts on holder, sl second gusset m to righthand needle, work 27 (30, 33, 36) sts of Lower Hand chart—54 (60, 66, 72) sts.
Continue in established chart pattern until Rnd 24 (24, 26, 28) has been completed.
Upper Hand
Knit 1 rnd with CC.
Knit 2 rnds with MC.
Next rnd: Removing gusset m in center as you come to it, work Rnd 1 of Upper Hand chart over 54 (60, 66, 72) sts, beg and ending where indicated for your size.
Continue in established chart pattern until Rnd 7 (9, 9, 17) has been completed.
Try the mitt on, and work more rnds in the established pattern if a longer mitt is preferred. Lengthening the mitt may require more yarn.
Break CC.
Knit 2 rnds with MC—piece measures 5½ (5¾, 6, 7)" (14 [14.6, 15.2, 17.8] cm) from CO without any length adjustment.
Top Ribbing
Change to smaller dpns.
Work in k1, p1 rib as for cuff for 4 rnds—piece measures 6 (6¼, 6½, 7½)" (15.2 [15.9, 16.5, 19.1] cm) from CO.
BO in rib pattern.
Thumb
Place 17 (19, 21, 23) thumb sts on larger dpns, distributing the sts as evenly as possible.
With RS facing, join MC and CC, and using the Gusset and Thumb chart for your size work the next rnd as follows:
Rnd 21 (21, 23, 27): Pick up and knit 1 st in corner of thumb using the color shown, work 17 (19, 21, 23) sts in pattern, pick up and knit 2 sts in corner of thumb using the color(s) shown, and pm for start of rnd—20 (22, 24, 26) sts.
Redistribute sts evenly if necessary, and work 3 more rnds of thumb chart, ending with Rnd 24 (24, 26, 30).
Break CC.
With MC, knit 1 rnd. To adjust length, knit all sts with MC until thumb measures 5/8" (1.6 cm) less than desired length.
Change to smaller dpns.
Work in k1, p1 rib as for cuff for 5 rnds.
BO in rib pattern.
Finishing
Using tapestry needle, weave in all ends, do not trim.
To smooth out stitches, wet-block your mitts to size, either with mitten blockers, by pinning, or by laying out flat as preferred. Once dry, trim the woven-in ends.