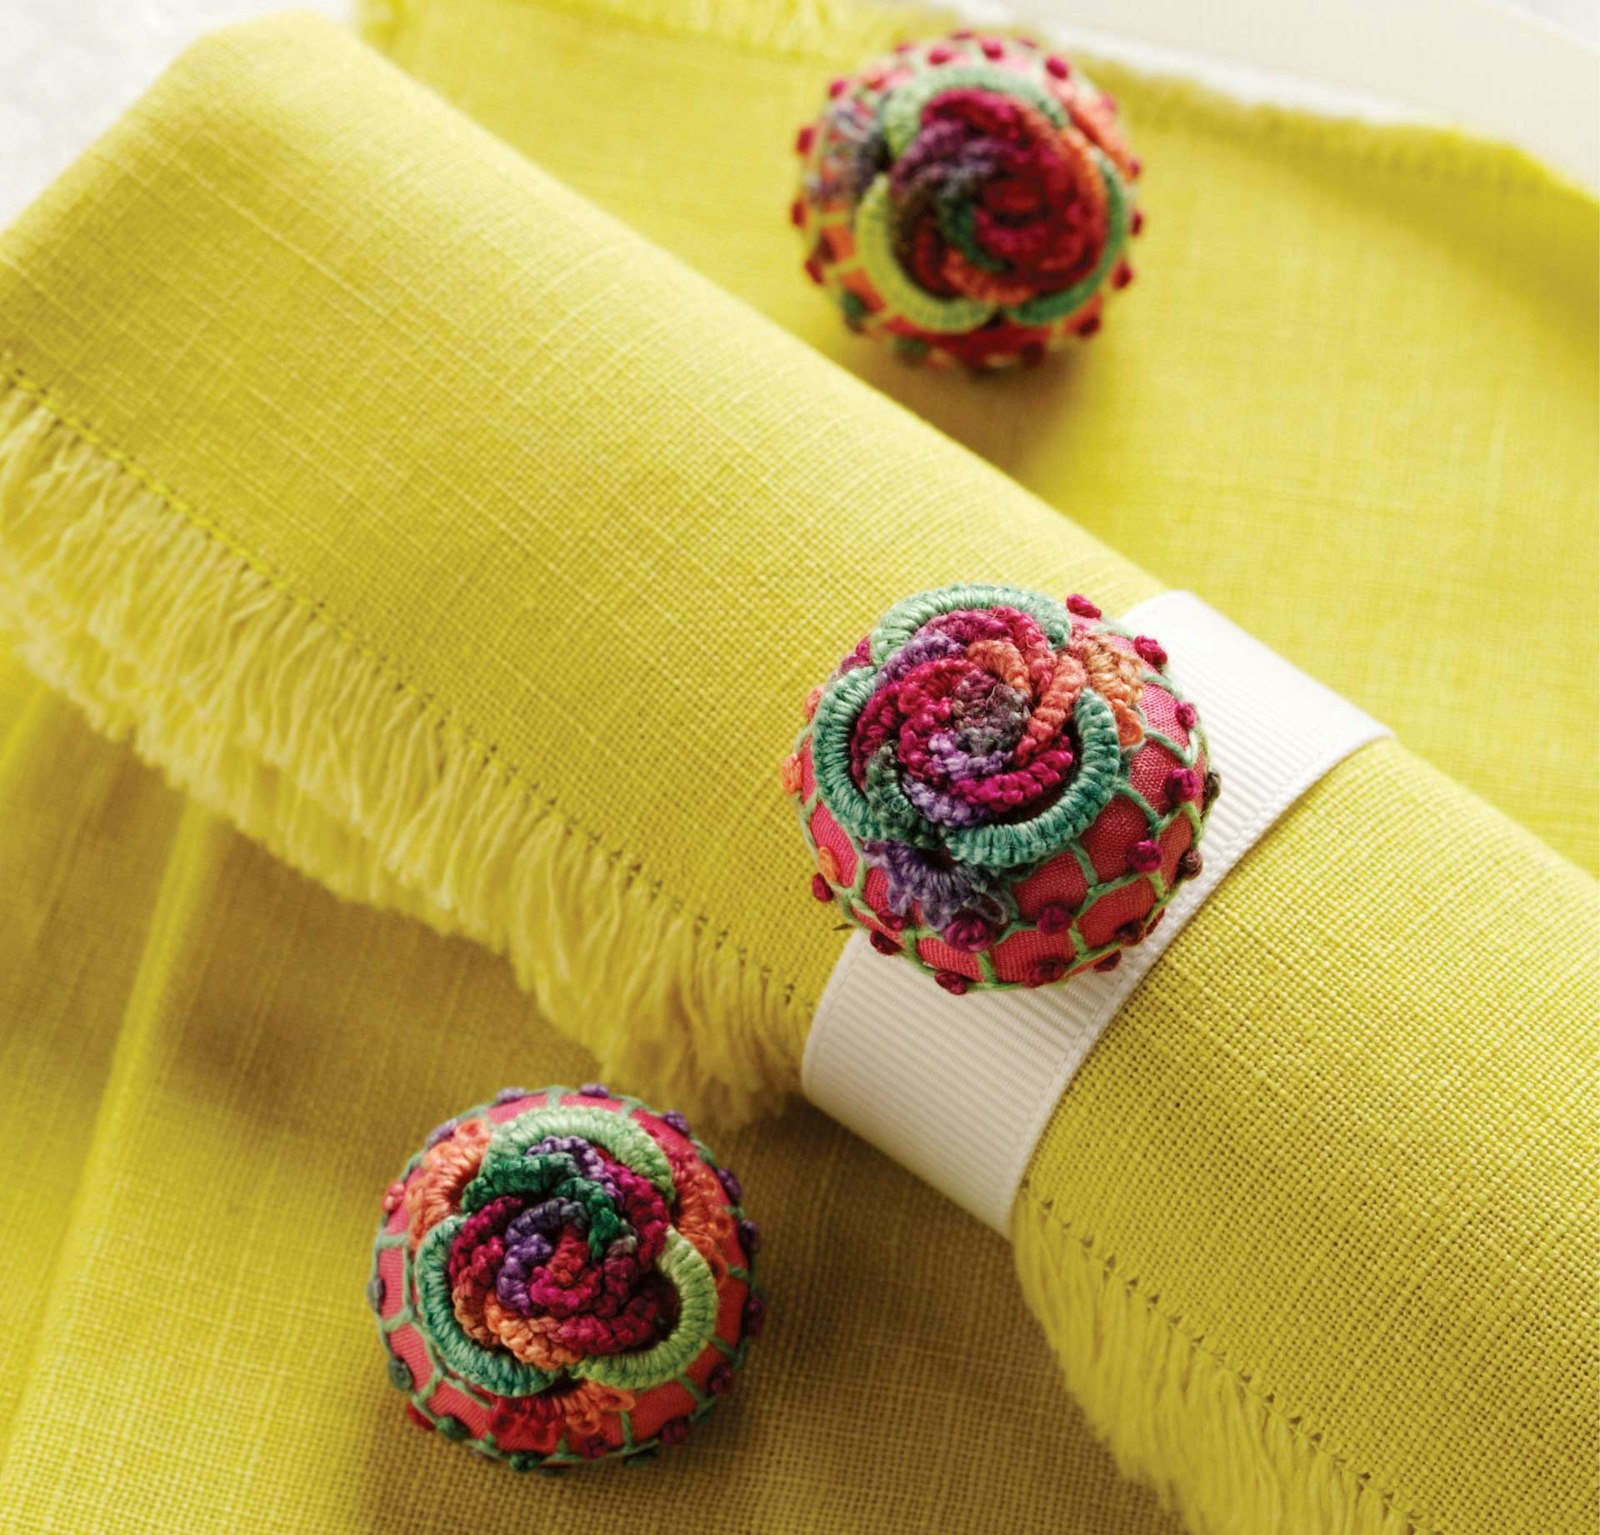
As a child, I loved looking at pictures of my great-grandmother in elegant lawn and lace blouses fastened by ivory-colored Dorset buttons. I have been fascinated with clothing and buttons since and have started to experiment with different needlework techniques to create my own handmade buttons. I named the buttons shown here “Tandletons,” a word derived from the techniques used, tatting and needlelace, and the function of the item, a button.
General Instructions
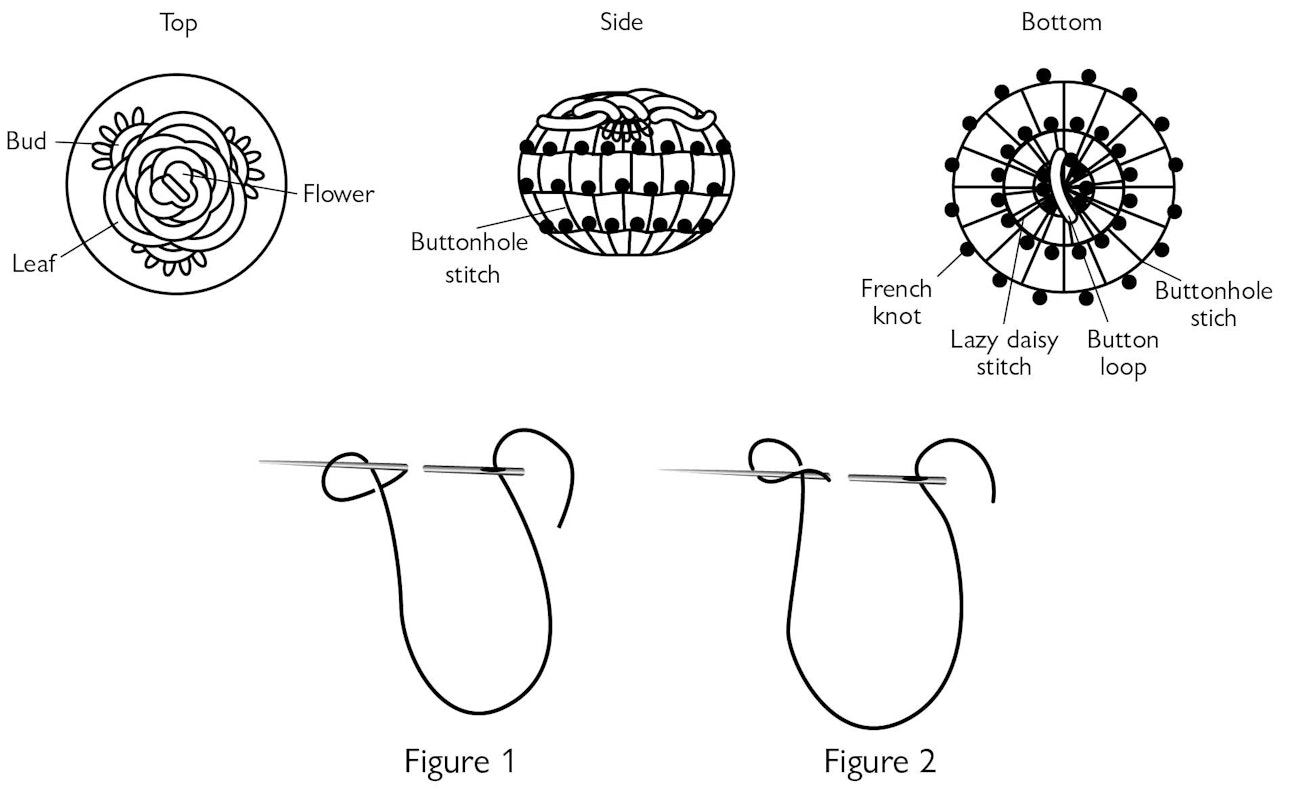
For embroidery stitches: Thread milliners needle with 1 yard (.9 m) of embroidery thread. When thread is down to 5 inches (12.7 cm), exit the tail through the bottom of the button; rethread another 1-yard (.9-m) length. Bring the needle up through the section of the gathered stitches at the bottom of the button and into position to begin the stitch. Leave a 5-inch (12.7-cm) thread tail, exiting from the bottom of the button; tail will be buried later with a French knot.
For tatting: A single tatted knot is comprised of two double half hitches cast onto the needle in different directions, forming one lark’s-head knot. Thread milliner’s needle with 1 yard (.9 m) of embroidery thread. Insert the needle to the left side of what will be the finished length of the looped stitch (see Figures 1 and 2). Take a stitch into the button from right to left, exiting the needle through the beginning point. Do not pull the needle all the way through the button; leave the working thread hanging below the needle. Work the first half of knot by placing your finger from left to right under the thread exiting from the button, turn your finger to the left over the base thread; insert the needle into the loop formed over your finger back to front. Pull the thread down the needle to the button. Work the second half of knot by placing your finger under the thread from right to left, turn your finger to point up and bend it into your palm; insert the needle into the loop formed over your finger from front to back. Pull the thread down the needle to the button. Use a uniform firm tension for each knot. Repeat the above steps for each double knot. When the required number of double knots are formed, grasp the knots with the left hand and pull the needle through both the fabric and the knots with the right hand, tightening the working thread firmly down and to the right. Take the needle down through the fabric to the right side of the looped stitch and up through the fabric to begin a new looped stitch. For picots, leave a short length of thread on the needle before the second half of the knot is completed and a loop or picot will form between the finished knots.
Ending threads: Thread a tail through the milliner’s needle and work a 2-wrap French knot into the open space of fabric around the button loop. Exit the needle at any spot through the base of the button, avoiding embroidery stitches and cut off excess thread. Repeat for each thread tail, filling in the open spaces around the button loop between the lazy daisy stitches and the loop.
Order of Stitching
First Row: Flower center; 5 double stitches
Second Row: 5 flower center petals; 7 double stitches each
Third Row: 7–9 flower outer petals; 9 double stitches each
Fourth Row: 3 leaves; 21 double stitches each
Fifth Row: 3 buds; 5 picots each
Sixth–Ninth Rows: Buttonhole stitches
Tenth Row: Lazy daisy stitches

Christen Brown’s embroidered and needle-tatted button.
Materials
- Caron Collection Wildflowers, 100% cotton thread, 36 yards (33 m)/skein, 1 skein each of #028 Confetti and #067 Celadon
- Hanah Silk Bias Ribbon, 1 inch (2.5 cm) wide, 1 yard (.9 m) of China Doll (will make 10 buttons)
- John James Needles, sharp size 8 and milliners, size 3
- Clover Stuffing Tool
- Fairfield Polyfil, small amount
- Sewing thread, pink
Finished size: ¾ inch (1.9 cm) high and 1 inch (2.5 cm) in diameter
Instructions
Note: Refer to photographs, figures, general instructions, and stitching order (above).
Button Base
For each base: Cut ribbon 3¼ inches (8.3 cm) long. Thread sharp needle with 18 inches (45.7 cm) of sewing thread and knot one end. Fold length of ribbon in half, aligning the raw ends. With very tiny stitches, sew a ⅛‑inch (3-mm) seam allowance across ribbon width. Sew a few stitches at ribbon edge to anchor the thread but do not cut it. Position the newly stitched seam to the left and flat against the ribbon and sew long running stitches around this edge of the ribbon; do not cross over the beginning stitch. Tightly pull thread to gather ribbon and close the hole; secure the thread with several knots. Thread needle through the seam allowance to the opposite edge, stitch a knot in the seam next to the edge. Turn the ribbon right side out. Sew long running stitches around remaining edge of the ribbon; do not cross over the beginning stitch. Pull the thread slightly to create a small opening; set threaded needle aside. Using the stuffing tool, firmly fill the opening with a small amount of stuffing (if you are making a set of buttons, measure out the same amount of stuffing at this point for each button to ensure consistent shapes). Pick up the threaded needle and tightly pull the thread to gather the ribbon and close the hole; push any wayward stuffing back into the hole. Secure the thread with several knots; cut off the excess thread.
Tatted Flower
Thread milliner’s needle with 1 yard (.9 m) of Confetti. For the 1st row (see Order of Stitching), bring the needle up through the button and 1⁄16 inch (2 mm) from the center, take a ⅛-inch (3-mm) stitch, straddling the center of the button top, and cast on 5 double knots. For the 2nd row, work clockwise around the center, stitching five ⅛‑inch (3-mm) overlapping looped stitches with 7 double knots each. For the 3rd row, work clockwise around the inner circle, stitching seven to nine ¼-inch (6-mm) overlapping looped stitch petals with 9 double knots each.
For the 4th row, thread milliners needle with 1 yard (.9 mm) of Celadon. Bring the needle up through the button and under the outer ring of the flower; take a stitch under the outer ring of the flower and ⅓ of the circumference of the flower base. Cast on 21 double stitches. Stitch 2 more leaves with the ends of the looped stitches next to each other. For the 5th row, thread milliner’s needle with 1 yard (.9 mm) of Confetti and bring the needle up through the button ⅛ inch (3 mm) under one edge of a leaf. Take a ¼-inch (6-mm) stitch between 2 leaves. Cast on the following pattern of knots: 2 double stitches and one 3⁄16 inch (4 mm) picot for the first knot/complete the second half of knot; repeat this pattern for a total of 5 picots, ending with 1 double stitch. Work 2 more buds under the remaining edges of the leaves.
Embroidery
For the 6th through 9th rows, thread milliner’s needle with 1 yard (.9 mm) of Celadon. Bring needle up through the button and under the outer ring of the flower. Stitch a row of buttonhole stitches, ⅛ inch (3 mm) wide and deep, around the button. To complete the row, stitch a straight stitch into the loop of the last stitch and into the button, exiting out of the button at the middle of the first stitch to begin the next row of buttonhole stitches. Stitch 3 more rows of buttonhole stitches with the last row ending ⅜ inch (1.0 cm) in from the gathered stitches at the bottom of the button. Stitch a lazy daisy stitch into each stitch of the last row of buttonhole stitches with the base of the lazy daisy stitches touching the button-hole stitches.
Thread milliner’s needle with 1 yard (.9 mm) of Confetti and bring the needle up through the bottom of the button and to the base and centered in one of the buttonhole stitches of the first ring of buttonhole stitches. Work a 2-wrap French knot into each of the buttonhole stitches.
Button Loop
Thread milliner’s needle with 18 inches (45.7 cm) of Confetti. Bring needle up through button and out ⅛ inch (3 mm) from the gathered stitches at base of button. Take a ¼-inch (6-mm) stitch into the button from right to left, exiting the needle through the beginning point, insert the stuffing tool through the thread loop, pull the thread through the button, and tighten the thread over the tool. Stitch 2 more loops on top of the first. With the working thread to the left of the loop, work buttonhole stitches over the loop, pulling the thread firmly. Cover the entire length of the looped threads over the tool. Bring the remaining thread tail through the button, next to the gathered stitches. End the thread with a French knot: Thread a tail into milliner’s needle and stitch a 2-wrap French knot into the open space of fabric around the button loop and between the lazy daisy stitches. Exit the needle at any spot through the base of the button (avoiding any embroidered stitch) and cut off the excess thread. Repeat this step for each tail.

Christen Brown is a needlework designer, retailer, and author. Visit her website at christenbrown.com.