Subscriber Exclusive
An Icelandic Endless Knot Design to Stitch
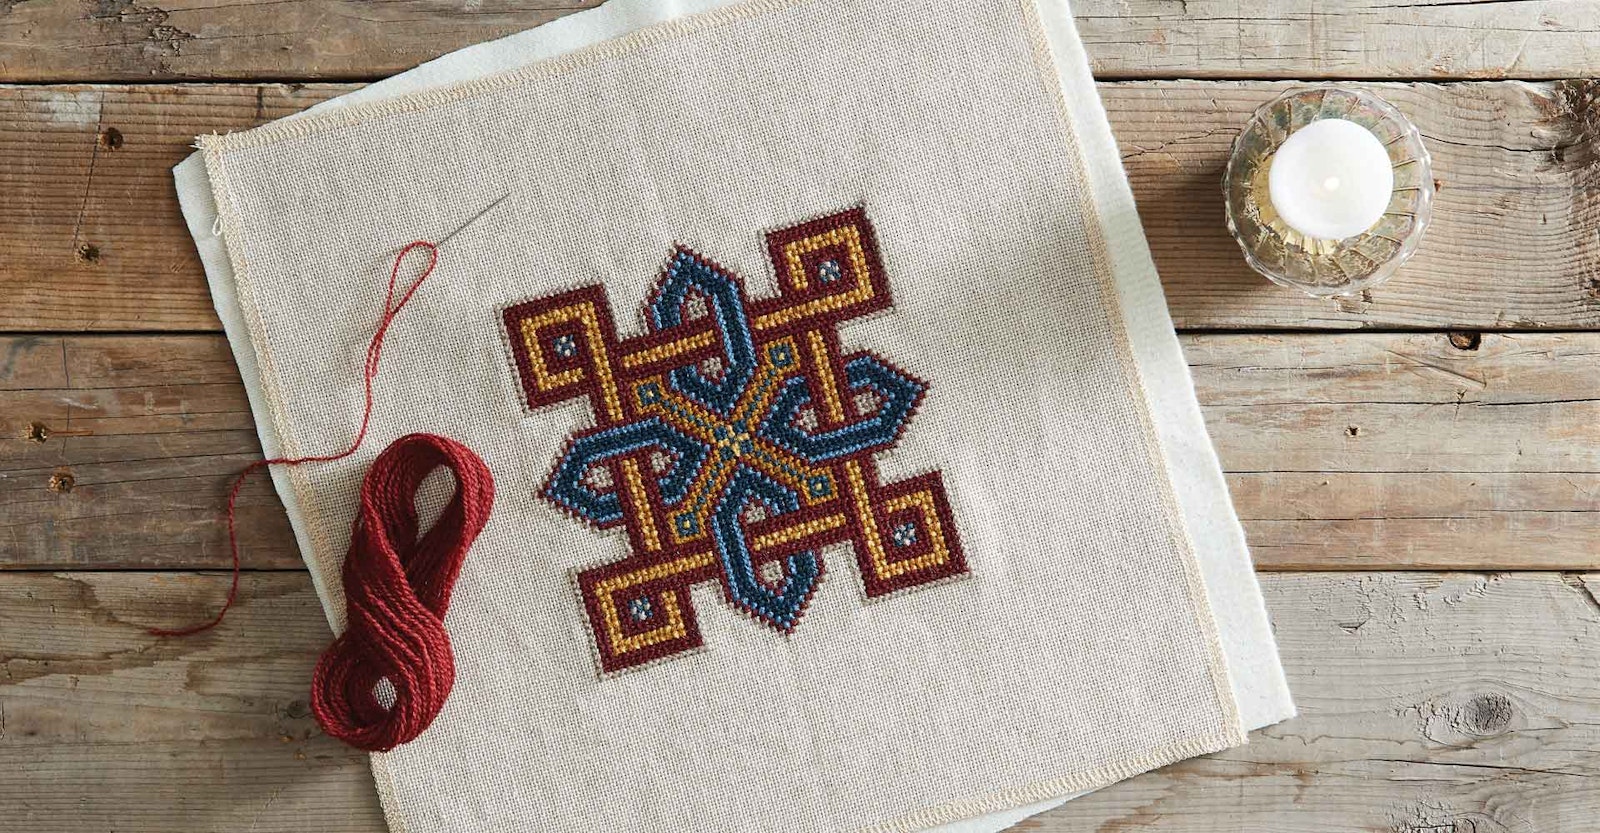
This design is entirely worked in long-arm cross-stitch, the most common stitch found in the extant traditional embroideries of Iceland.
This design is entirely worked in long-arm cross-stitch, the most common stitch found in the extant traditional embroideries of Iceland. <a href="https://pieceworkmagazine.com/an-icelandic-endless-knot-design-to-stitch/">Continue reading.</a>
https://pieceworkmagazine.com/cdn-cgi/image/format=auto/https://www.datocms-assets.com/75076/1656656857-icelandic-knot-1.jpg?auto=format&w=900
The valhnútur, Icelandic for endless knot, is a design motif that appears in several handwritten Icelandic manuscripts from the eighteenth and nineteenth centuries. This needlework version is inspired by a pattern recorded in the Skaftafell Book, drawn by an eighteenth-century farmer, Jón Einarsson. The colors for this design were inspired by a seventeenth-century bridal bench cushion in the collection of the National Museum of Iceland. This design is particularly fitting for a wedding—the two entwined knots symbolize the married couple.
Traditional Icelandic embroidery was typically worked with plant-dyed wool yarns. The Icelandic yarn manufacturer Ístex, maker of Lopi yarns, produces a laceweight yarn offered in a twenty-six-color palette that is a close facsimile, but it is hard to use with any readily available modern evenweave fabric. Appletons Wool crewel-weight (two-ply) yarn, available in more than four hundred colors, works well.
SUBSCRIBER EXCLUSIVE
The valhnútur, Icelandic for endless knot, is a design motif that appears in several handwritten Icelandic manuscripts from the eighteenth and nineteenth centuries. This needlework version is inspired by a pattern recorded in the Skaftafell Book, drawn by an eighteenth-century farmer, Jón Einarsson. The colors for this design were inspired by a seventeenth-century bridal bench cushion in the collection of the National Museum of Iceland. This design is particularly fitting for a wedding—the two entwined knots symbolize the married couple.
Traditional Icelandic embroidery was typically worked with plant-dyed wool yarns. The Icelandic yarn manufacturer Ístex, maker of Lopi yarns, produces a laceweight yarn offered in a twenty-six-color palette that is a close facsimile, but it is hard to use with any readily available modern evenweave fabric. Appletons Wool crewel-weight (two-ply) yarn, available in more than four hundred colors, works well.
[PAYWALL]
Traditional counted-thread embroideries were worked on wool tvistur, a loosely woven plain-weave or basketweave fabric. I am unaware of any modern Icelandic manufacturer of a comparable fabric. However, Zweigart makes an excellent fabric substitute in its 20-count Cork linen. When you stitch on this loosely woven fabric, it is best to place the linen in a roller frame or on stretcher bars (instead of using a hoop) to keep the fabric taut because this fabric stretches easily on the bias. Also, you can use any 28-count evenweave fabric or 14-count Aida if you work with two strands of embroidery floss; however, the design will be smaller.
This design is entirely worked in long-arm cross-stitch, the most common stitch found in the extant traditional embroideries of Iceland. In Icelandic, the stitch is called gamli krosssaumurinn (old cross-stitch) or fléttusaumur (braid stitch) because of the plaited texture the stitch creates; it is not to be confused with the braid stitch found in Hungarian needlework.
Materials
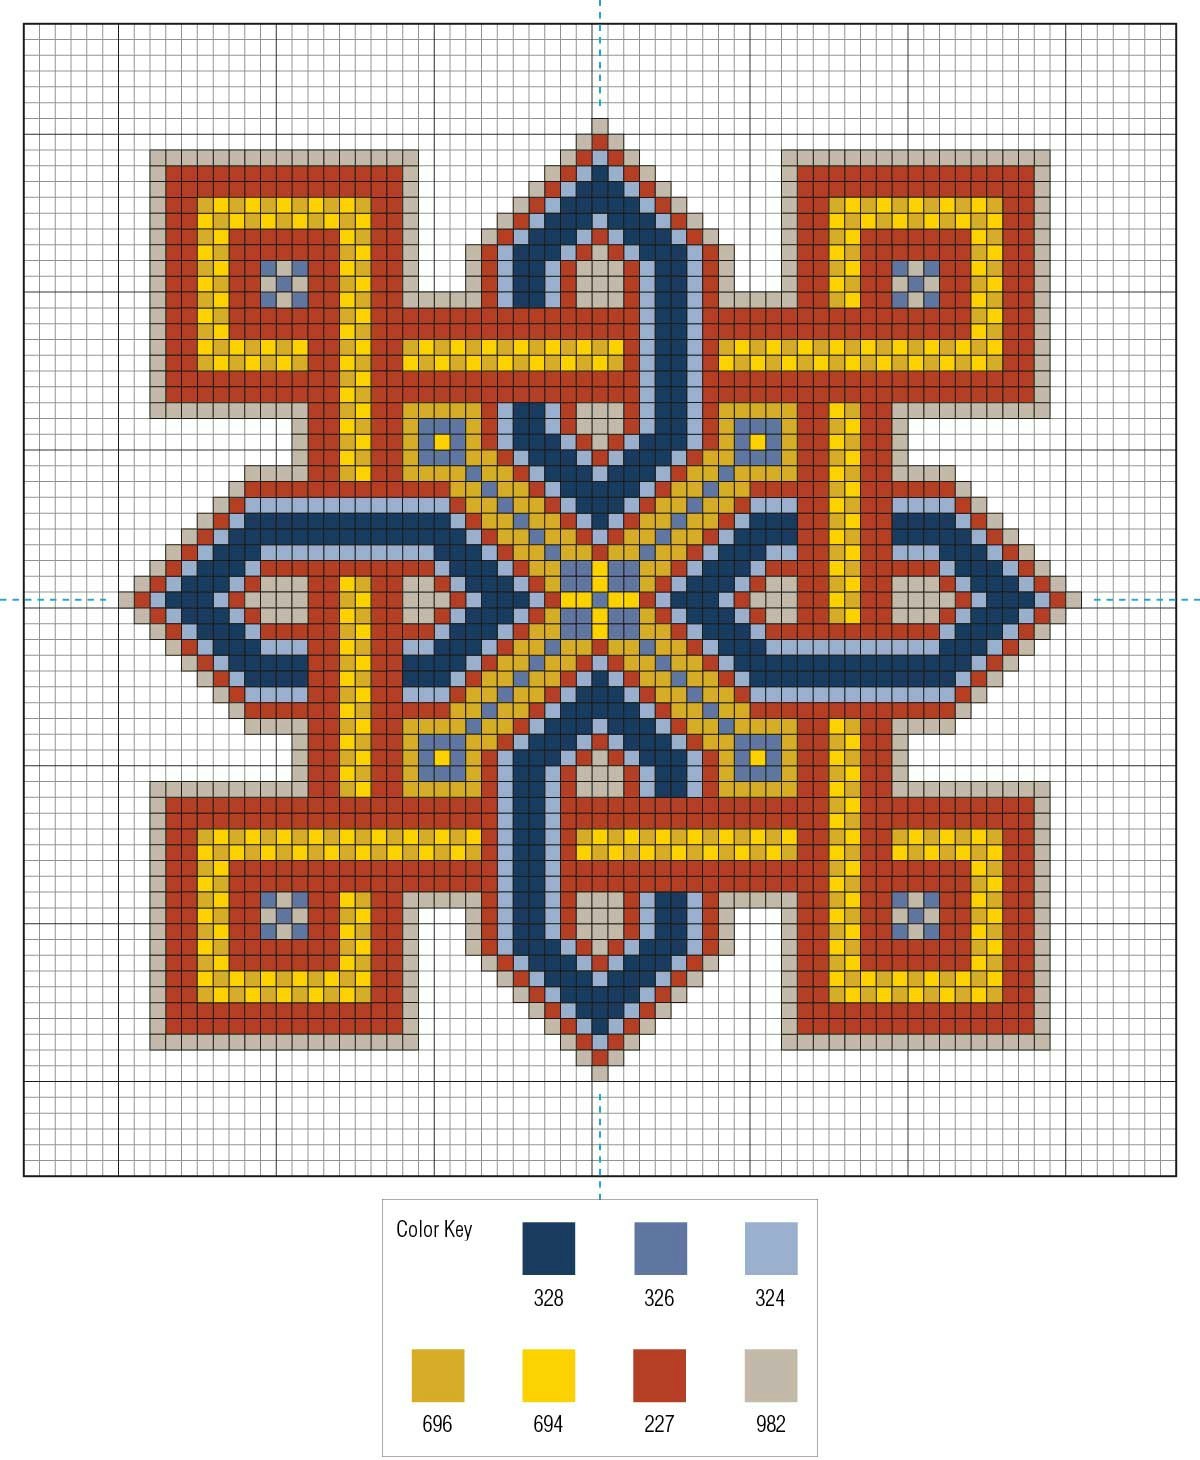
- Zweigart Cork, 20-count, 100% linen fabric, 1 piece 12 × 12 inches (30.5 × 30.5 cm) of Raw Linen, Cream, or White
- Appletons Wool, 100% wool yarn, crewel weight, 2 ply, 25 meter (27.3 yd)/skein, 1 skein each of #324, #326, and #328 Dull Marine Blue; #694 and # 696 Honeysuckle Yellow; #227 Bright Terra Cotta; and #982 Putty Groundings
- John James Needle, tapestry or petite tapestry, size 20 or 22
- Roller frame or stretcher bars to fit the width of the fabric
Finished design size: 5½ × 5½ inches (14.0 × 14.0 cm)
Instructions
Endless Knot
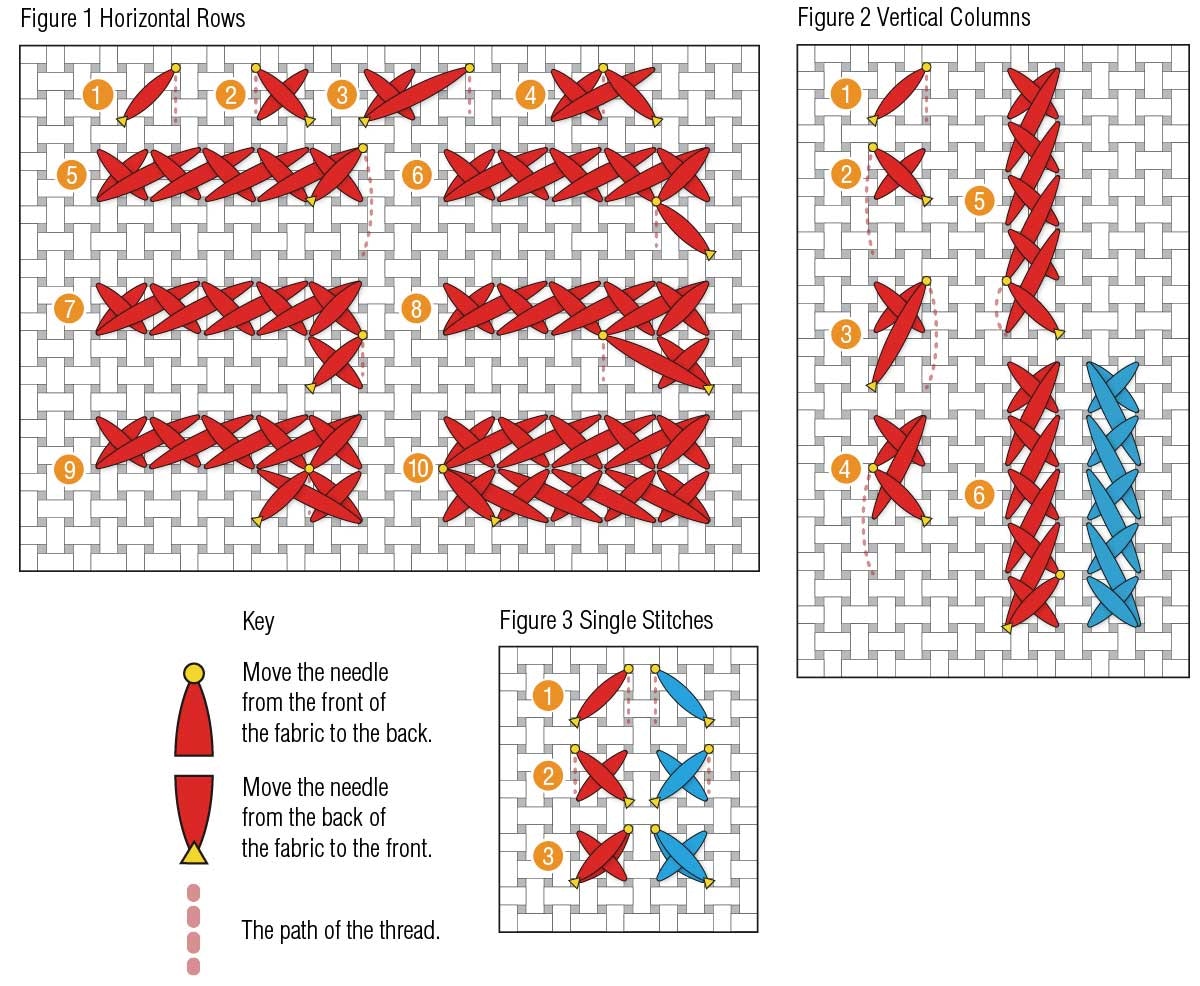
To prepare the fabric edges, use a serger, machine zigzag, or hand overcast to prevent fraying. Stitch the design, using the long-arm cross-stitch and a single strand of yarn. Cut the yarn length no longer than 12 inches (30.5 cm) to reduce wear, as wool yarns tend to become fuzzy with stitching. See the illustrations for the Figure 1 Horizontal, Figure 2 Vertical, and Figure 3 Single long-arm cross-stitches.
Notes: Be careful of the stitch tension because the warp and weft threads of this large-count fabric can shift easily. Worked in yarn, the long-arm cross stitch can be very difficult to remove if a mistake is made. It is best to use a seam ripper to cut and remove all of the stitches worked with that particular length of yarn.
Finishing
Remove the work from the frame or stretcher bars and handwash in cool water with a mild detergent; rinse until no detergent remains. Do not wring or twist the fabric to remove the water; instead, place the fabric between two terry towels and blot. Allow the fabric to air-dry flat. Place the fabric face down on a dry towel and gently iron to remove any persistent wrinkles, if necessary.

Notes on Long-Armed Cross-Stitch
Horizontal Rows
Step 1: The first arm in a row is a shortened long arm; all long arms in this row will repeat the direction of this stitch. This first row is worked from left to right.
Step 2: The second arm is another short arm; all short arms in this row repeat the direction of this stitch.
Step 3: This is the first long arm covering two horizontal and four vertical threads of the ground fabric.
Step 4: Steps 3 and 4 complete one full long-arm cross-stitch; repeat these steps to the last stitch in the row.
Step 5: The last arm in a row is a shortened long arm.
Step 6: The long arms in the adjacent rows run in the opposite direction, regardless of the color of the stitches. As with the previous row, the first arm is a shortened long arm; all long arms in this row will repeat the direction of this stitch. This second row is worked from right to left.
Steps 7–9: These steps mirror Steps 2–4 in the previous row. Repeat Steps 8 and 9 to the end of the row.
Step 10: As with the previous row, the last arm in the row is a shortened long arm.
Vertical Columns
Long-arm cross-stitch can also be worked in vertical columns, although only one column is recommended; stitches should be worked primarily in horizontal rows. Columns can be worked downward or upward. As with horizontal stitches, each column starts with a shortened long arm (Step 1). Repeat Steps 3 and 4 until the end of the column (Step 5). The last leg of the column is a shortened long arm (Step 6).
Single Stitches
Single stitches can be worked as a regular two-arm cross-stitch. For consistent loft, single stitches should be worked with three short arms with the first and last arm worked in the same direction.
— Justin Allan-Spencer

Illustrations by Justin Allan-Spencer


