ADVERTISEMENT

An 1863 Embroidered-Ticking Notecase

Stitch and sew a charming embroidered-ticking bag based on an 1863 pattern.

Colleen Formby Jan 19, 2022 - 11 min read

An 1863 Embroidered-Ticking Notecase Primary Image

Stitch and sew a charming embroidered-ticking bag to store your treasured possessions. Colleen based her project on the “46. Embroidered Note-Case” instructions from The Lady’s Newspaper, May 23, 1863. Photos by Matt Graves unless otherwise noted

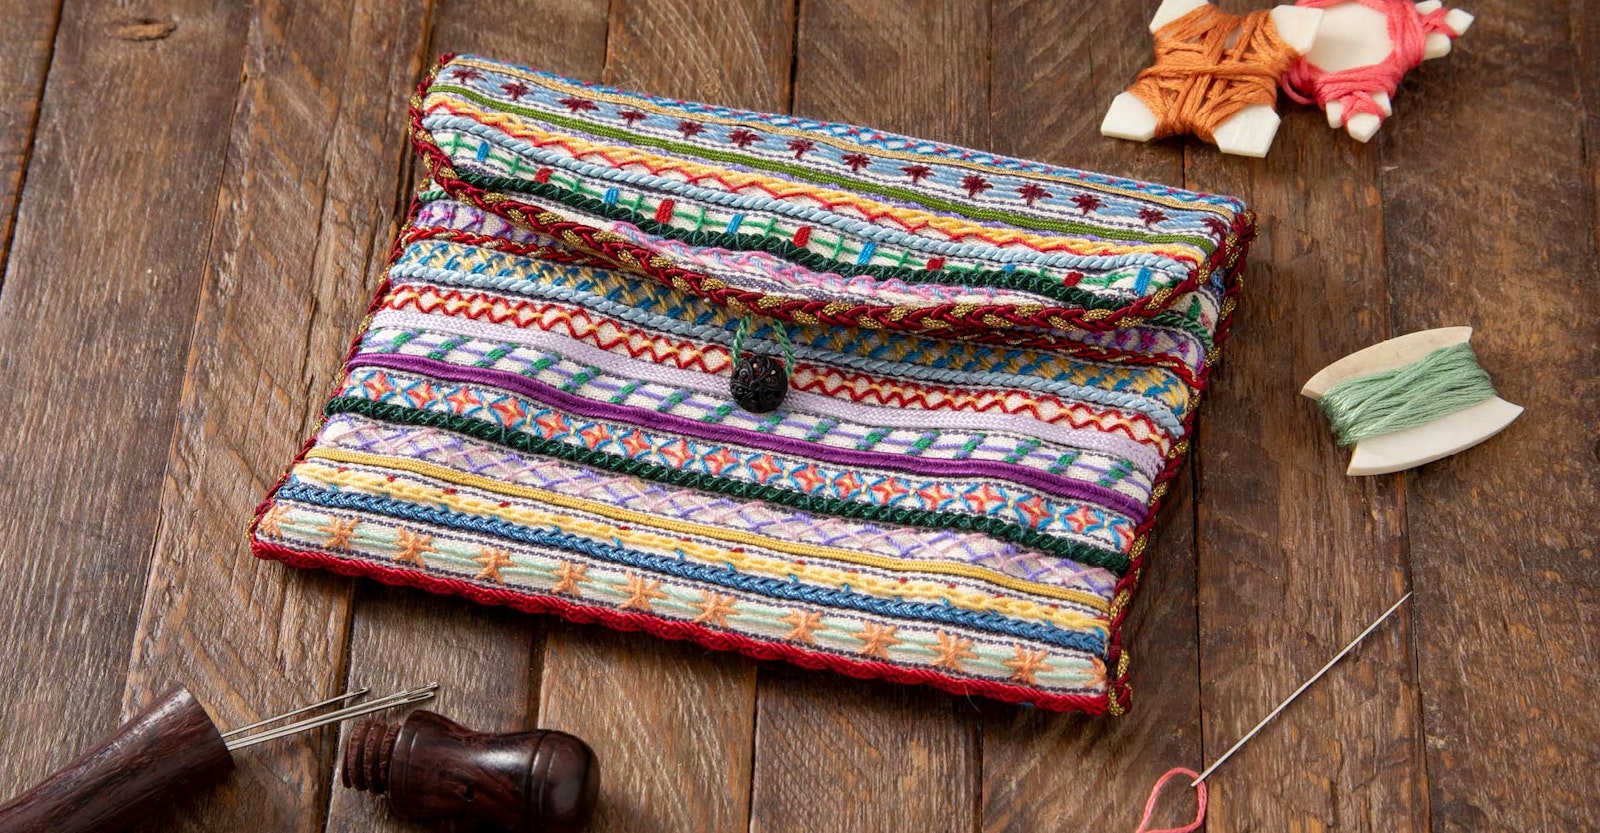
After I found various articles and projects for ticking embroidery, such as the ones in The Lady’s Newspaper May 23, 1863, and Godey’s Lady’s Book and Magazine from 1868, shown below, I began watching auctions and antique shops for examples. I found a small bag that is probably from the turn of the twentieth century and is covered in various embroidery stitches and tiny braids and trim. It has a silk Petersham ribbon forming the top. The bag is unlined, and there is a multicolored drawstring closing it. There was no information or provenance with the bag, but it was so charming that I felt I had to add it to my collection.

I have since added two other items to my collection, including one whose use is a bit of a mystery to me. Perhaps the creator of this piece had a particular item that she wished to store and created her own unique holder for it. On this particular item, the embroidery on the inside is complete, and the incomplete areas on the outside suggest that they were not intended to be seen when the item was folded properly. It is a nod to the versatility of the medium and the ingenuity of the designer.

Having these items in my collection, I decided to re-create an embroidered notecase based on the one in The Lady’s Newspaper. Because I was creating it for use in living history presentations, I stayed as close as I could to the original size noted in the period instructions, but the size could easily be changed for use as a cell-phone case, a small evening bag, or even a tablet case. Note that the case that inspired this project has the stripes running horizontally, but one could make the case with vertical stripes, as was done in the Godey’s Lady’s Book version (see photo below). Also, my notecase is handsewn, but it could be machine sewn.

Embroiderd-Ticking-Notecase-2

The notecase instructions as published in Godey’s Lady’s Book and Magazine from 1868, Volume 76. Note that the stripes run the opposite direction in this illustration.

I chose materials that would have been available during the mid-nineteenth century. All my embroidery threads are silk, or the closest thing I could find to “purse silk.” But the modern maker could use any thread and create a great variety of looks. I have not included instructions for the exact embroidery stitches and color choices I used to create my bag. In the past, makers were often left to creatively interpret these details for themselves. In that spirit, I leave the color and stitch combinations to you.

ADVERTISEMENT

Visit pieceworkmagazine.com/abbreviations for terms you don’t know.

Materials

  • Medium-weight cotton ticking fabric, blue and white, 1 piece about 8" × 12" (20.3 × 30.5 cm) with the ticking stripes running horizontally
  • Silk fabric for the lining (I used a patterned silk taffeta), 1 piece 7" × 11" (17.8 × 27.9 cm)
  • Lightweight cotton batting, 1 piece 7" × 11" (17.8 × 27.9 cm)
  • Thread for embroidery, about 2½ yd (2.3 m) each of 14 different colors
  • Braids, cords, and ribbons to fill the ticking stripes; no more than 1⁄8" (about 3 mm) wide (1/16" [2 mm] is best to fit the ticking stripe), 5½–6 yd (5–5.5 m) total
  • Braid to edge the sides and flap of the case, about ⅛" (3–4 mm) wide, 24" (61 cm)
  • One small shank button for fastening, about ½" (1.3 cm)
  • Small embroidery hoop, 6" or 7" (15.2–17.8 cm)
  • Sewing thread, 100% cotton, to match the cords, braids, and ribbons
  • Quilting thread to quilt the lining in either a matching or contrasting color (Because this is not a heavy fabric, regular cotton sewing thread is best.)
  • Needles: size 8–9 embroidery needles; small handsewing needles (I used size 12 sharps.)
  • Needle threader
  • Erasable marking pen (I recommend FriXion pens.)
  • Finished size: Opened, about 6" × 7" (15.2 × 17.8 cm); closed, about 6" × 4½" (15.2 × 11.4 cm).

Embroiderd-Ticking-Notecase-3

Detail of the interior lining, loop closure, and braid trim on the edge of the bag. Photo by Colleen Formby

Special Notes

I used Elegance size 8 silk thread from Rainbow Gallery because I wanted the notecase to be period correct. However, other silk threads, metallic threads, or cotton threads work as well.

The embroidery stitches are entirely up to you. If you are not an embroiderer, there are numerous books and online sources available (see Resources).

Braids and cords are the hardest to find—remember, you’re looking for braids, cords, and ribbons that are no more than 1/16"–1/8" (2–3 mm) wide. Thistle Threads also has silk lacet, which is flat silk trim that is sold by the yard. One yard is more than sufficient to use on several of the ticking stripes, but you are going to want varied colors and styles. Their silk soutache is appropriate, but the silk gimp is only useful for making your own cording. There are some good-looking cotton/rayon soutaches as well, as long as they are not so shiny as to look “plastic” (see Resources).

Embroiderd-Ticking-Notecase-4

Rows of embroidery stitches, ribbons, and braids follow the blue and white lines of ticking cloth in this re-creation of an 1863 notecase. Photo by Colleen Formby

Instructions

Notecase

Outer Case

With a pencil or a marking pen, lightly trace the pattern centered on the 8" × 12" (20.3 × 30.5 cm) piece of ticking with the stripes running horizontally. Also mark the stitching lines and fold line. Do not cut out the pattern yet.

Put the ticking fabric in the embroidery hoop and embroider in the white lines between the blue ticking lines. Use a variety of embroidery stitches, with multiple layers and colors. Even if you repeat some stitches, you will find they look different with different colors.

Once you have completed all the embroidery sections, remove the ticking fabric from the embroidery hoop and begin to lay the braids/cords/ribbons over the blue lines. On each end, let about ½" (1.3 cm) extend beyond the stitching line so no frayed ends will show when the case is complete. Tack down the flat braids and ribbons with small running stitches and couch over the rounded cords.

Once you’ve applied all the embroidery and braids/cords/ribbons, with fabric scissors, carefully cut out the pattern along the cutting line.

Lining

With a pencil or a marking pen, lightly trace the case pattern onto the silk for the lining. With fabric scissors, carefully cut out the silk piece along the cutting line. Using the silk piece as a guide, cut a piece the same size from the cotton batting. Lay the silk on the cotton batting, with the right side of the silk facing out. Baste the lining and batting together all around. You might also want to baste the silk and batting together in quadrants, depending on the quilting pattern you use. Any simple quilting pattern will do, even a simple crosshatch. With the erasable marking pen, draw your quilting pattern on the silk and quilt with the cotton sewing thread.

Finishing

Remove the basting threads from the quilted lining. Place the ticking work and the lining right sides together, ensuring that the braid ends on the ticking piece extend into the seam allowance. Pin. Stitch all around leaving an opening along the bottom large enough to turn the case. Turn the case right side out. Turn the seam allowances along the unstitched section to the wrong side and stitch with either a blindstitch or whipstitch.

There is a fold line marked on the pattern, but it is simply a guideline. Decide how deep you want the “pocket” of the case to be, fold the bottom up, pin, and stitch together on the sides. Any stitching will be hidden by the braid edging.

After the case is put together, apply the edging braid to the sides and flap (the bottom will have the embroidery and cording on it, so it is not necessary to apply braid there). At the beginning and end, turn under about ¼" (0.6 cm) of the braid to hide the end. Couch and stitch through in places to hold the braid in place.

For the closing loop, stitch a piece of cording to the inside top of the flap. You may either tack the loop in place or create a tiny tab to cover the ends as I did. Sew the button in place.

Embroiderd-Ticking-Notecase-5

Resources

Colleen Formby holds graduate degrees from Radford University and the University of Maryland. Before her retirement to Hot Springs, Arkansas, she was the manager of the Maryland History Room for the Prince George’s County Library System in Maryland. To learn more about her work, see her article about Civil War–era knitting in PieceWork, March/April 2009. Her love of knitting, historic embroidery, and needlework keeps her busy and happy during retirement.

This article first appeared in PieceWork Fall 2021.

ARTICLES FOR YOU