Subscriber Exclusive
A Haapsulu Lace Pelerine to Knit
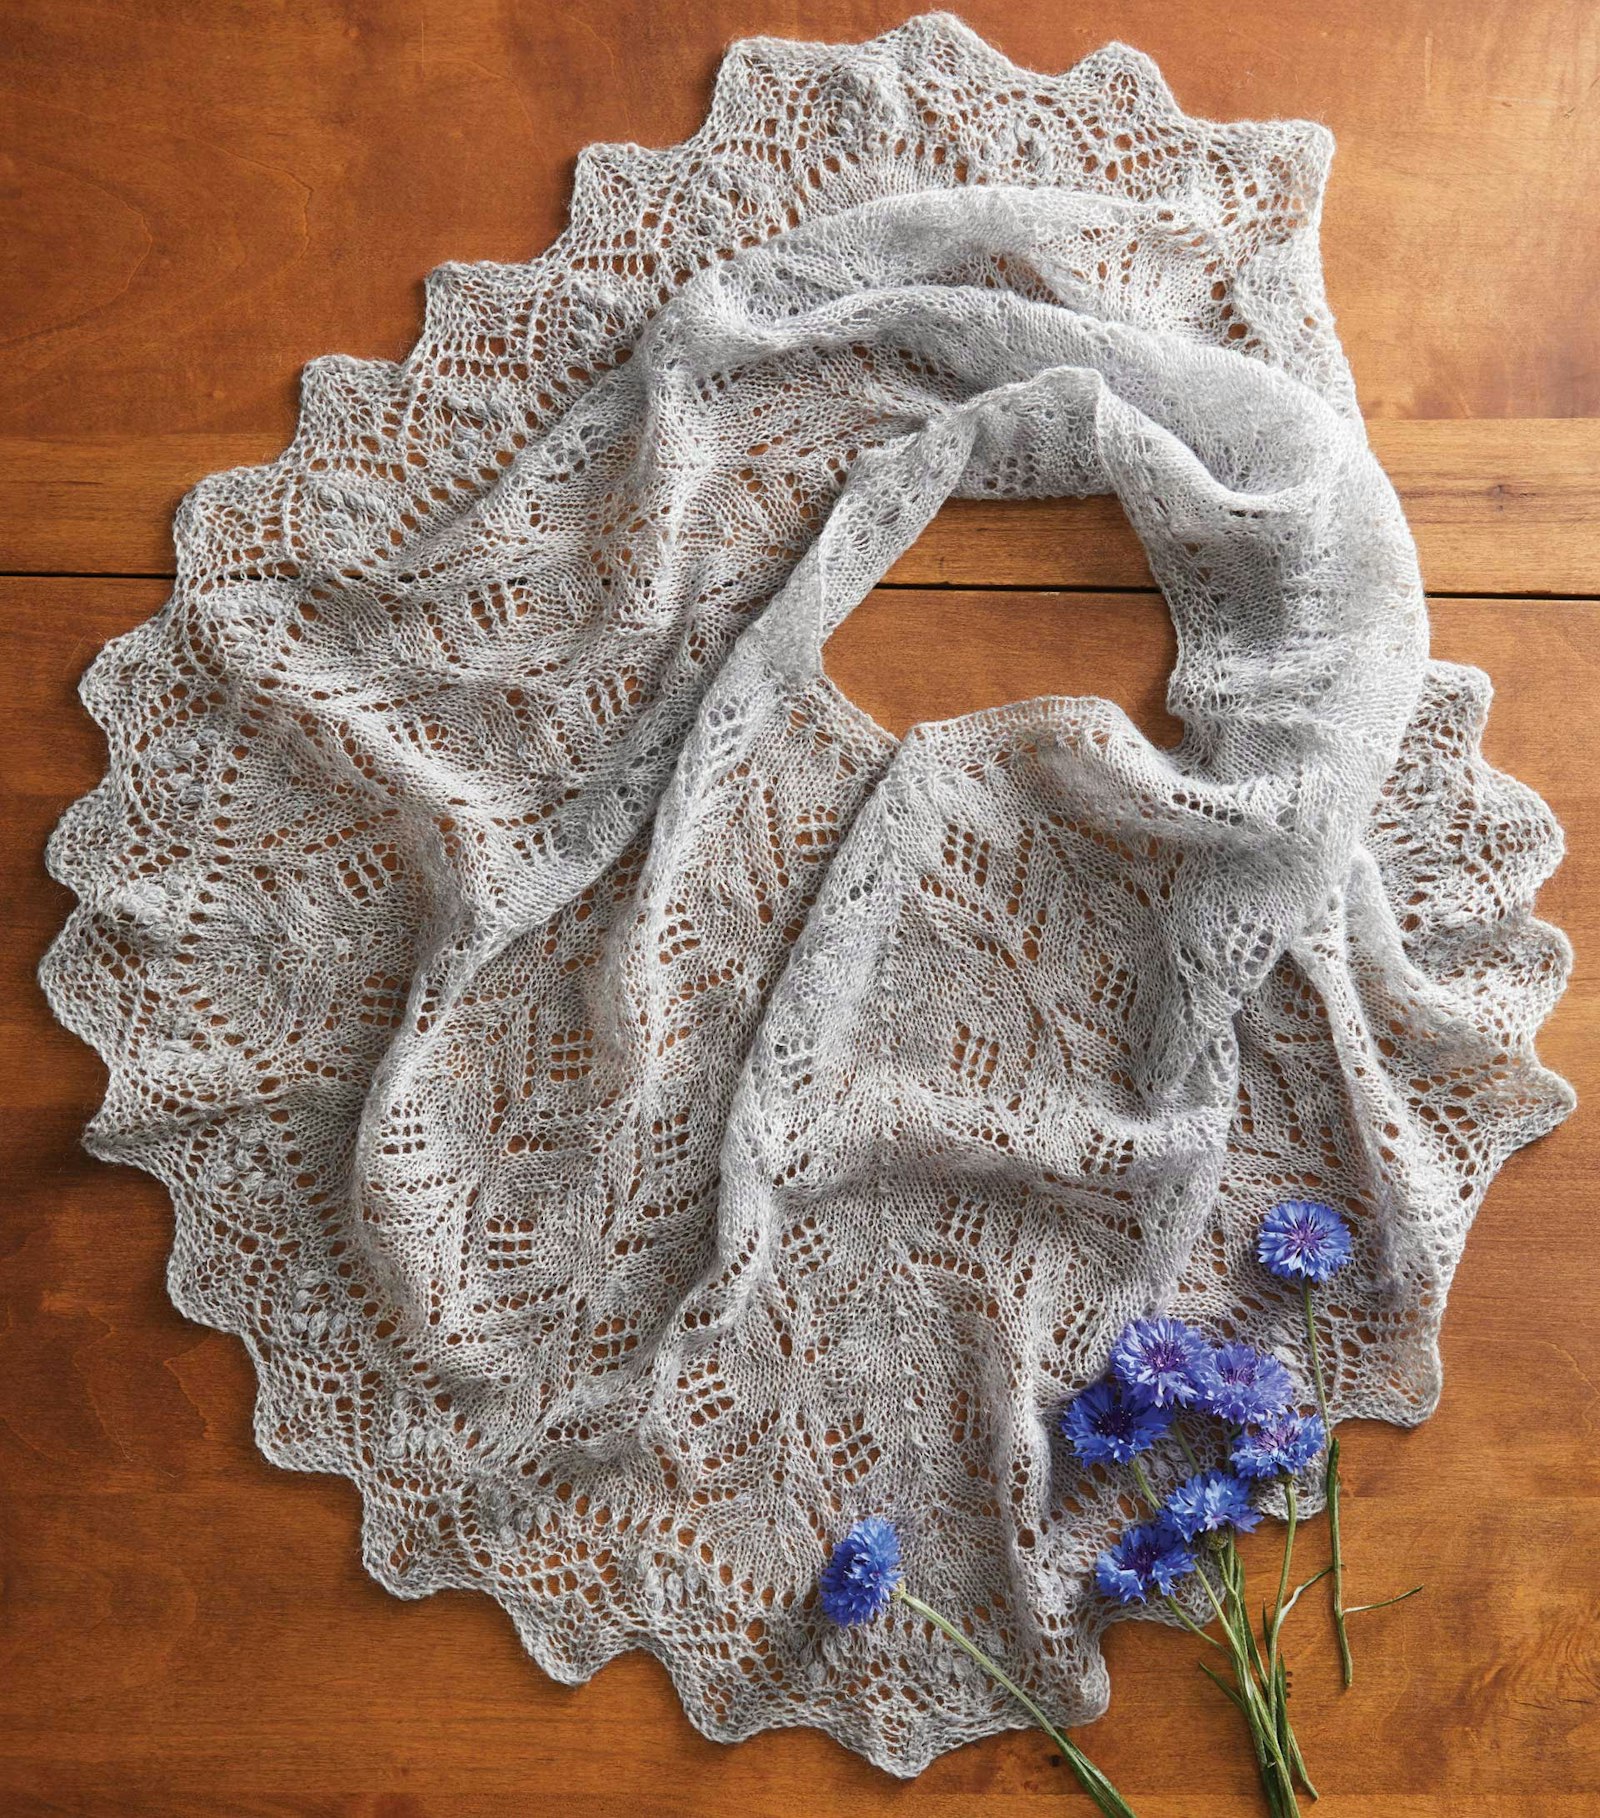
Nancy Bush’s circular capelet is a different shape from a traditional knitted-lace shawl or scarf from Haapsalu, but this modern interpretation still includes the iconic nupps.
Nancy Bush’s circular capelet is a different shape from a traditional knitted-lace shawl or scarf from Haapsalu, but this modern interpretation still includes the iconic nupps. <a href="https://pieceworkmagazine.com/a-haapsulu-lace-pelerine-to-knit/">Continue reading.</a>
https://pieceworkmagazine.com/cdn-cgi/image/format=auto/https://www.datocms-assets.com/75076/1656659057-haapsulu-lace-pelerine-1.jpg?auto=format&w=900
Similarly constructed shawls made by several master knitters in Haapsalu, Estonia, inspired this small circular shawl or pelerine. I loved their airiness and the challenge of figuring out how they were made. This garment falls into the category of “Rebellious Lace” as it is a different shape from a traditional knitted-lace shawl or scarf from Haapsalu, and it is made in the round, offering a few technical challenges as well.
Nancy Bush continues her fascination with Estonia and their lace knitting. She travels to Estonia regularly, always finding something new to catch her attention. The author would like to thank Michelle Poulin-Alfeld for invaluable help with the “architecture” of the pelerine and her great cast-off solution, and Lisa Sewell and Sheryl Gillilan for the loan of their lovely pelerines from Haapsalu.
Editor's note: This project was featured in the Winter 2019 issue of PieceWork.
Further Resources
Bush, Nancy. Knitted Lace of Estonia: Techniques, Patterns, and Traditions. Fort Collins, Colorado: Interweave, 2010.
Materials
- Skacel HiKoo Merino Lace Light, 100% merino wool yarn, laceweight, 1,531 yard (1,400.0 m)/100 gram (3.5 oz) hank, 1 hank of #1003 Shade
- Needles, sizes 2 (2.75 mm) and 6 (4 mm) circ 24 inches (61 cm) or sizes needed to obtain gauge
- Stitch markers
- Coil-less pins or moveable markers
- Tapestry needle
Finished size: 28 inches (71.1 cm) circumference at top and 18 inches (45.7 cm) deep
Gauge: 26 stitches and 26 rnds = 4 inches (10.2 cm) in St st with size 2 (2.75 mm) needles, after blocking
SUBSCRIBER EXCLUSIVE
Similarly constructed shawls made by several master knitters in Haapsalu, Estonia, inspired this small circular shawl or pelerine. I loved their airiness and the challenge of figuring out how they were made. This garment falls into the category of “Rebellious Lace” as it is a different shape from a traditional knitted-lace shawl or scarf from Haapsalu, and it is made in the round, offering a few technical challenges as well.
Nancy Bush continues her fascination with Estonia and their lace knitting. She travels to Estonia regularly, always finding something new to catch her attention. The author would like to thank Michelle Poulin-Alfeld for invaluable help with the “architecture” of the pelerine and her great cast-off solution, and Lisa Sewell and Sheryl Gillilan for the loan of their lovely pelerines from Haapsalu.
Editor's note: This project was featured in the Winter 2019 issue of PieceWork.
Further Resources
Bush, Nancy. Knitted Lace of Estonia: Techniques, Patterns, and Traditions. Fort Collins, Colorado: Interweave, 2010.
Materials
- Skacel HiKoo Merino Lace Light, 100% merino wool yarn, laceweight, 1,531 yard (1,400.0 m)/100 gram (3.5 oz) hank, 1 hank of #1003 Shade
- Needles, sizes 2 (2.75 mm) and 6 (4 mm) circ 24 inches (61 cm) or sizes needed to obtain gauge
- Stitch markers
- Coil-less pins or moveable markers
- Tapestry needle
Finished size: 28 inches (71.1 cm) circumference at top and 18 inches (45.7 cm) deep
Gauge: 26 stitches and 26 rnds = 4 inches (10.2 cm) in St st with size 2 (2.75 mm) needles, after blocking
[PAYWALL]
Special Techniques
Knitted Cast-On
The cast-on for the lace edge is worked using two ends of the yarn held together. This cast-on edge is the outer edge of the lace. When the cast-on with two ends is complete, break one end and continue for the rest of the pelerine using a single end.
Work the cast-on as follows: Make a slipknot and place it onto the left-hand needle. With the right-hand needle, go into this slipknot as to knit and make a new stitch. Place this new stitch on the left-hand needle by putting the left-hand needle beyond the new stitch (to the right of it) and go into it from right to left. This keeps the stitch mounted correctly on the needle. Knit into the stitch, making a new stitch. Repeat this process until you have the desired number of stitches.
Nupps
The nupps in this project, made of seven stitches, are not worked in the traditional way, as the project is worked in the round as opposed to back and forth.
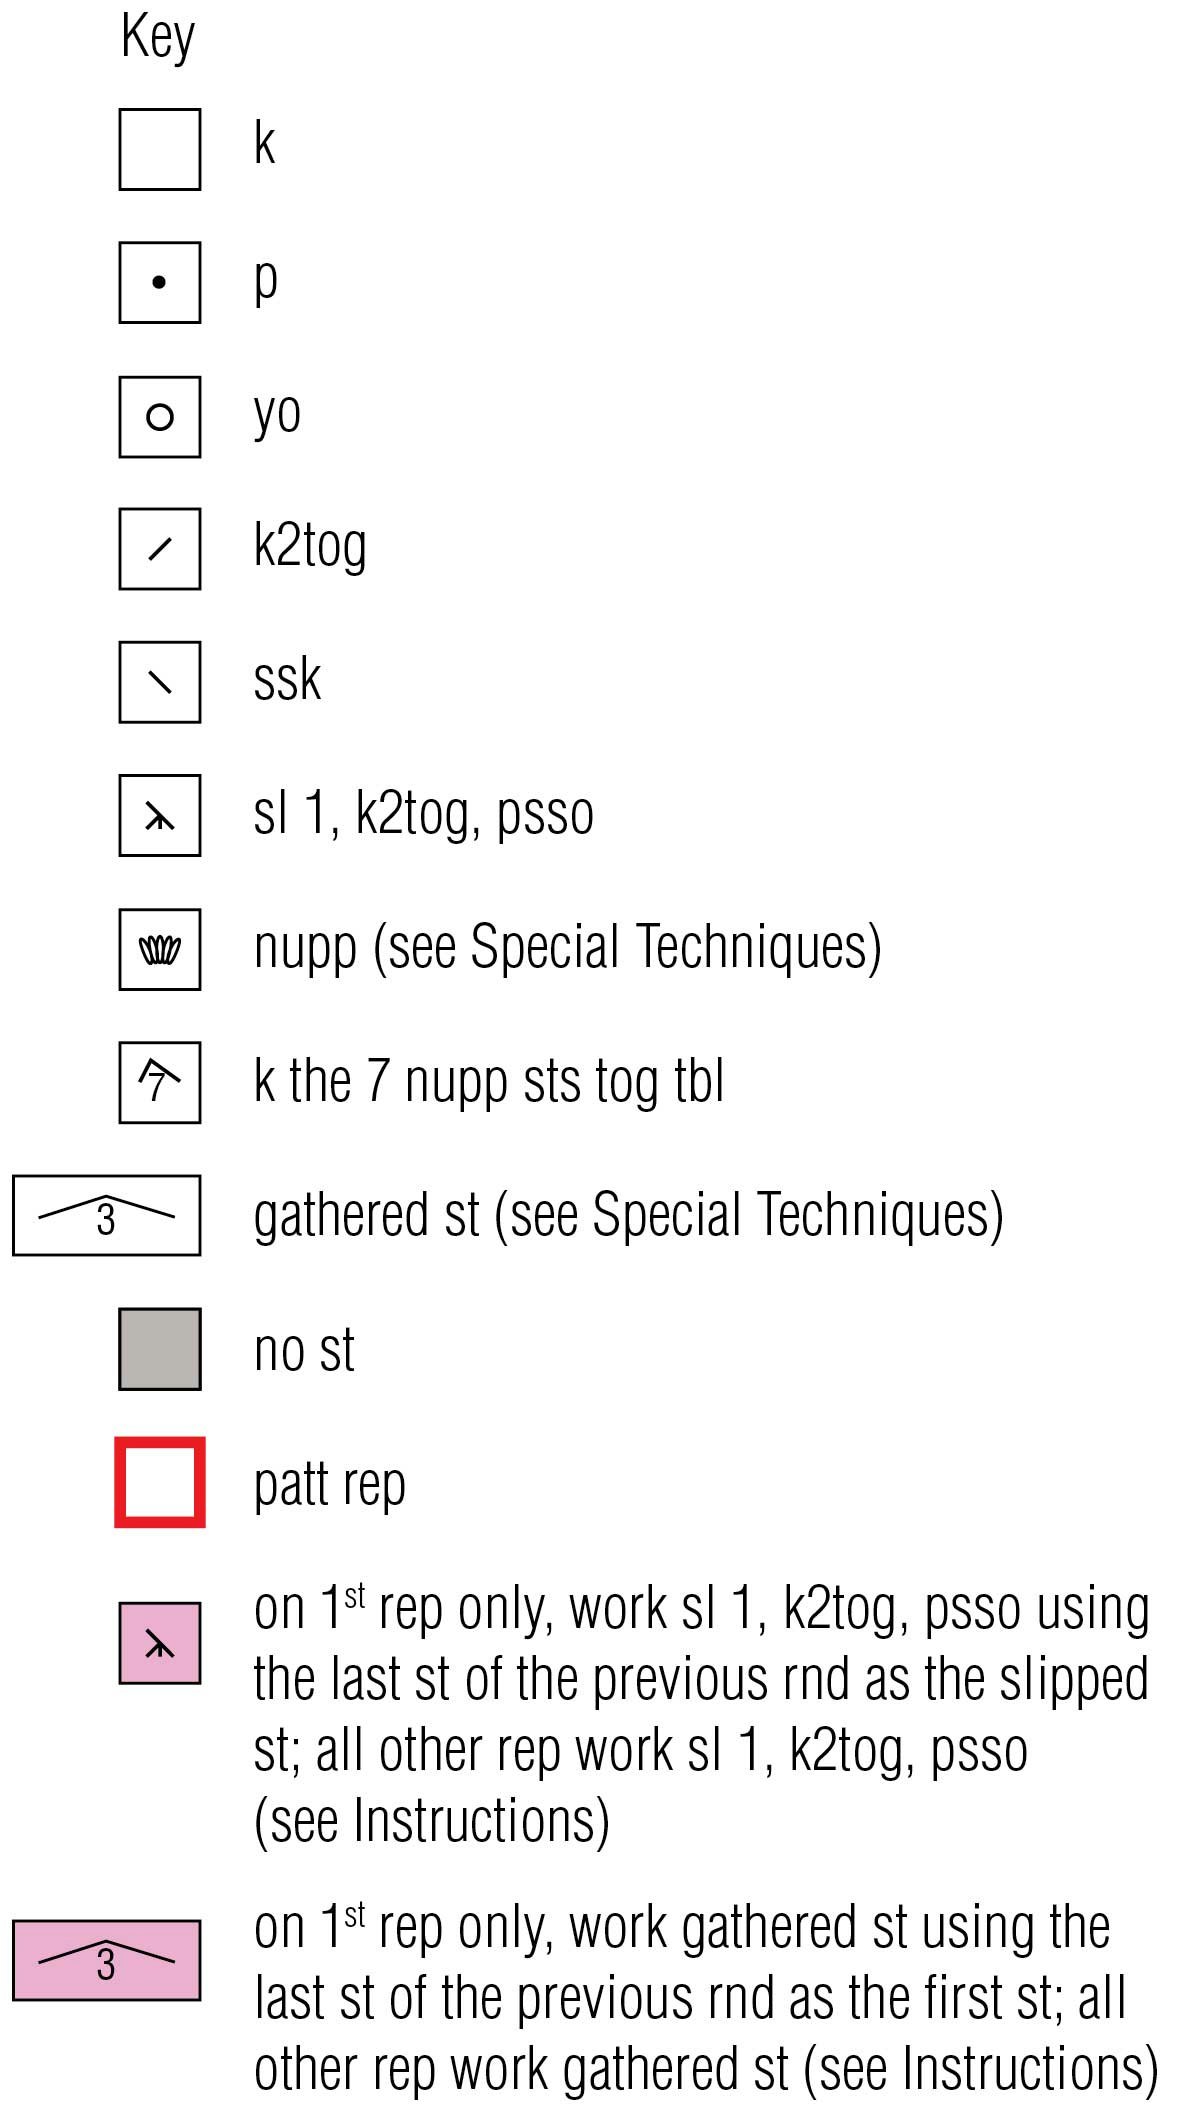
Make nupps as follows: When you reach the nupp symbol, increase seven stitches in one stitch. Do this by knitting into the marked stitch, don’t remove it from the left needle, make a yarnover and knit the stitch again; repeat from * two more times—seven nupp stitches. You must do this *loosely. These increased stitches are always completed with a knit stitch, to secure the group of stitches. On the next round, when you reach the cluster of nupp stitches, knit them together through the back loop to create one stitch again, which keeps the stitch count correct. When you knit these stitches together, you will understand why they needed to be made loosely on the previous row.
Gathered Stitch
Knit three together but do not drop the stitches from the left needle, knit these three stitches together again through the back loop and drop the three stitches from the left needle—three stitches decreased to two stitches.
Instructions
Notes: The pelerine is worked circularly from the lower edge up, beginning with the scalloped-lace edge. Shaping is done with double decreases in four equal places around the piece. When the project is complete, it is bound off.

Pelerine
Scalloped Lace Edge
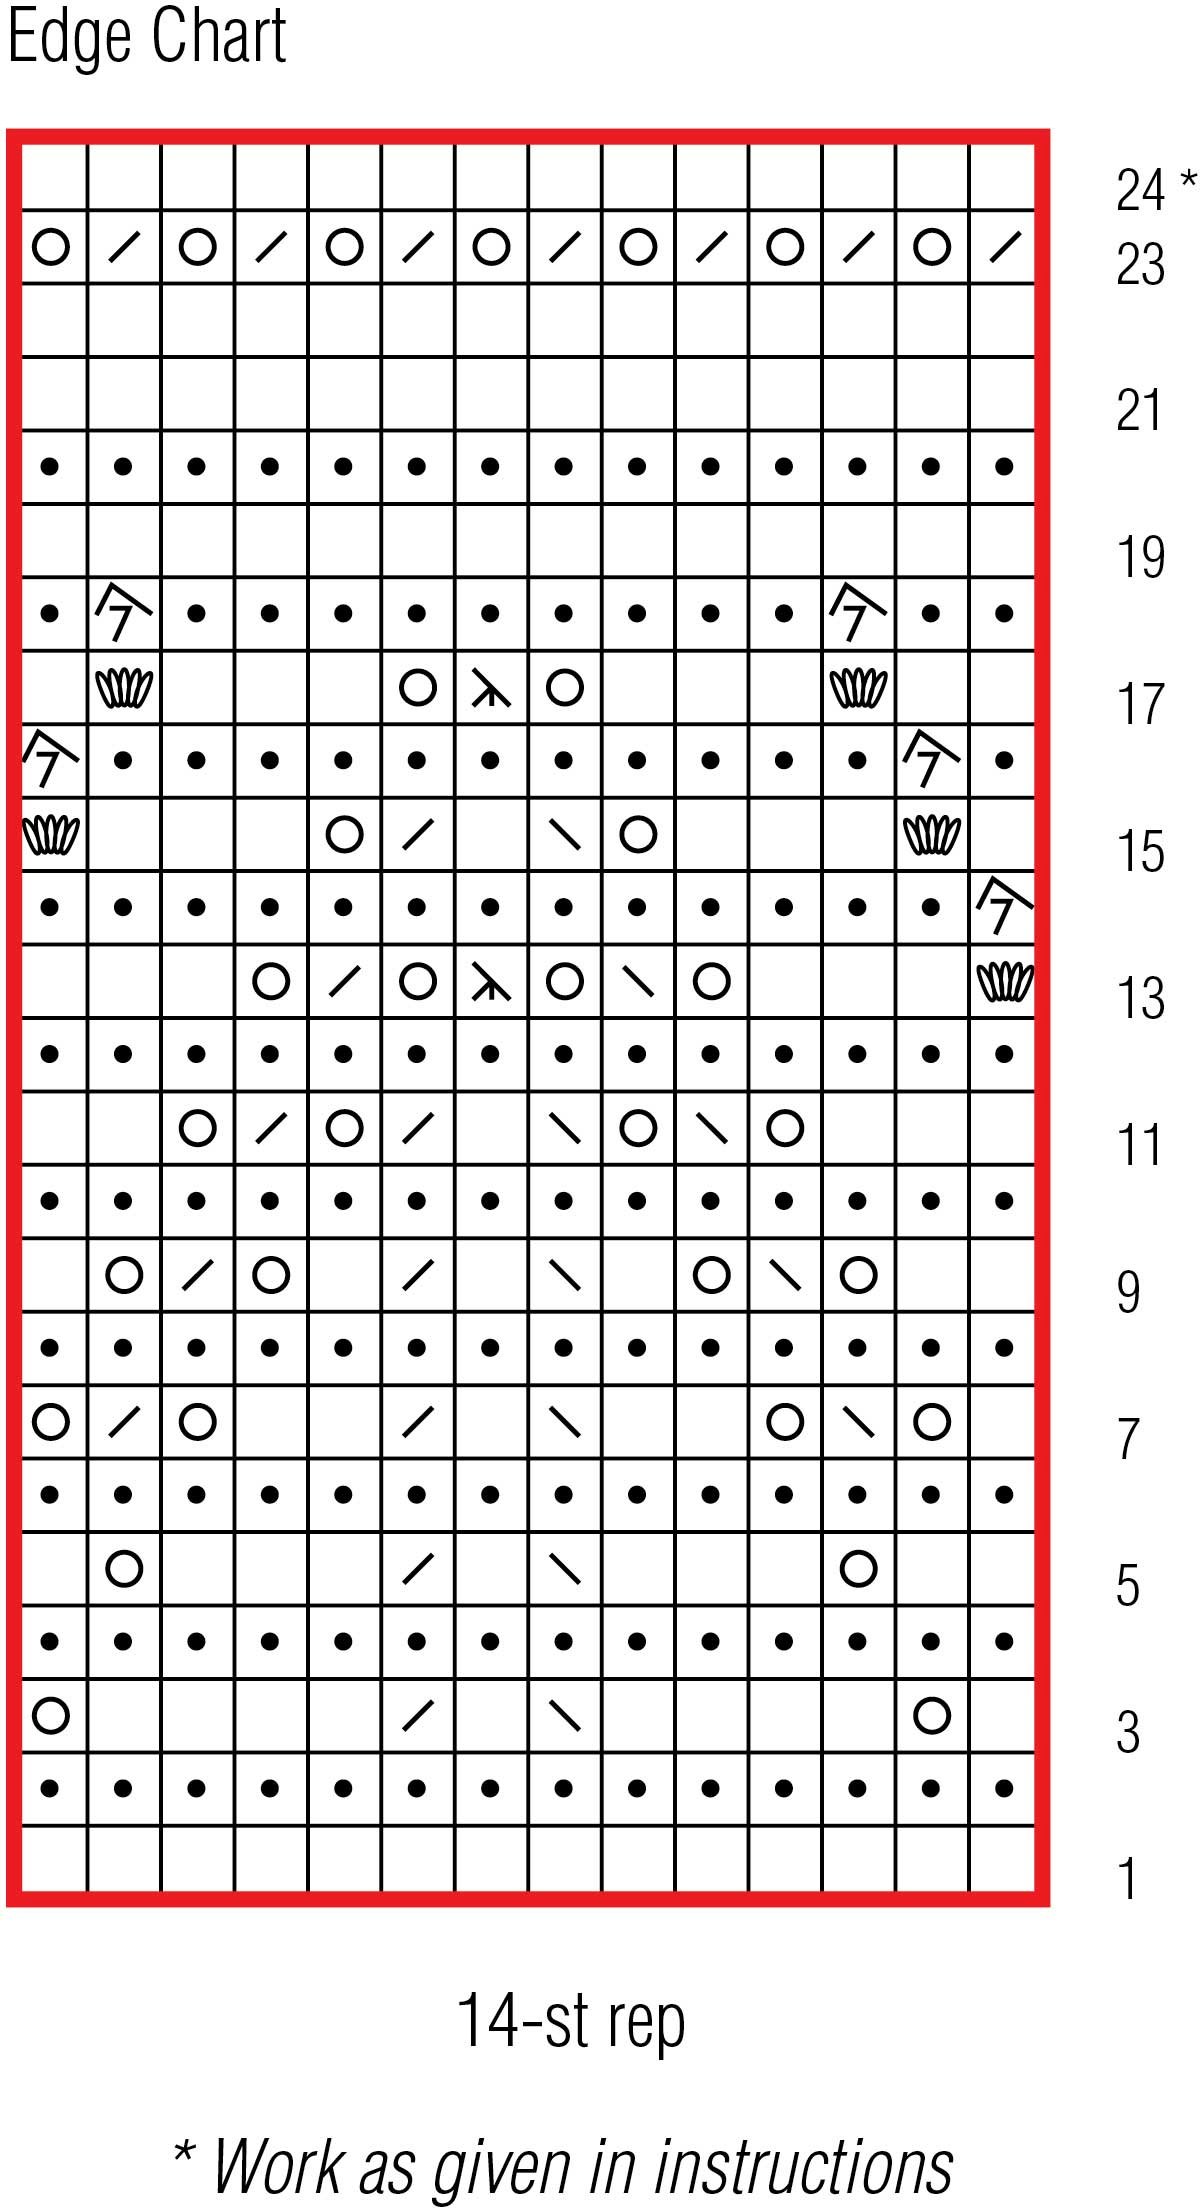
With size 6 (4 mm) needle, yarn doubled, and using the knitted method, CO 420 sts. Break off one end of yarn and cont with single yarn and size 2 (2.75 mm) needle. Beg chart for scalloped lace edge. Note that the edge is worked in garter st.

Rnd 1: (Stitches are not joined yet.) K across all sts.
Pm and join work into a rnd when you beg the 2nd rnd, being very careful not to twist your work.
Note: Since there are so many stitches, it is really easy to twist them around the needle. I recommend taking the time to check and double-check how the stitches are mounted on the needle. You may want to actually pin down the needle with the cast-on stitches on a board or soft surface so you can be sure the stitches are not twisted. You can repair a twist between the first and second round, but after that, you will have a Möbius.
Rnd 2: After you have joined, p 1 rnd. These are Rnds 1 and 2 on the Edge Chart.
Cont foll chart for the lace edge.
Note: I recommend placing a marker every two repeats of the pattern to keep track as you work. When Rnd 20 is complete, cont in St st (odd rnds are patterned and even rounds are knit).
On Rnd 24, place a coil-less pin or movable marker on the 1st st, the 106th st, the 211th st, and the 316th st. So you can keep track of the double decs as you work up the piece, move the m every time you make a double dec.
Center
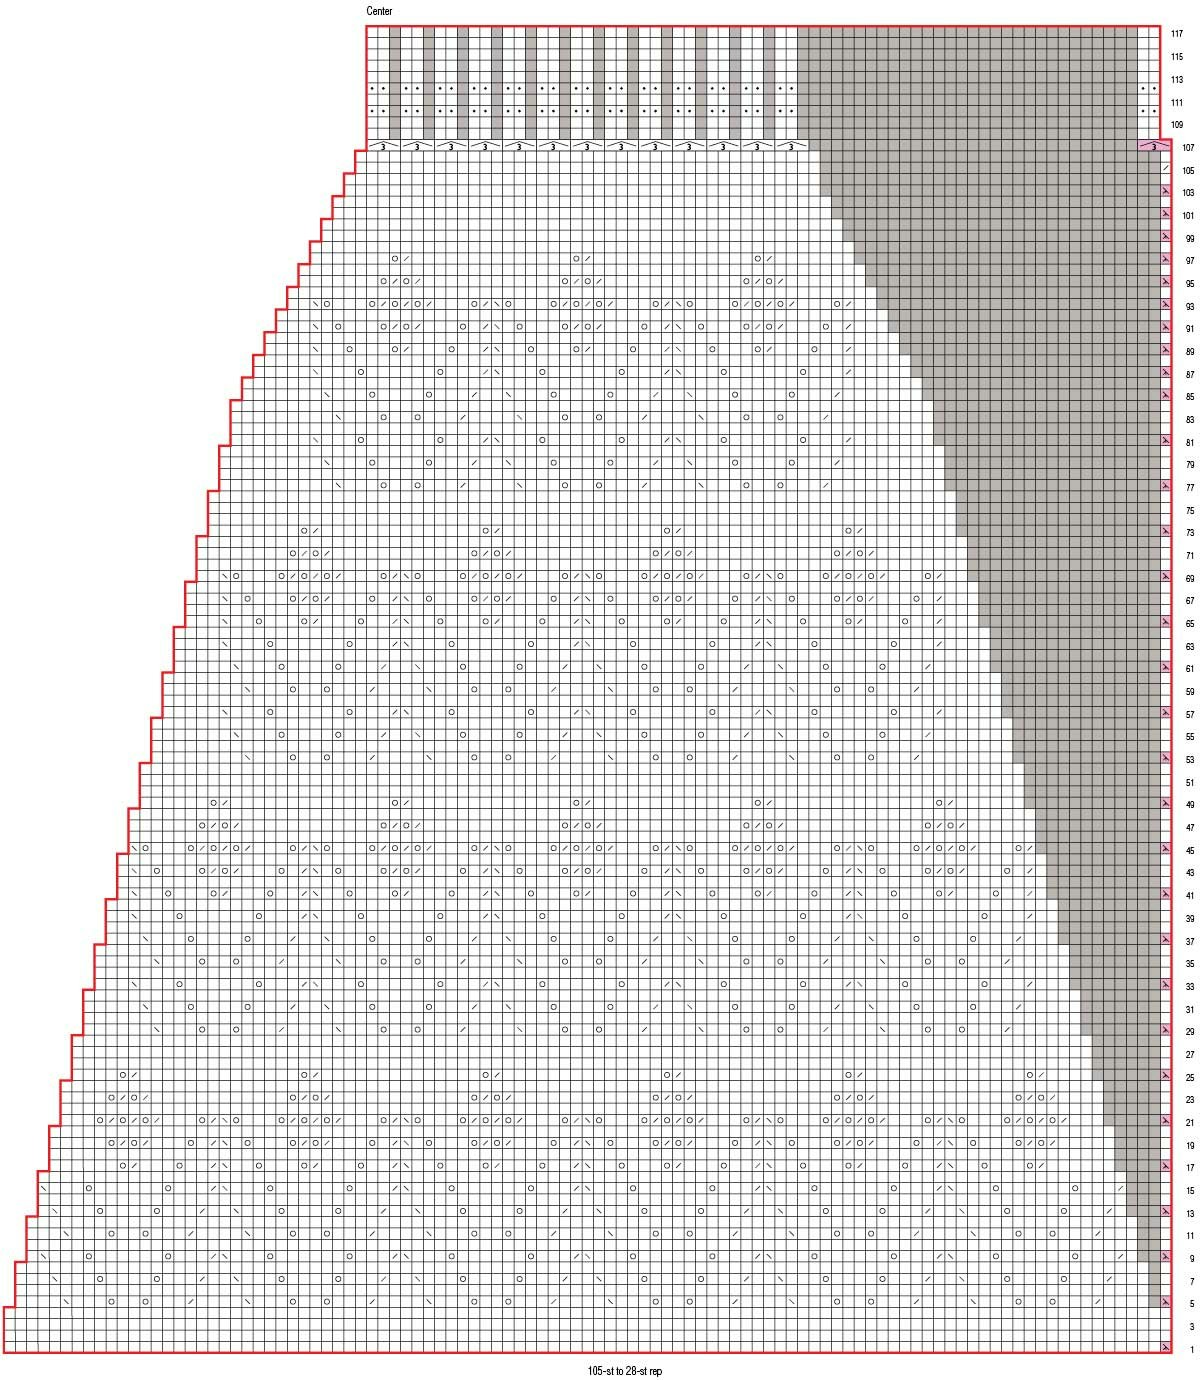
Beg working the Center Chart.

On Rnd 1 of the Center Chart, beg shaping. In order to make the 1st double dec (sl 1, k2tog, psso), which is indicated on the 1st st of the rnd, you will need to use the last st of the previous rnd. This is indicated by the double dec symbol in a pink square. Every time you make a double dec at the beg of a rnd, you must use the last st from the previous rnd to make the slipped st of the double dec.
Cont following the chart, dec every 4th rnd until you reach Rnd 85, then dec every other rnd until you have completed Rnd 104. You will have 42 sts between each marked st and a total of 172 sts. On Rnd 105, work a single dec at each dec place as indicated on the chart—168 sts rem.
On Rnd 107, you will need to use the last st of the previous rnd to make the 1st of the gathered sts as indicated on the chart by the pink background. When you complete the rnd, you will have reduced the number of stitches by one-third, from 168 to 112 sts.
Work through Rnd 117 of the chart.
BO as foll: K 2 sts, *bind the 1st st over the 2nd st, yo, bind the 2nd st over the yo, k1, bind the yo over the knitted st, k1; rep from * to end. Fasten off.
Finishing
Weave in ends. Block to desired measurements.


